03. Common Dart Manipulations: Two-Dart Designs. Slash Method
Category: Patternmaking Series 10 February 21
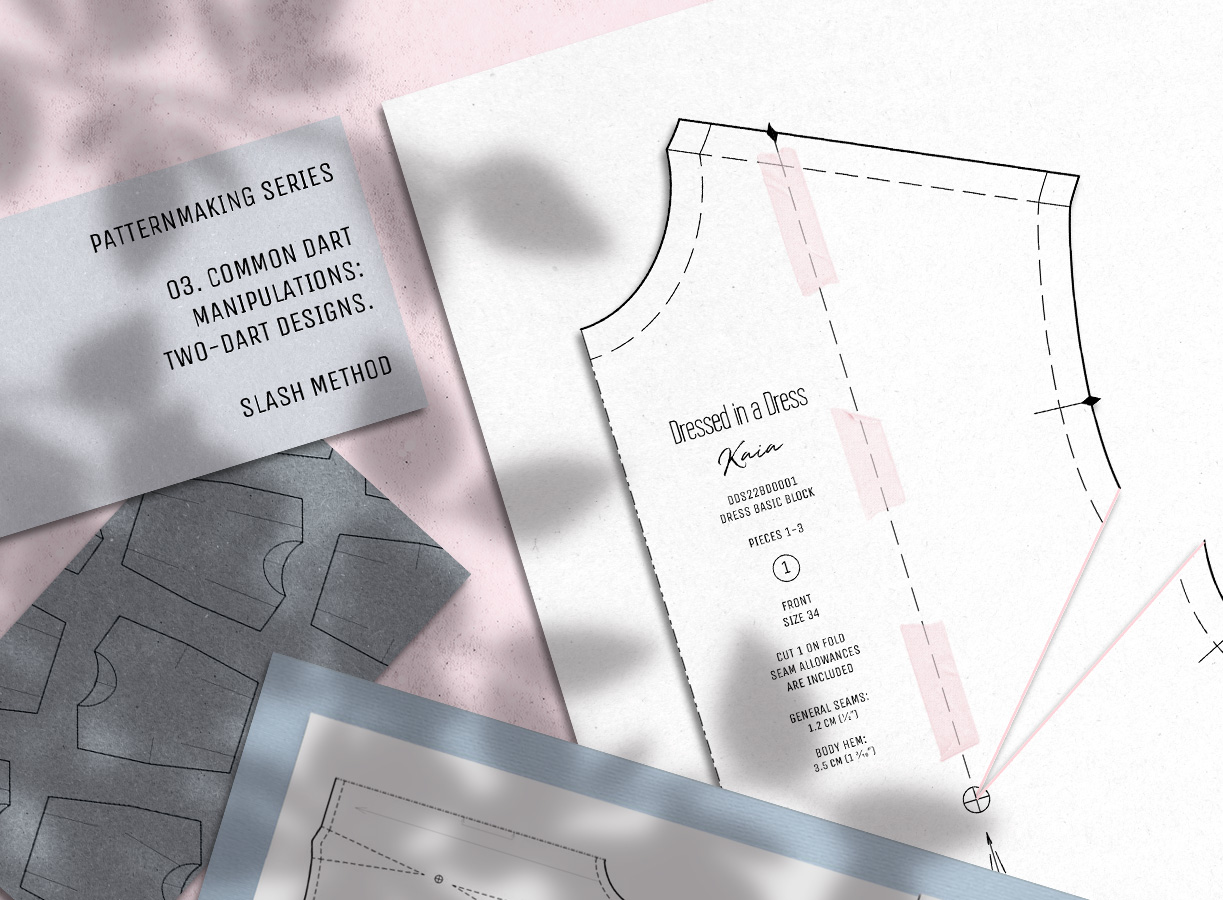
After three previous theoretical posts, we are finally ready for practice. I hope you have already printed and prepared the 1:3 scale basic block, which I shared in the previous post. If you have just joined us or had no time to make it before, don’t worry; click the link and follow the directions at the bottom of the page.
In this post, we will need only the basic front bodice piece. Prepare your pencils, pens, rulers and paper—both usual and transparent—and we are ready to start.
Common Designs
Most of the time, dart manipulation is most apparent at the Front Bodice.
But wait, why relocate the darts at all?
- Well, first of all, for design purposes. Let’s say you like some options more than the other, or you find some designs more flattering for your figure. Or maybe you are curious about trying something new. Everyone has different tastes and reasons. Apart from relocating the dart, you can transform its excess into gathers, pleats, tucks, style lines or flare. This creative use of dart intake is called a dart equivalent.
- On the manufacturing scale, relocating the dart can reduce fabric consumption to produce more dresses and gain more profit.
- Then, you can relocate the dart to make it less noticeable. For example, the bust dart, which goes straight to the shoulder, could ruin pretty flowers or stripes' fabric print. In this case, side dart #1 could work well.
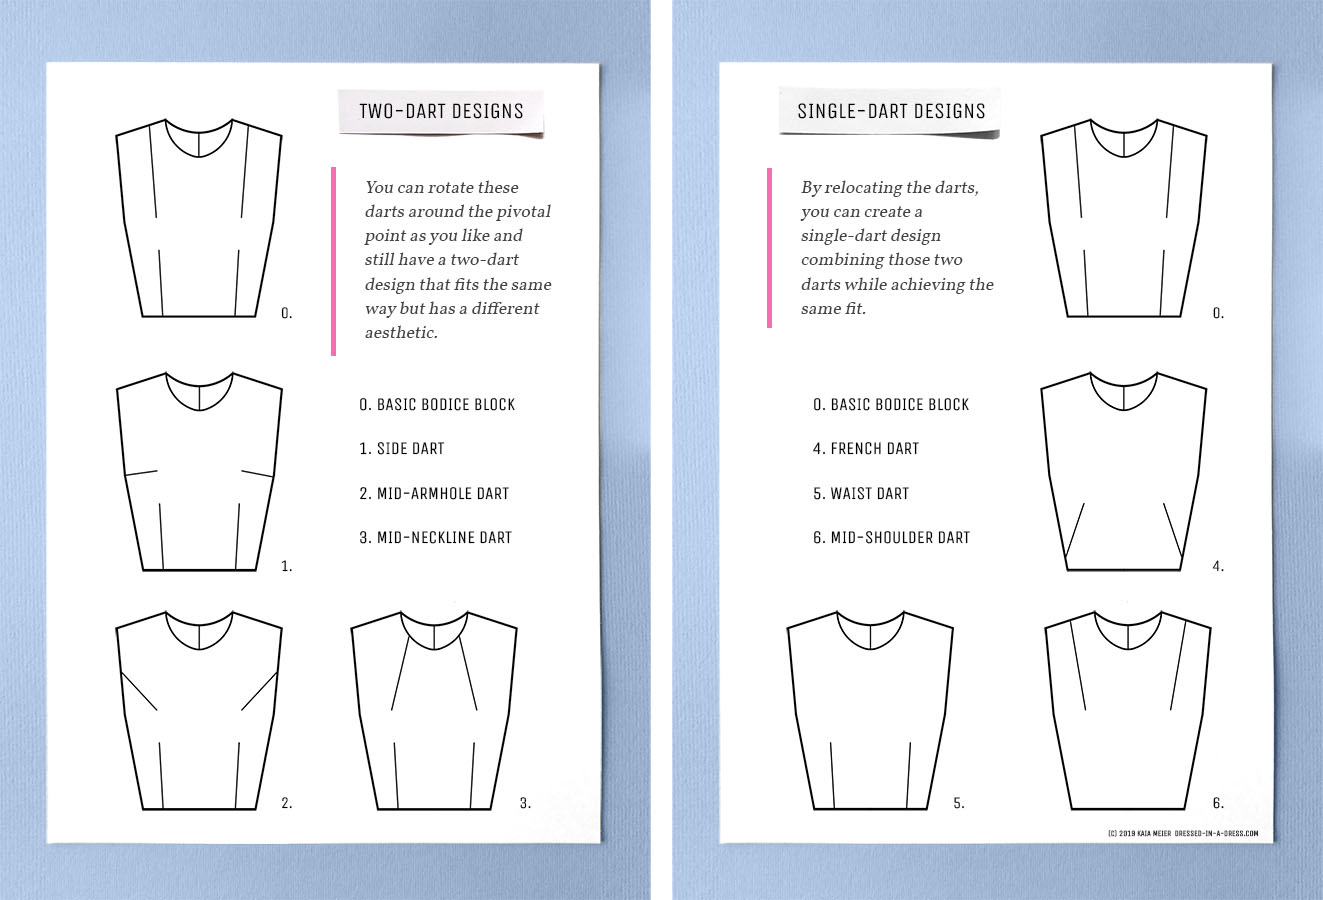
As I wrote before, the basic front bodice piece has two darts—the bust and the waist ones—I’ll call them basic darts. You can rotate these darts around the pivotal point as you like and still have a two-dart design that fits the same way but looks different.
Also, by relocating the darts, you can make a single-dart design, where those two darts are combined while the fit stays the same. Please note, this is not always recommended for bigger breasts since it will be hard to steam-press the dart point.
In this and the next post, we will look at the two-dart designs—there will be side, mid-armhole and mid-neckline darts. They will be created by relocating the bust dart—the waist one will stay so I could better explain the process.
Below you’ll see their instructions for pattern manipulation.
Dart Relocation
These designs are only the beginning, but they will form the foundation for the future, as every design follows the same rules:
You can rotate a dart to any location around the pattern outline without affecting the pattern’s fit or size, as long as a dart point directs to its pivotal point.
The dart or its equivalent will always direct itself to the pivotal point. To avoid puckering at the pivotal point or cone-shaped breasts, one should end the dart before reaching the pivotal point.
Try to keep this in mind while patternmaking.
To relocate the darts, we will use two patternmaking methods, which I described in the previous post:
Slash method: according to the name, the pattern is slashed and spread or overlapped for dart relocation, adding more fabric or creating a closer fit.
Pivotal method: in this method, a pattern is not slashed but rotated around the pivotal point for dart relocation. It is faster and more efficient, though the method is based on the knowledge gained from slashing the pattern.
Today, I’ll make dart adjustments with the slash method’s help, and in the following post, I’ll create the same designs in the pivotal one I do advise you to try both ways. The more practice you have, the easier the process goes.
If you enjoy it, at the end of the post, you can find a little homework.
Have fun.
Two-dart Designs: Slash Method
Prepare as many basic pattern copies as you need to complete the following designs. Since we are doing this for practice, you can print multiple copies with your printer—this will also work if you have your full-scale basic block in a digital format. In case if you are going to do everything manually, follow the guidelines below. This preparatory step works both for training with scaled patterns and real-size ones.
- Take a sheet of transparent paper and place the basic front bodice piece on top of it.
- Then trace outlines of the piece. You’ll do this to avoid re-drafting your basic pattern from the beginning again and again.
- After that, place the basic pattern under the transparent paper and match the outlines.
- Mark notches, dart and pivotal points, seam allowances and a grainline.
In the following pictures, every step has its brief description. If you’d like to read a more detailed guide, click on the text above the image. It is marked with a tiny pink arrow. I hid the text, so it won’t make the page look too long and over-filled.
Side dart
Step-by-Step Guide
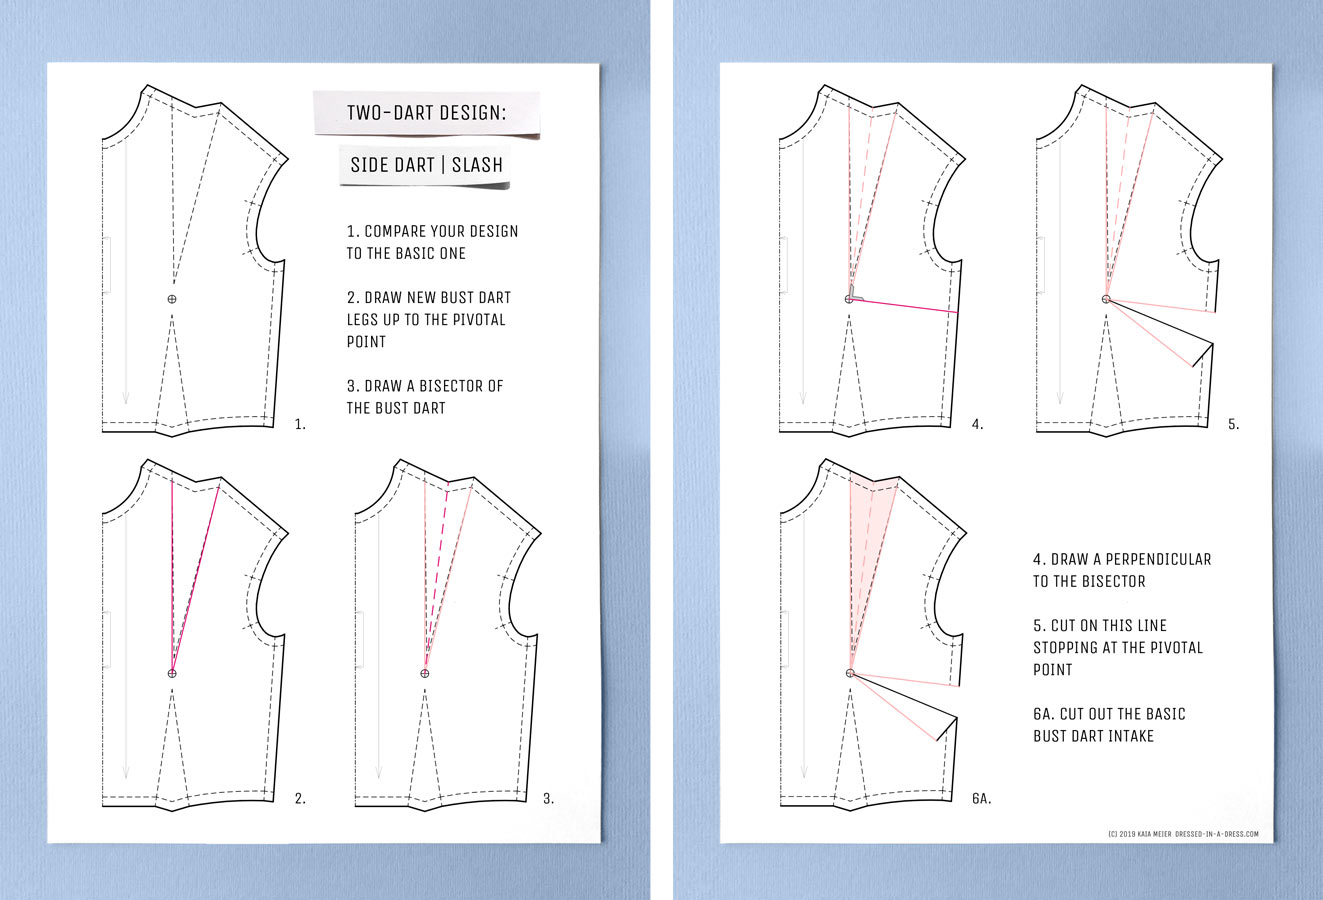
- Compare the new design to the basic block and ask yourself the following questions:
- How many darts are there in the flat drawing?
- Does any of the basic darts remain in their place?
- If yes, which one?
- If not, where did it go?
- On your copy pattern, draw new dart legs for the basic darts that will change their position. Now they should end precisely at the pivotal point.
- Find a bisector of the bust dart. It will help us locate the new dart position.
- Starting at the side of the pattern, aim at the pivotal point and draw a line perpendicular to the bisector.
- Cut on this line and stop at the pivotal point.
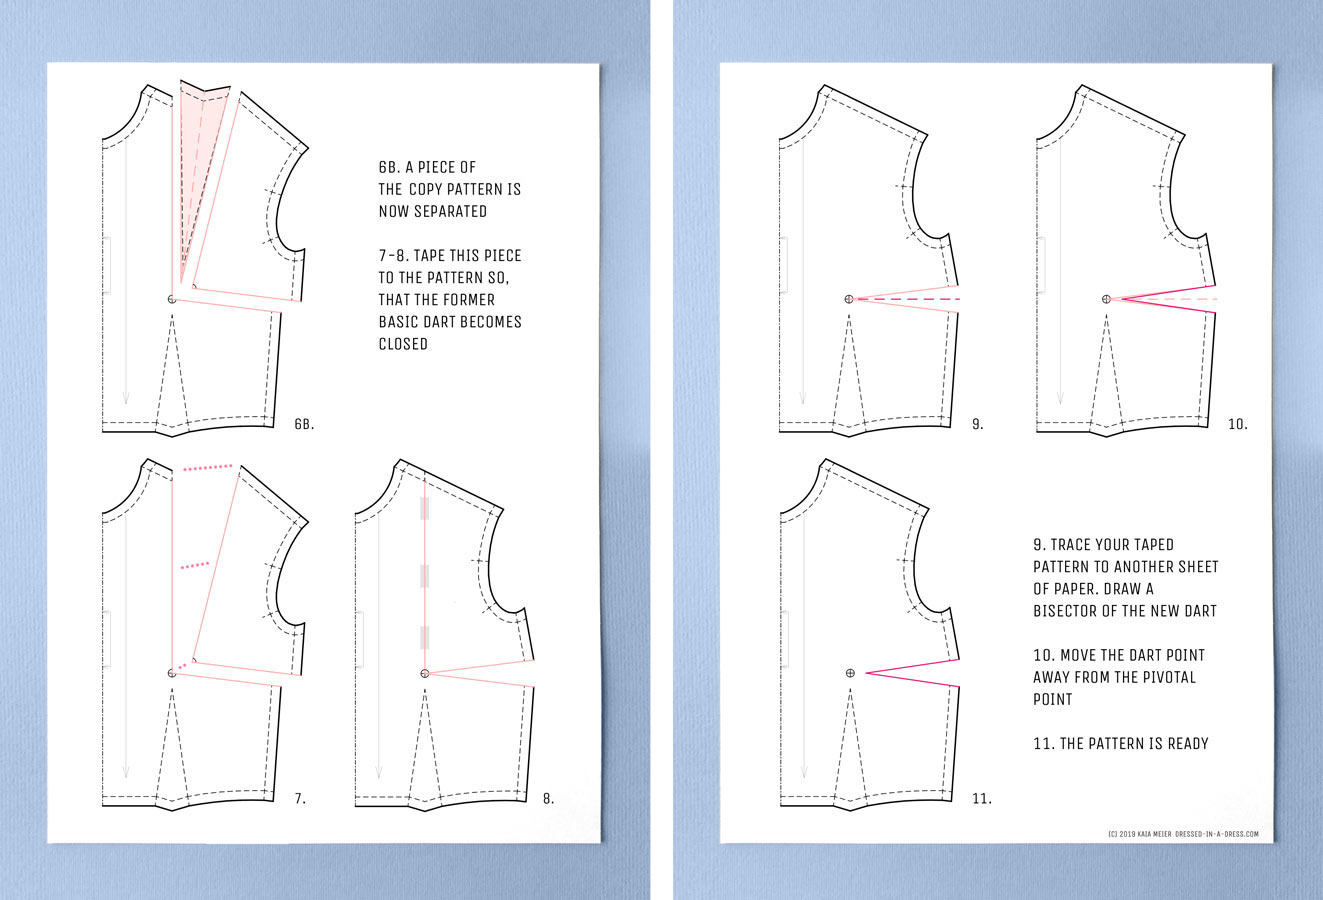
- Cut out the basic dart intake of the bust dart. A piece of your copy pattern should now separate.
- Match the dart legs of the former bust dart. The shoulder should form a straight line.
- Tape this piece to the pattern so that the former basic dart becomes closed. It will now finally disappear from its old place.
- Trace your taped pattern to another sheet of transparent paper, and don’t forget the notches. Draw a bisector of a new dart.
- Move the dart point 1.5–2 cm (5⁄8–0.8ʺ) away from the pivotal point to avoid puckering.
- The pattern is ready.
Well, almost: we’ll need to complete the dart intake. That will be a subject for future posts.
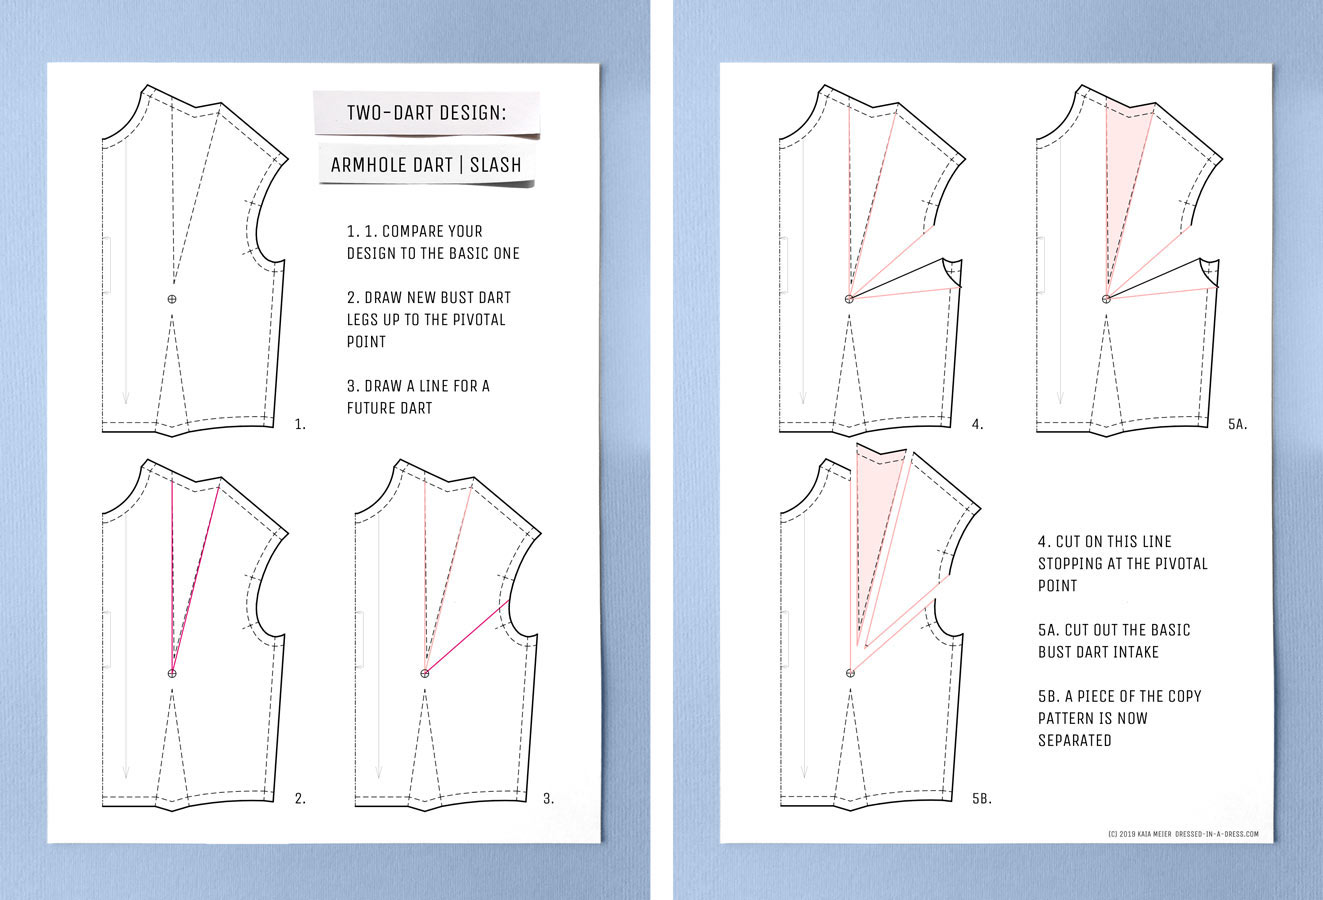
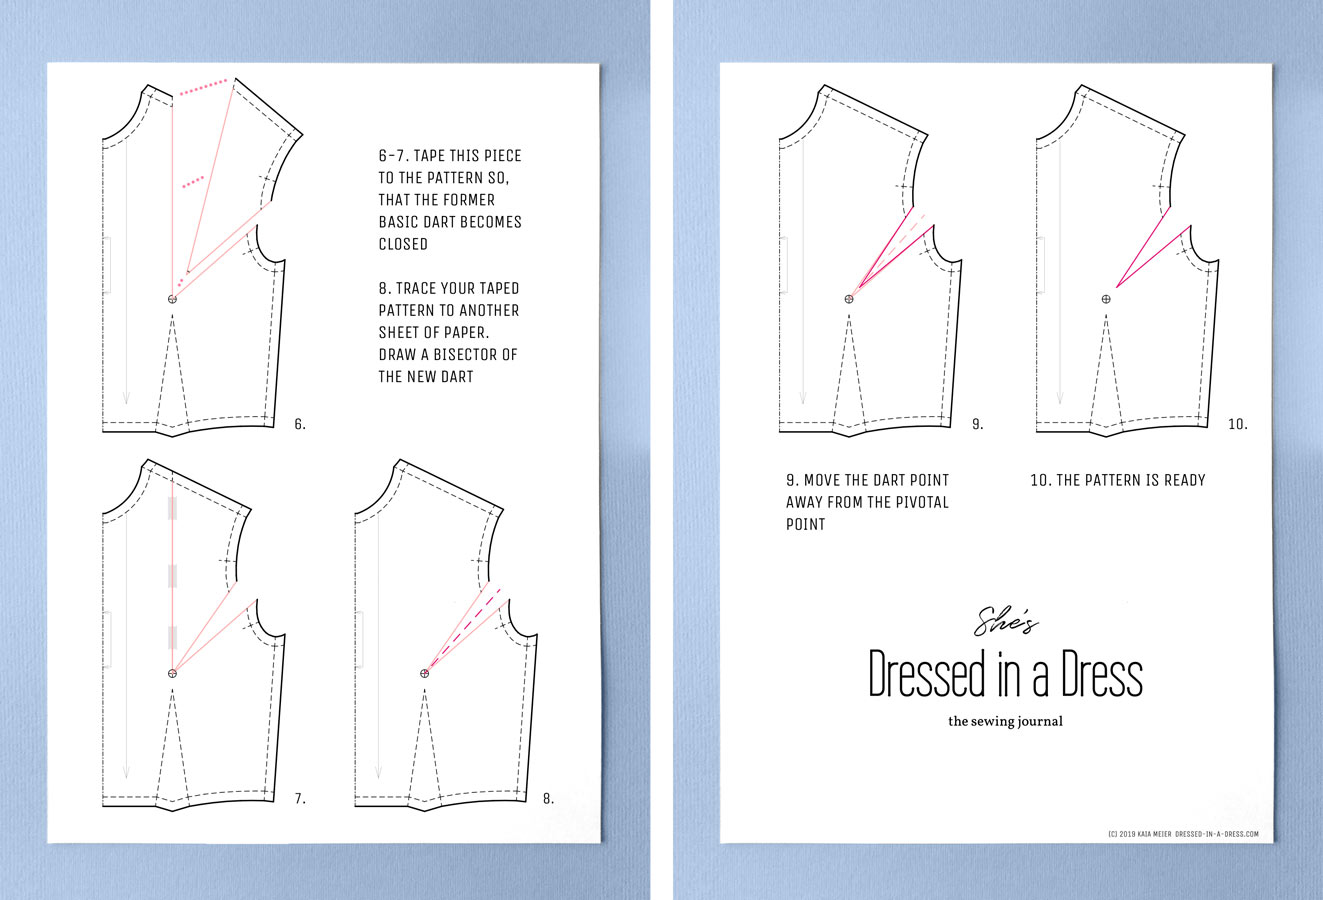
Mid-Armhole Dart
Step-by-Step Guide
- Compare the new design to the basic block.
- On your copy pattern, draw new dart legs for the basic darts that will change their position. Now they should end precisely at the pivotal point.
- Draw a straight line from the pivotal point to the middle of the armhole where you’d like your new dart to be. This line represents the dart that is already sewn. Now we need to rip it apart.
- Cut on this line and stop at the pivotal point.
- Cut out the basic dart intake of the bust dart. A piece of your copy pattern should now separate.
- Match the dart legs of the former bust dart. The shoulder should form a straight line.
- Tape this piece to the pattern so that the former basic dart becomes closed. It will now finally disappear from its old place.
- Trace your taped pattern to another sheet of transparent paper, and don’t forget the notches. Draw a bisector of a new dart.
- Move the dart point 1.5–2 cm (5⁄8–0.8ʺ) away from the pivotal point to avoid puckering.
- As I said before, the pattern is almost ready.
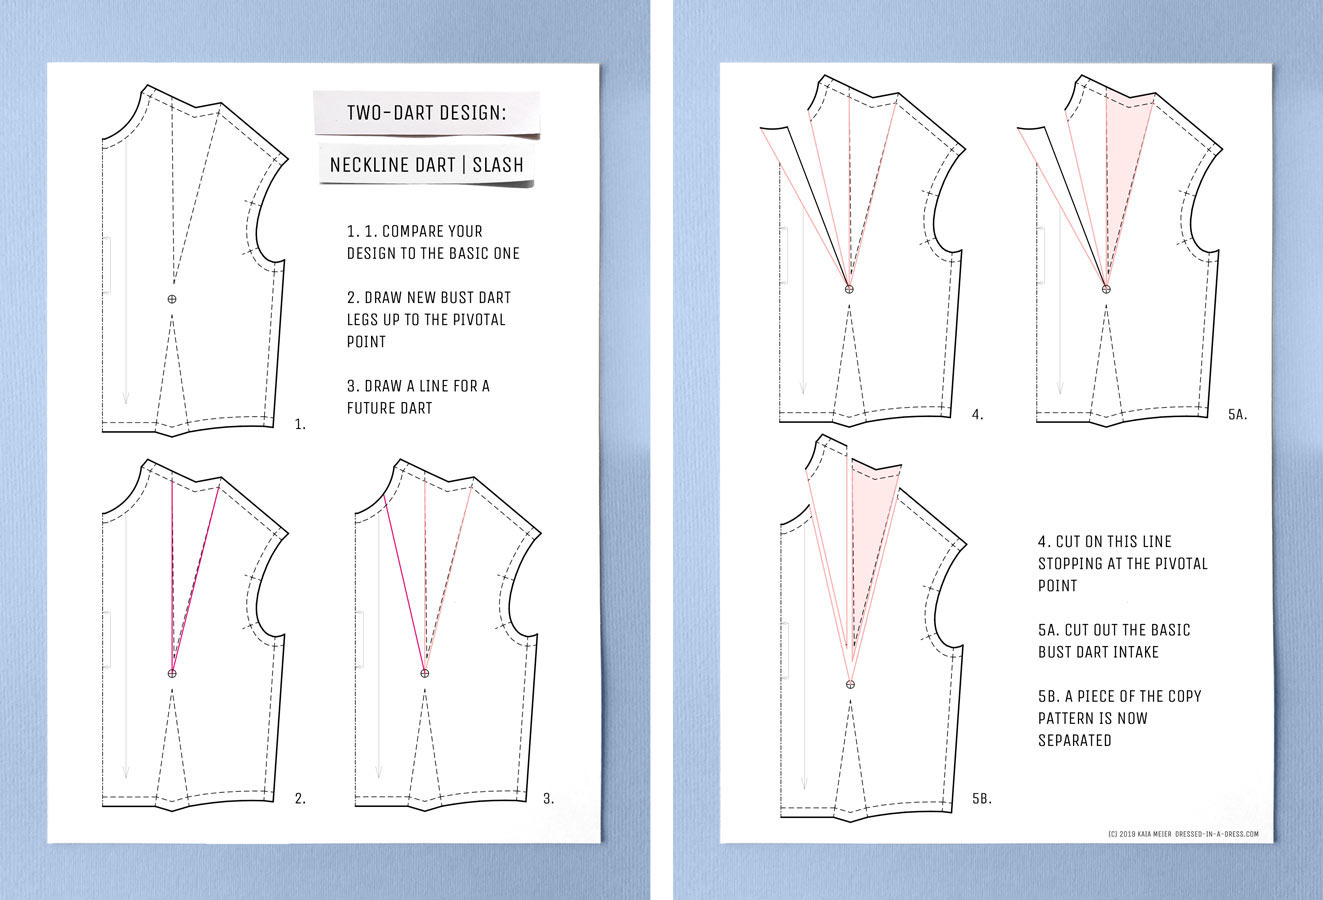
Mid-Neckline Dart
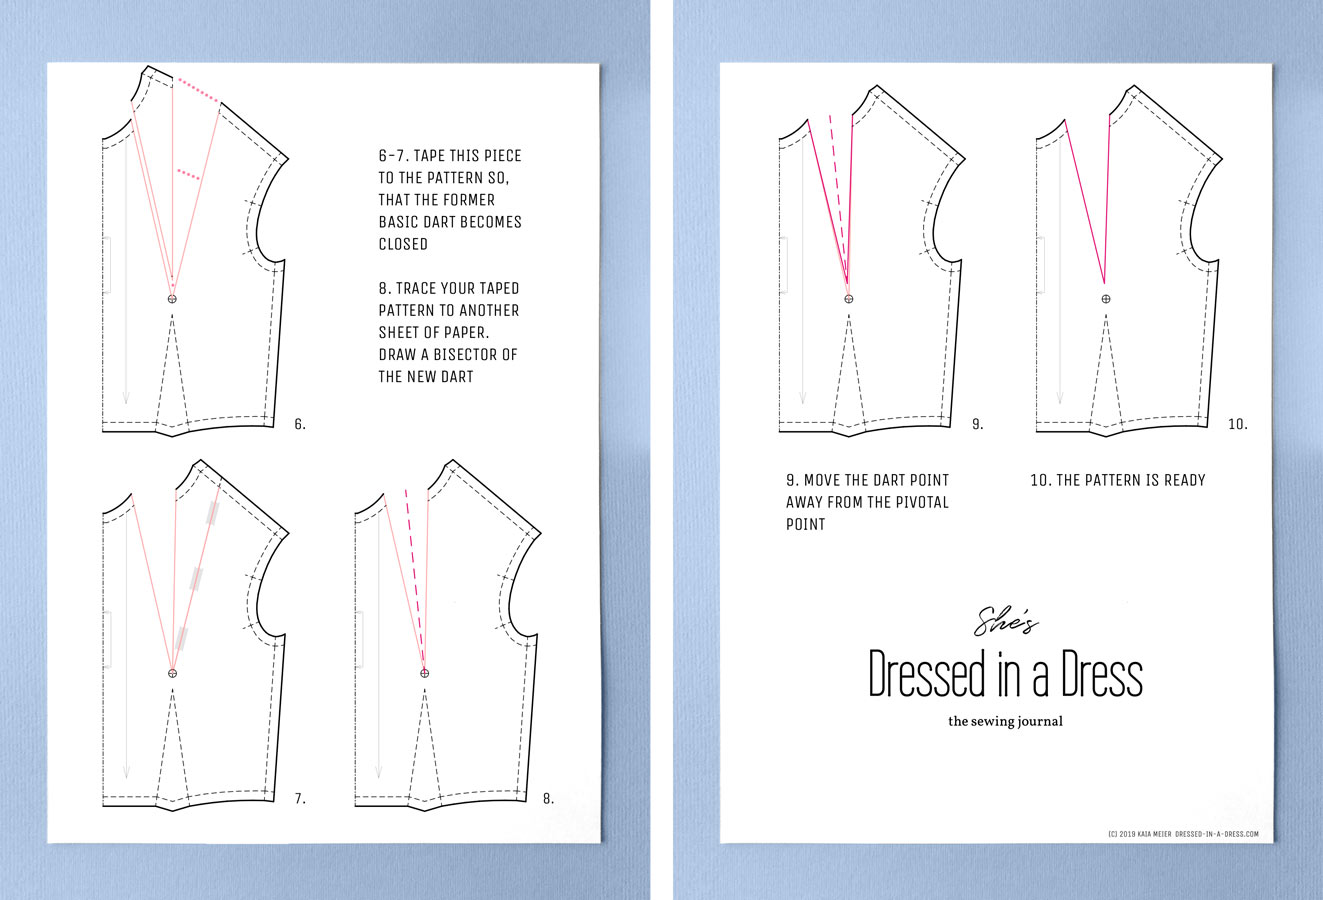
Step-by-Step Guide
- Compare the new design to the basic block.
- On your copy pattern, draw new dart legs for the basic darts that will change their position. Now they should end precisely at the pivotal point.
- Draw a straight line from the pivotal point to the middle of the neckline where you’d like your new dart to be. This line represents the dart that is already sewn. Now we need to rip it apart.
- Cut on this line and stop at the pivotal point.
- Cut out the basic dart intake of the bust dart. A piece of your copy pattern should now separate.
- Match the dart legs of the former bust dart. The shoulder should form a straight line.
- Tape this piece to the pattern so that the former basic dart becomes closed. It will now finally disappear from its old place.
- Trace your taped pattern to another sheet of transparent paper, and don’t forget the notches. Draw a bisector of a new dart.
- Move the dart point 1.5–2 cm (5⁄8–0.8ʺ) away from the pivotal point to avoid puckering.
- Almost done :)
As you might have noticed, the process is pretty much the same every time:
Draw the future dart line - Cut - Close the former dart - Tape - Move the bust point away.
It is not that scary once you get used to it.
Homework
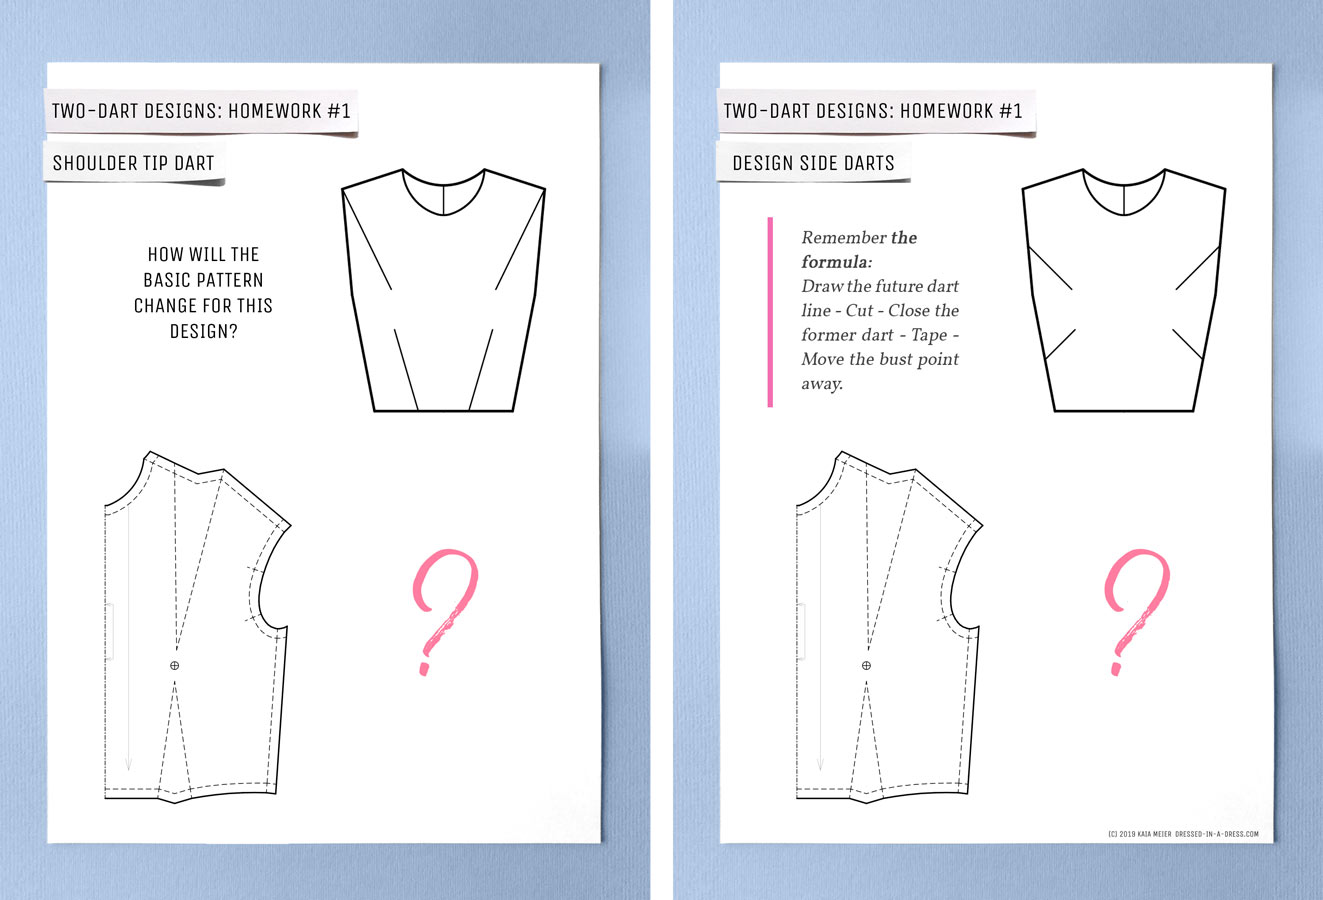
Here is the homework to help you get more practice. You can make one design using the slash method and then wait for an article about the pivotal one to complete the second design. Or you can draw both patterns with both methods to level up the skills.
Please, note I do emphasize the gap between dart points at the bust point. I do it, so no one forgets about moving dart points away from the pivotal point. In real life, the dart point stand away for only 1.5–2 cm.
A little hint: the waist dart is going to move too.
Share your results on Instagram with #dressedinadress and #patternmakingseries hashtags and tag me @_kaia_meier, so I could see how you are doing.
Also, if you are new here, it might be helpful to take a quick look at the previous articles: “The Introduction”, “01. The Block Patterns”, and “02. Pattern Shapes and Flat Patternmaking”.
See you soon,
xoxo
Kaia
