04. Common Dart Manipulations: Two-Dart Designs. Pivotal Method
Category: Patternmaking Series 12 June 22
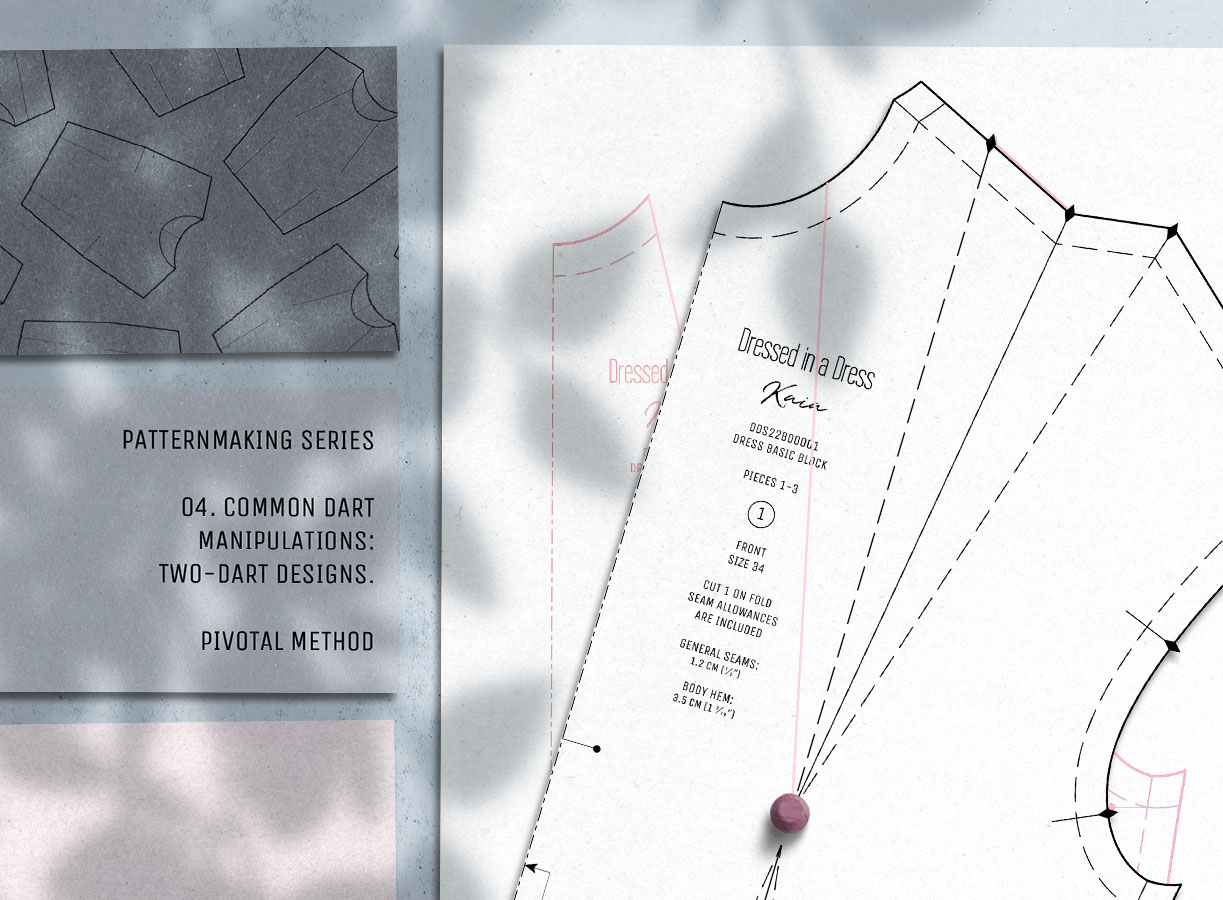
Continuing with the patternmaking series, we are ready to delve deeper into dart manipulations using the pivotal method. Building on the concepts explored in the previous post with the slash method, we will now learn about the creative potential of another technique. If you’re new to the series or missed the previous post, I recommend starting there to grasp the foundation for today’s tutorial.
Today, we’ll continue working with the same two-dart designs as before, but this time, we’ll employ the pivotal method to create our patterns. Before we proceed, let’s refresh our memory on the essential rules and definitions from the last post.
The Quick Review
The Rules
A dart can be rotated to any location around the pattern outline without affecting the fit or size of the pattern as long as a dart point is directed to its pivotal point.
The dart or its equivalent will always direct itself to the pivotal point. To avoid puckering at the pivotal point or cone-shaped breasts, one should end the dart before reaching the pivotal point.
The Methods
Pivotal method: in this method, a pattern is not slashed but rotated around the pivotal point for dart relocation. It is faster and more efficient, though the technique is based on the knowledge gained from slashing the pattern.
Slash method: according to the name, the pattern is slashed, spread, or overlapped for dart relocation, adding more fabric or creating a closer fit.
Common Designs
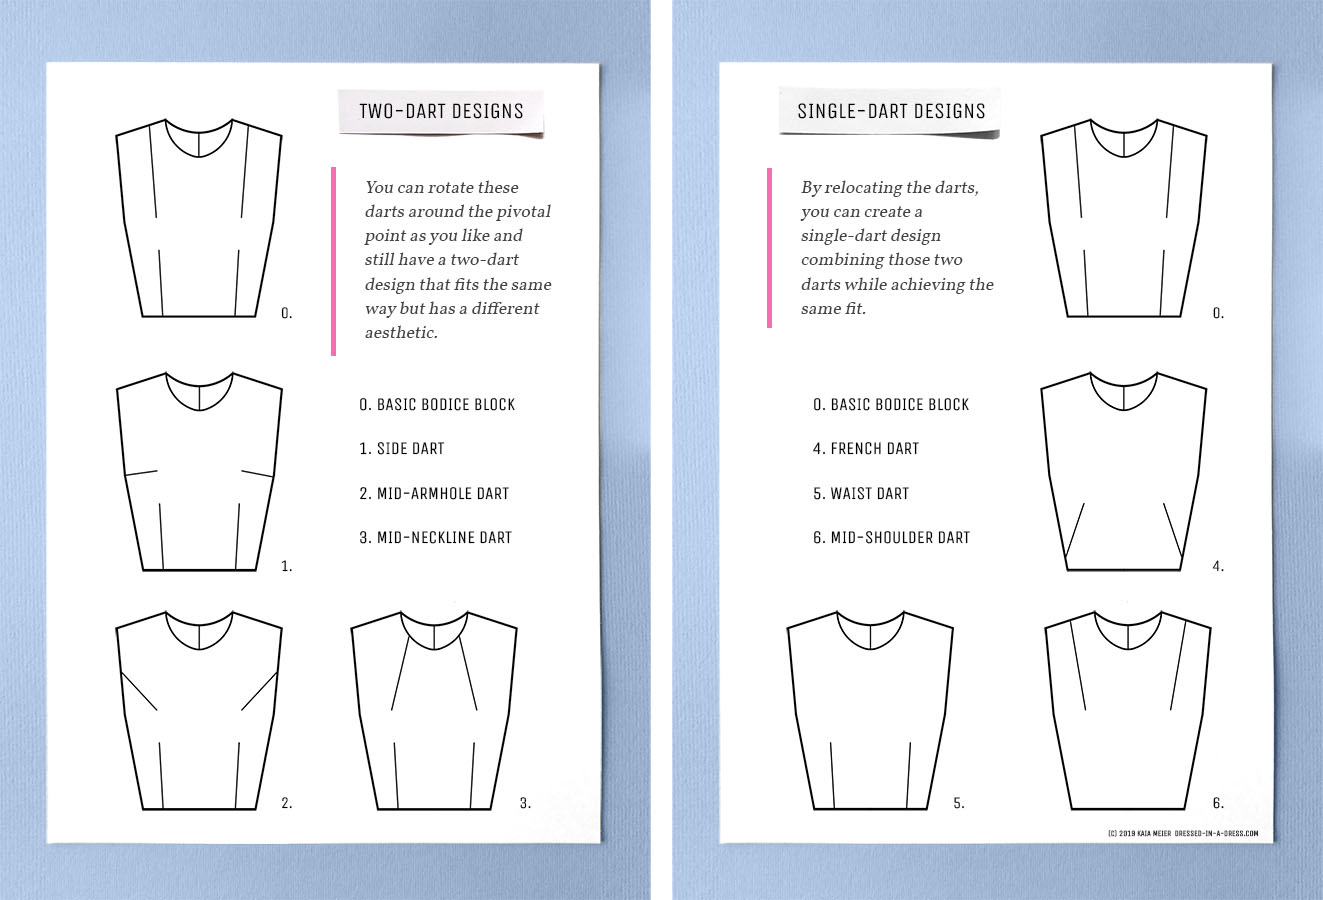
As I mentioned, the basic front bodice piece has two darts: one for the bust and one for the waist—I’ll call them basic darts.
You can rotate these darts around the pivotal point as you like and still have a two-dart design that fits the same way but has a different aesthetic.
Also, by relocating the darts, you can create a single-dart design combining those two darts while achieving the same fit.
Unfortunately, single-dart bodices might not look flattering on every client, as attaining a well-fitting bust area for those with C-cup plus breasts can pose challenges due to the difficulty and occasional impossibility of pressing the dart point flat, given the significant dart intake in such cases.
Two-dart Designs: Pivotal Method
Though the process has much in common with the slash method, there’s no need to copy the basic block this time, as we will work directly with it. Please keep the tiny marks that you’ll make on it neat.
We will only work with the bust dart in this post to keep the process easy to follow. But you can apply the same principles to relocate only the waist dart or both the waist and the bust one simultaneously.
Now, let’s proceed with the patternmaking process for the side dart design.
Side Dart
Step-by-Step Guide
- Compare the new design to the basic block and ask yourself the following questions:
- How many darts are there in the flat drawing?
- Does any of the basic darts remain in their place?
- If yes, which one?
- If not, where did it go?
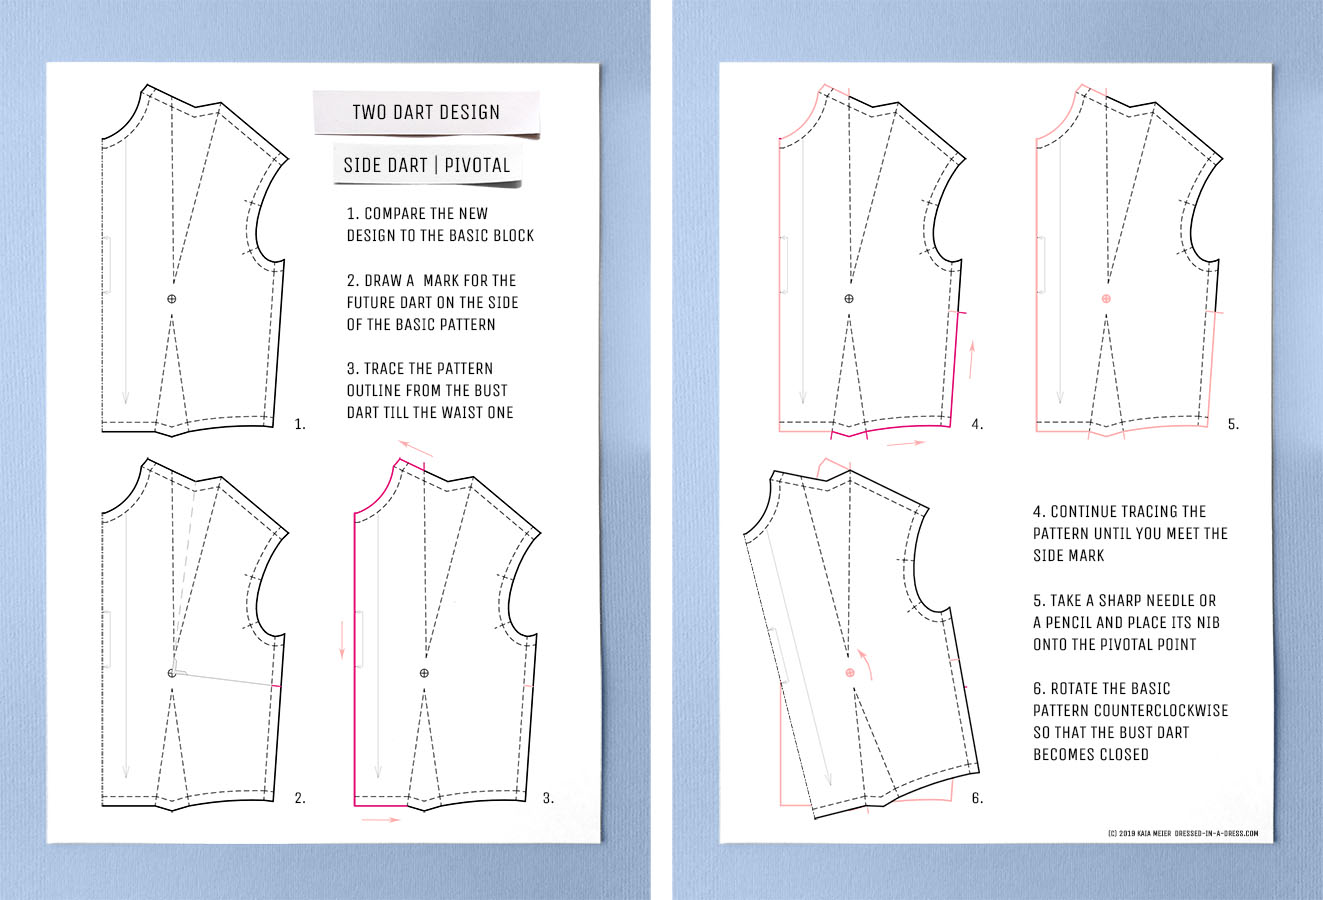
- Draw a small mark for the future dart on the side of the basic pattern outline. It should aim at the pivotal point, as always. In this case, the imaginary line drawn from this mark will form a perpendicular with a bust dart bisector.
- Place the basic pattern on a sheet of paper. At the left bust dart leg, draw a mark as shown. Moving counterclockwise, trace the pattern outline from here till the waist dart.
- The waist dart remains in place because we are working on a two-dart design. So, draw the marks at its legs and continue tracing the pattern until you meet the side mark. Draw a new mark there too.
- Take a sharp needle or a pencil and place its nib onto the pivotal point. Press it well, so the pattern cannot move from side to side but can rotate around it.
- Rotate the basic pattern counterclockwise so that the bust dart becomes closed.
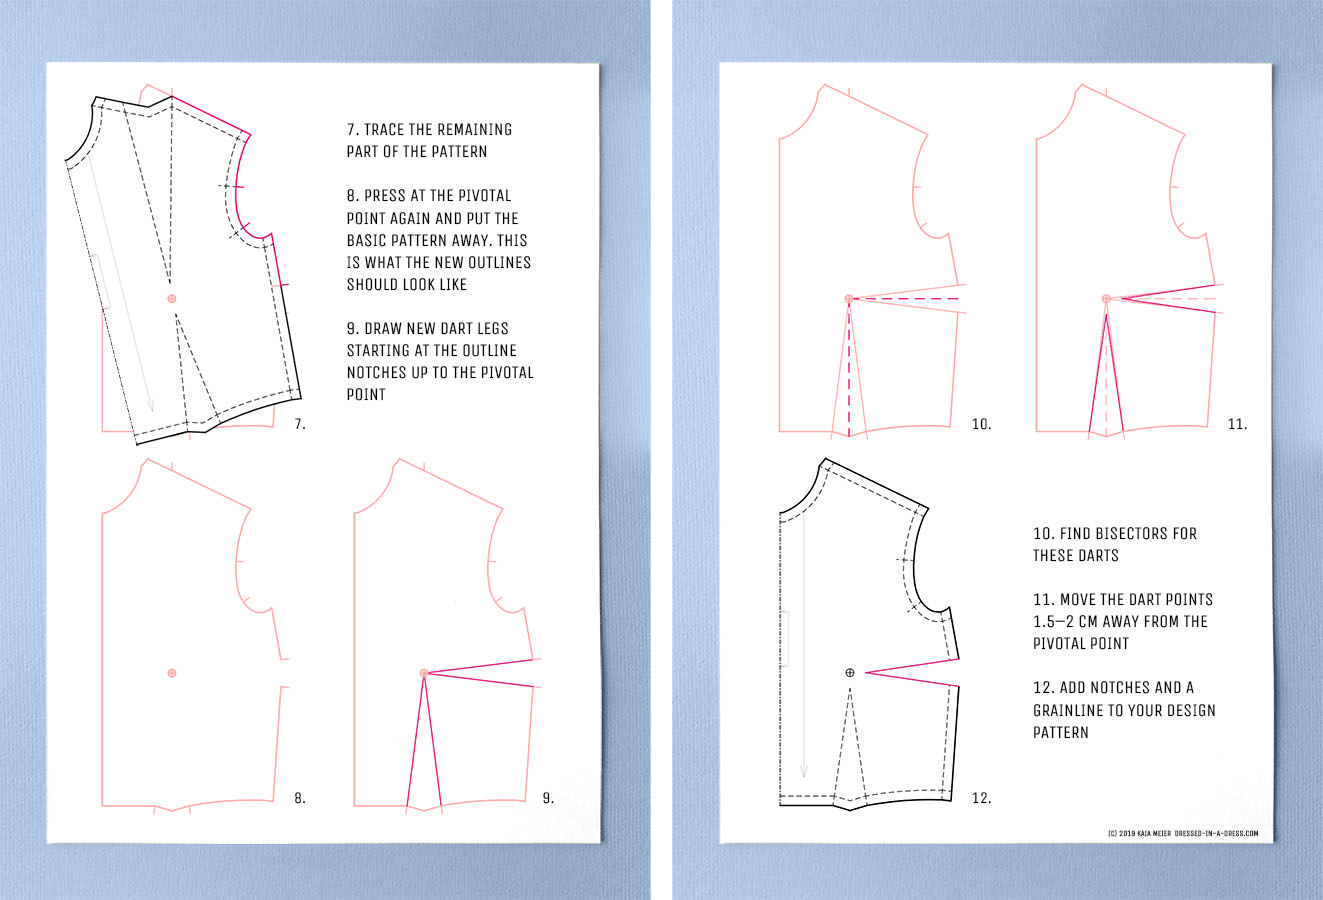
- Trace the remaining part of the pattern. Start at the side mark and move the shoulder. Don’t forget to mark armhole notches, as you will need them to sew sleeves in.
- Press at the pivotal point again so that the nib leaves a mark on the paper under it. Put the basic pattern away. You can see what your new outlines should look like in the illustration.
- Draw new dart legs starting at the outline notches up to the pivotal point.
- Find bisectors for these darts.
- Move the dart points 1.5–2 cm away from the pivotal point to avoid puckering.
- Add notches and a grainline to your design pattern.
- The pattern is almost ready; one little thing left is completing the dart intake outline. But we’ll learn about it a bit later.
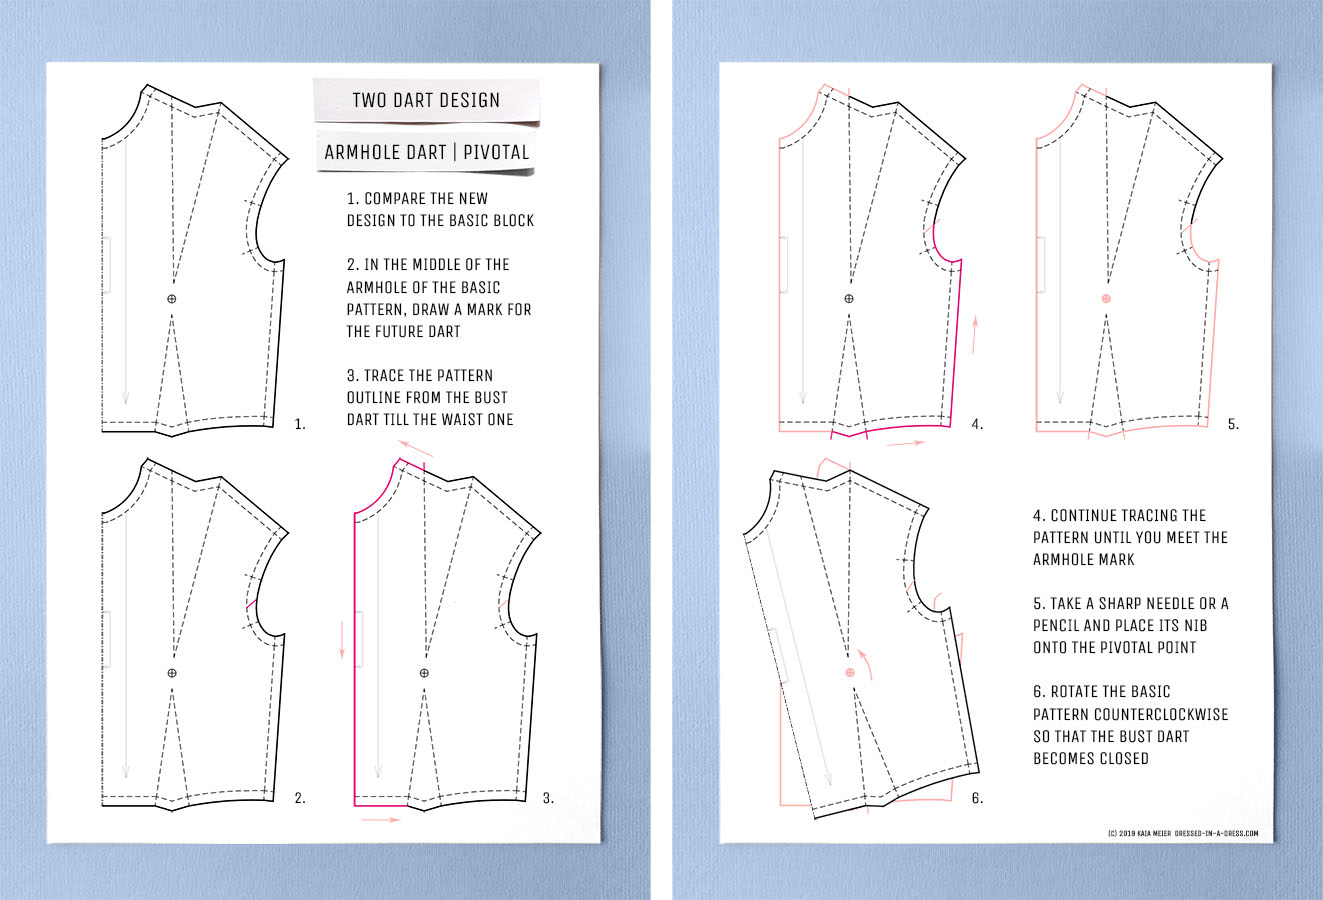
Mid-Armhole Dart
Step-by-Step Guide
- Compare the new design to the basic block.
- In the middle of the armhole of the basic pattern outline, draw a small mark for the future dart. It should aim at the pivotal point, as always.
- Place the basic pattern on a sheet of paper. At the left bust dart leg, draw a mark as shown. Moving counterclockwise, trace the pattern outline from here till the waist dart.
- The waist dart remains in place because we are working on a two-dart design. So, draw the marks at its legs and continue tracing the pattern until you meet the armhole mark. Draw a new mark there too.
- Take a sharp needle or a pencil and place its nib onto the pivotal point. Press it well, so the pattern cannot move from side to side but can rotate around it.
- Rotate the basic pattern counterclockwise so that the bust dart becomes closed.
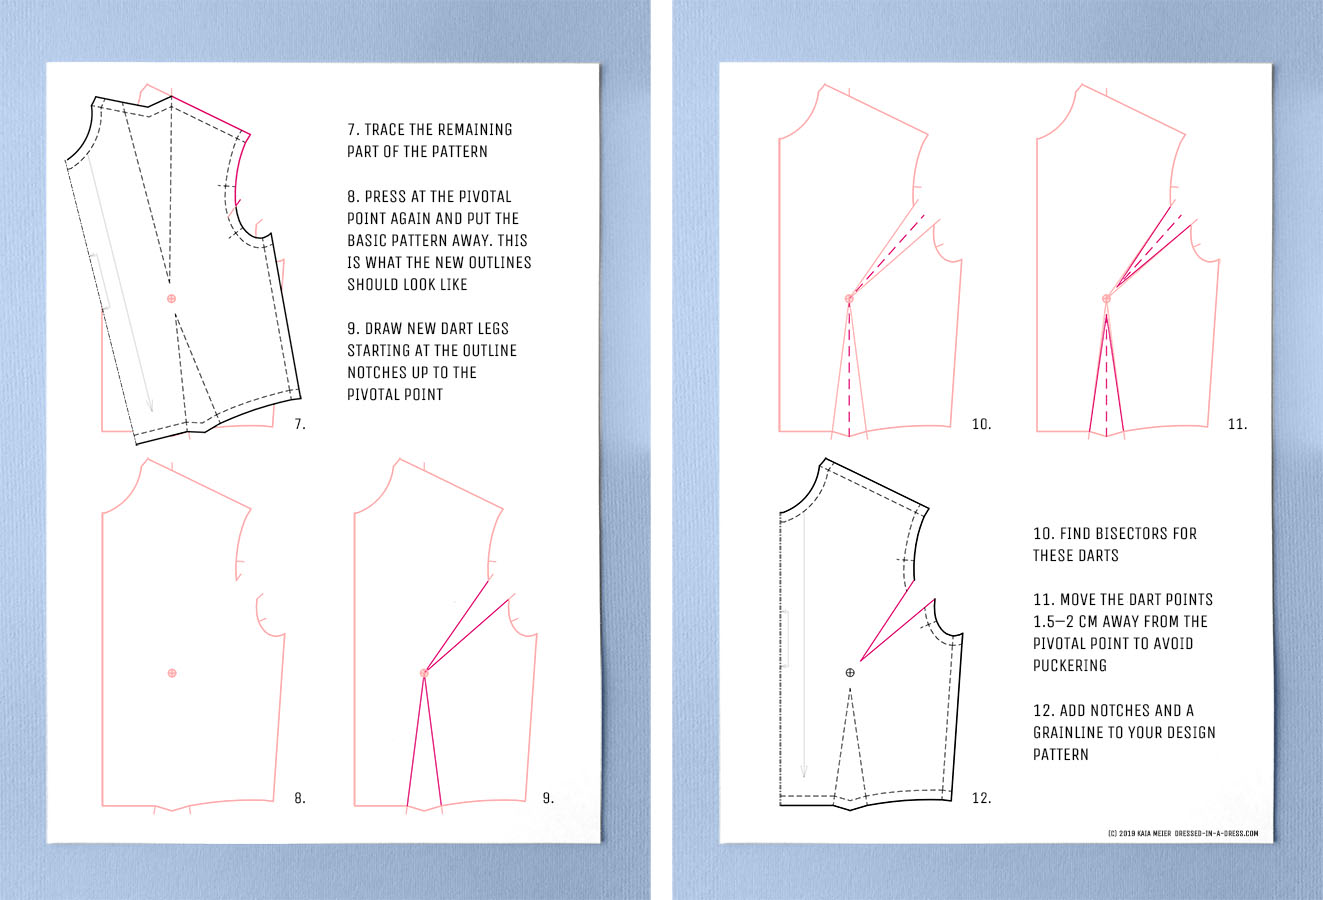
- Trace the remaining part of the pattern. Start at the armhole mark and move the shoulder. Don’t forget to mark other armhole notches, as you will need them to sew sleeves in.
- Press at the pivotal point again so that the nib leaves a mark on the paper under it. Put the basic pattern away. You can see what your new outlines should look like in the illustration.
- Draw new dart legs starting at the outline notches up to the pivotal point.
- Find bisectors for these darts.
- Move the dart points 1.5–2 cm away from the pivotal point to avoid puckering.
- Add notches and a grainline to your design pattern.
- The pattern is almost ready; one little thing left is completing the dart intake outline. But we’ll learn about it a bit later.
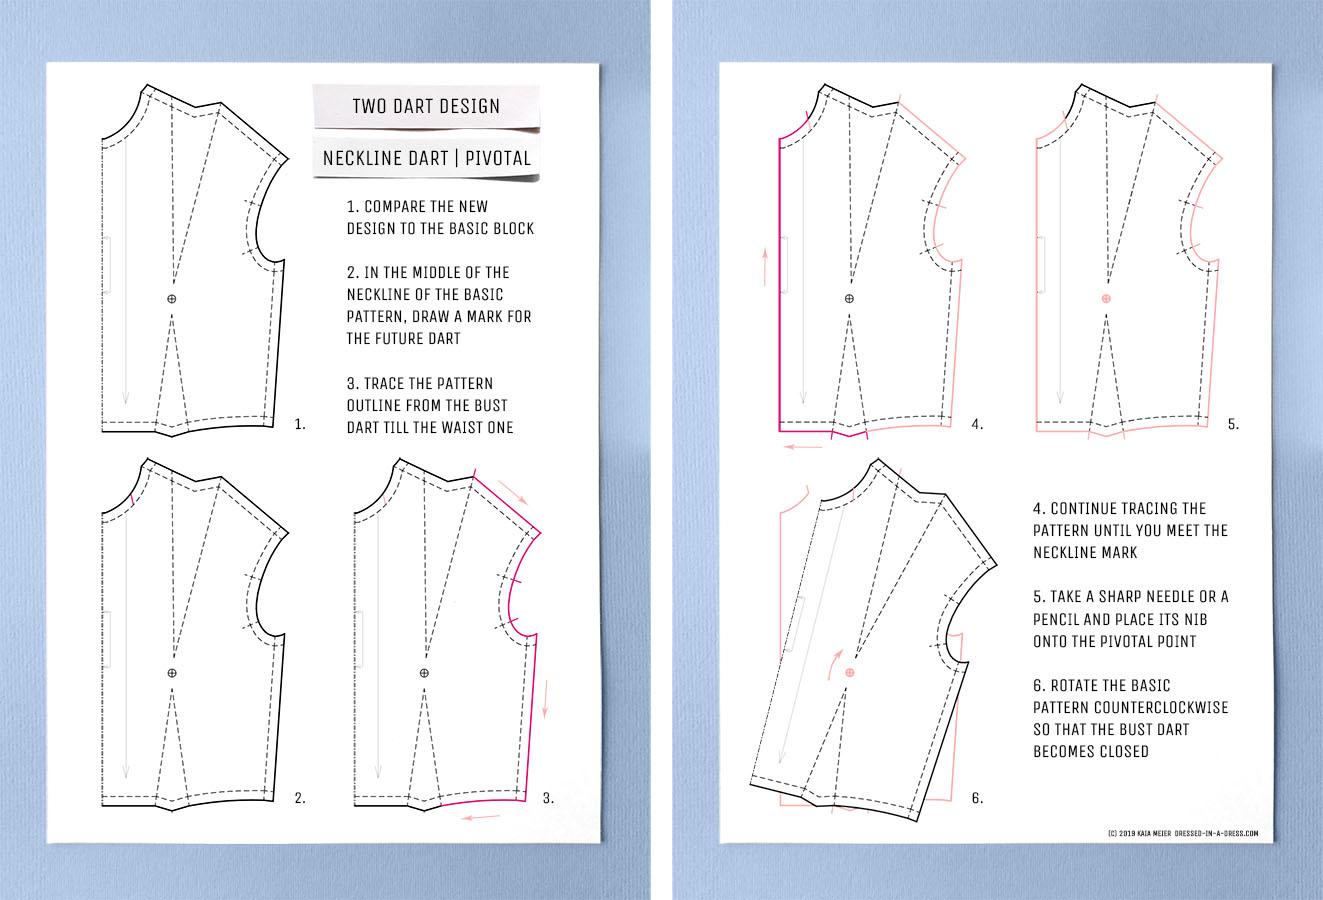
Mid-Neckline Dart
Step-by-Step Guide
- Compare the new design to the basic block.
- In the middle of the neckline of the basic pattern outline, draw a small mark for the future dart. It should aim at the pivotal point, as always.
- Place the basic pattern on a sheet of paper. At the right bust dart leg, draw a mark as shown. Moving clockwise, trace the pattern outline from here till the waist dart.
- The waist dart remains in place because we are working on a two-dart design. So, draw the marks at its legs and continue tracing the pattern until you meet the neckline mark. Draw a new mark there too.
- Take a sharp needle or a pencil and place its nib onto the pivotal point. Press it well, so the pattern cannot move from side to side but can rotate around the nib.
- Rotate the basic pattern counterclockwise so that the bust dart becomes closed.
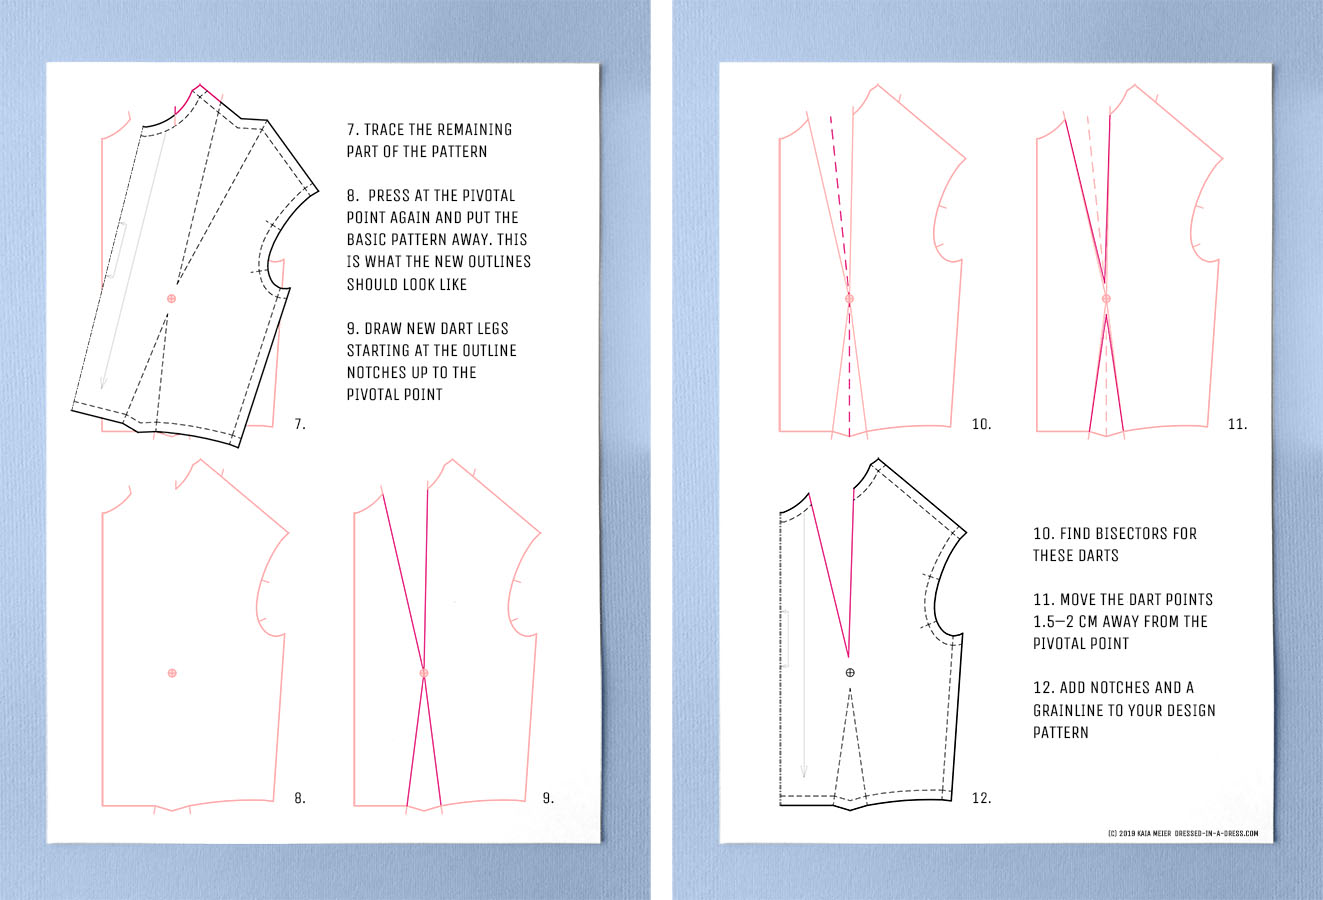
- Trace the remaining part of the pattern. Start at the side mark and move the shoulder. Don’t forget to mark armhole notches, as you will need them to sew sleeves in.
- Press at the pivotal point again so that the nib leaves a mark on the paper under it. Put the basic pattern away. You can see what your new outlines should look like in the illustration.
- Draw new dart legs starting at the outline notches up to the pivotal point.
- Find bisectors for these darts.
- Move the dart points 1.5–2 cm away from the pivotal point to avoid puckering.
- Add notches and a grainline to your design pattern.
- The pattern is almost ready; one little thing left is completing the dart intake outline. But we’ll learn about it a bit later.
The knowledge acquired from these dart manipulations is a solid foundation for our upcoming exploration of single-dart designs, to which I’ll dedicate the next post.
As with the slash method, the process of bust dart relocation with the pivotal method follows a similar path every time:
Draw the mark for the future dart - Trace the outline from the bust dart to the waist one - Mark it - Keep tracing until the new dart mark - Close the bust dart by rotating the pattern - Trace the rest of the pattern - Move the bust point away.
Remember, pattern manipulation is a skill that improves with consistent practice and experimentation. With a steady hand and a touch of creativity, you’ll achieve beautifully balanced patterns.
Homework
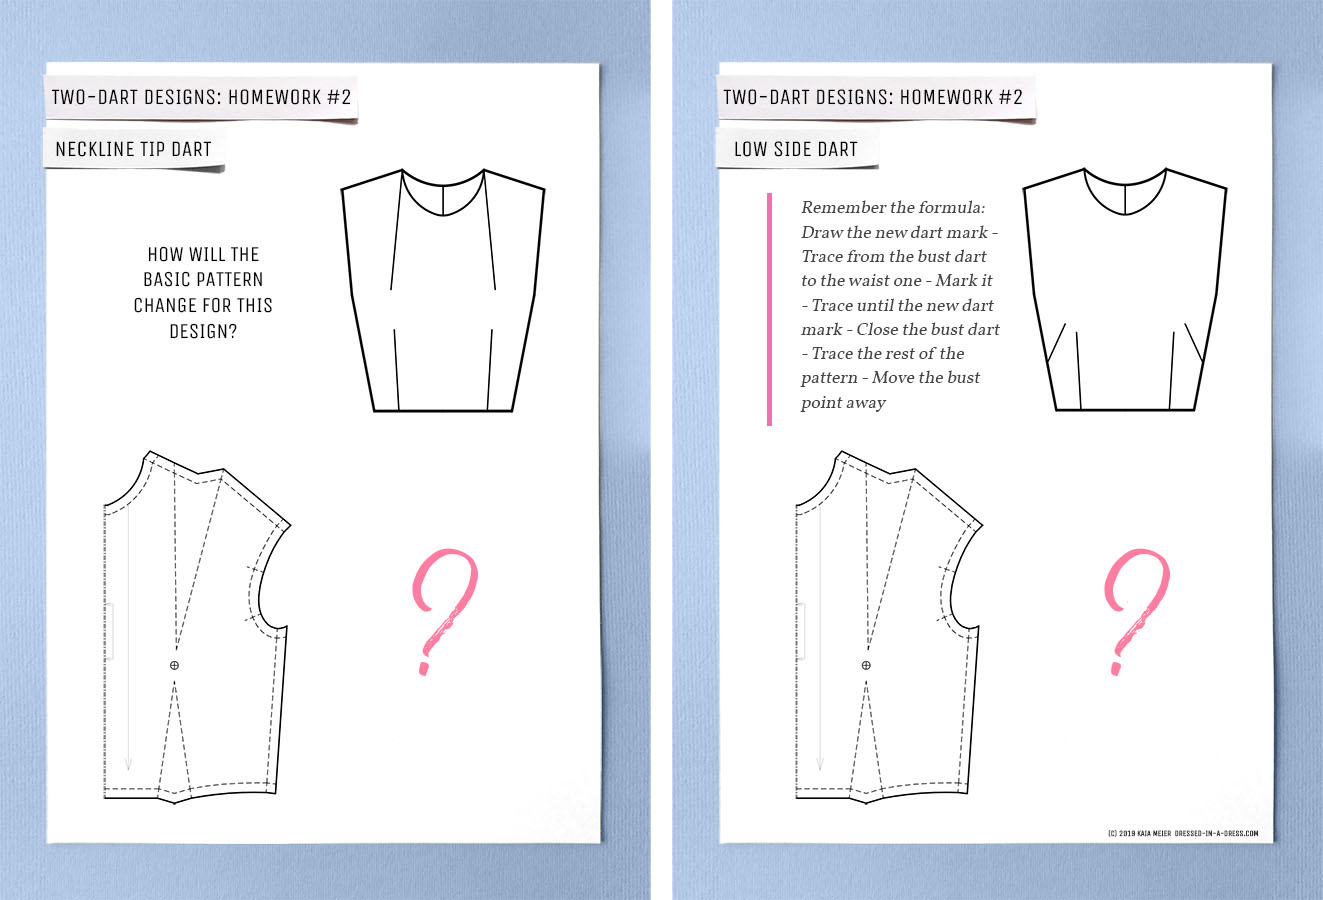
To further refine your skills, here’s a new set of exercises for extra practice. If you’ve already explored the slash method, now’s the perfect time to try the pivotal one and compare your preferences. Feel free to draw both patterns using both methods for even more practice. The resulting patterns should be the same, of course.
Please note that I emphasize the gap between dart points in the illustration to ensure that no one forgets about moving them away from the pivotal point. In real life, the dart point is only 1.5–2 cm away.
Continuously sharpen your patternmaking abilities, and don’t hesitate to share your results on Instagram with #dressedinadress and #patternmakingseries hashtags and tag me @_kaia_meier, so I can see how you are doing and maybe give you some advice.
xoxo
Yours,
Kaia
