05. Common Dart Manipulations: Single-Dart Designs
Category: Patternmaking Series 25 July 23
Darts play a crucial role in our garments, providing structural integrity and aesthetic appeal, particularly in fitted and semi-fitted designs. Earlier in this Patternmaking Series, we talked about the core elements of the front bodice: the bust and waist darts. We discussed how and why their location could change and learned about the Slash and Pivotal methods that help achieve various two-dart designs.
To refresh the memories, take a look at the previous posts that tell about dart manipulation in the two-dart designs:
- 03. Common Dart Manipulations: Two-Dart Designs. Slash Method
- 04. Common Dart Manipulations: Two-Dart Designs. Pivotal Method
Although bust and waist darts are crucial for a good fit, having two seams on the front bodice in every design is unnecessary. Sometimes, it’s possible to combine these darts into a single one while preserving the accurate fit. Creating a single-dart bodice shares similarities with the patternmaking process for a two-dart design, as it follows the same principles and rules.
While learning patternmaking, it’s important to remember that knowing every possible design variation by heart isn’t necessary or feasible, as it can be overwhelming and restrictive. Instead, it is best to understand and apply the rules wisely and creatively.
And there’s no better way to learn the rules than to apply the knowledge in practice. Now, let’s delve into the process and explore it in detail.
Design Features
In this post, we’ll take a look at the most common single-dart designs:
- French Dart
- Waist Dart
- Mid-Shoulder Dart
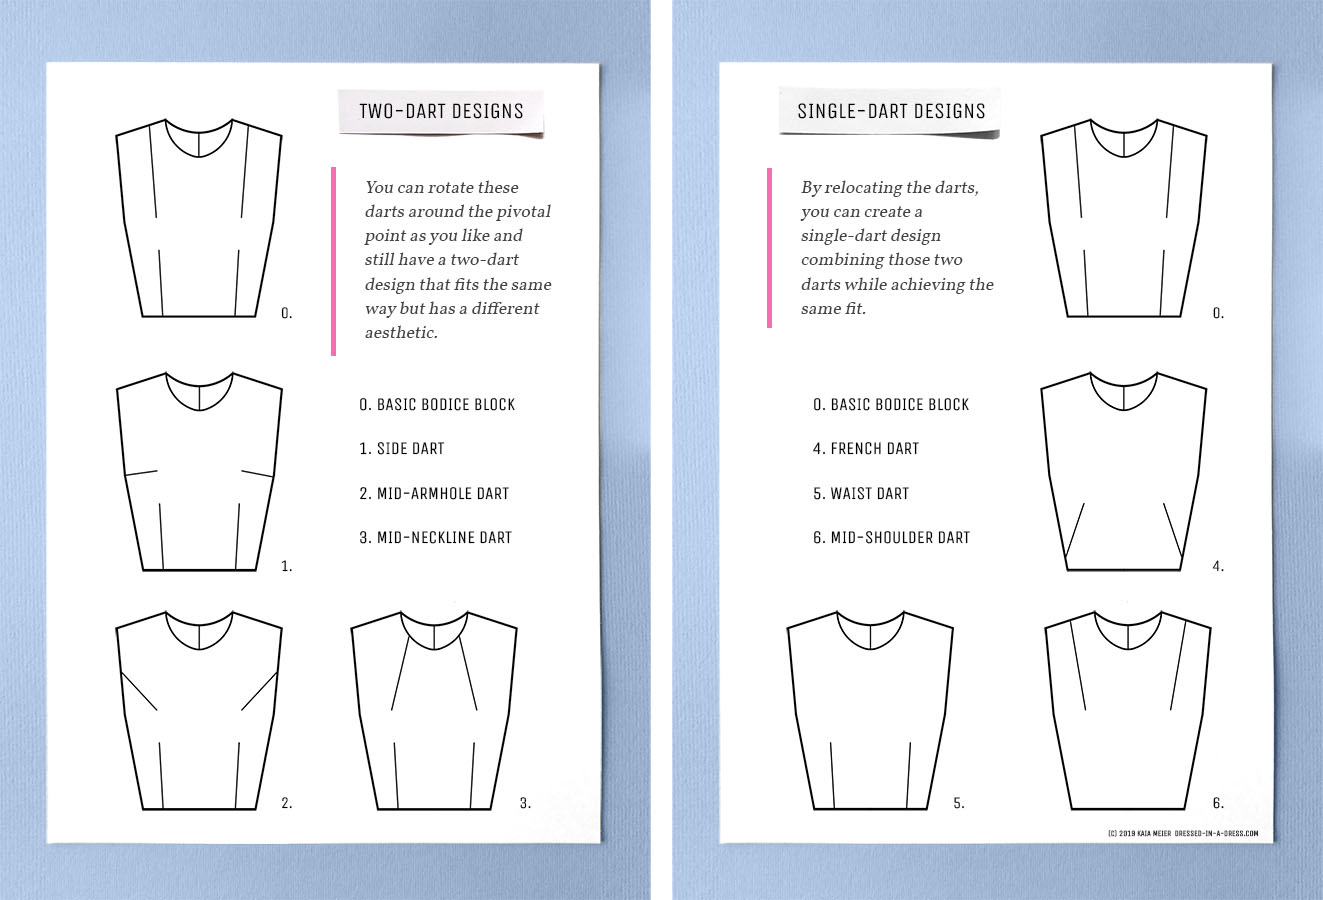
When considering the choice between single-dart and two-dart designs, the single-dart option offers advantages in design and aesthetics. In contrast, two-dart bodices provide a better fit and more flexibility for alterations. Unfortunately, single-dart bodices might not look flattering on every client and might not be the most reasonable choice for some situations. The reasons for that are cutting and fitting issues that might happen:
- The single-dart front piece may require more fabric than the two-dart version, making it less cost-effective.
- Side seams might stretch or deform because of their apparent slant.
- Achieving a well-fitting bust area for those with C-cup plus breasts can pose challenges due to the difficulty and occasional impossibility of pressing the dart point flat, given the significant dart intake in such cases. The result will also depend on the fabric and its flexibility.
The Dart Angle
But why is there a more significant dart intake? Explaining this requires some insight into the underlying mathematical principles. If you prefer to focus on the practical aspects, here’s a little spoiler so that you can skip to the actual patternmaking:
Because two darts are combined.
The Math
If you’ve decided to read this paragraph, let’s recollect what a definition of a dart is.
Dart is a folded wedge of fabric that confines unneeded fullness in certain areas to shape a garment to body curves.
The excess space that is removed is commonly referred to as “dart intake”.
In the case of a two-dart design, a bust dart helps fit the bodice in the corresponding area, and a waist one takes away the difference between the bust and waist measurements. In the single-dart designs, one dart performs both of these functions.
Let’s see how the dart angles work when I rotate the darts around the pivotal point.
- The basic dart is shaped like an isosceles triangle, and its dart point stays away from the pivotal one. To relocate the darts properly, I’ll connect new dart legs to the pivotal point for both darts.
- Then I measure the angle of a bust dart at the pivotal point with a protractor, and the angle is 14°.
- I do the same for the waist dart, whose angle appears to be 14.4°. And no matter where I rotate these darts, their angles will remain the same. In my case, it is 14° for a bust and 14.4° for the waist one. Yes, it might seem that the side bust dart angle is smaller than the shoulder one, but it’s not. The side dart is shorter, and it causes an optical illusion while their angles are equal.
- If I choose a single-dart design, I will combine those two darts with their angle measurements. Hence, the angle of my new dart will be 14° + 14.4° = 28.4°, regardless of its placement around the pivotal point.
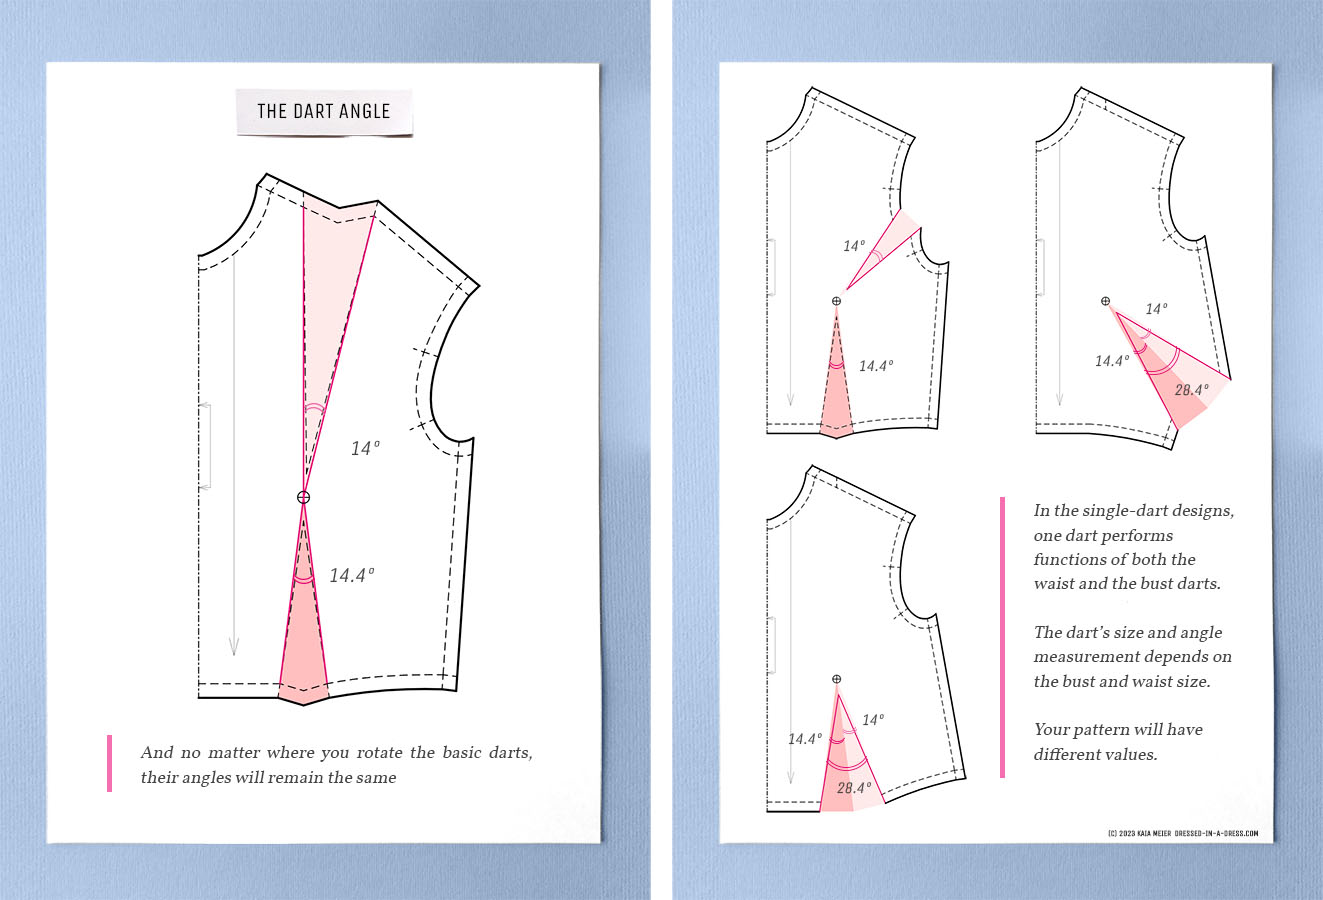
The dart’s size and angle measurement depends on the bust and waist size. The bigger the breast, the wider the angle of a bust dart. The smaller the waist compared to the bust measurement, the bigger the waist dart. And vice versa.
The example above and the following statement explain why dart intakes might be too significant for pressing:
Pressing the dart point at an acute angle rather than an obtuse one is always easier.
And that’s just enough Math for today. Let’s get back to patternmaking.
Single-dart Designs: Slash Method
Now, let’s dive into the patternmaking process for these common designs. As for which patternmaking method to choose, the slash method is more straightforward for me as I do the patterns and illustrations digitally. So, I’ll be utilising it for most of the case studies. As I mentioned, all the rules and principles we encountered while learning about two-dart designs apply here. That is also fair for the pivotal method, so you may go ahead and adapt the logic to it.
Before we start with the actual examples, here is the short scenario for the slash patternmaking process:
Draw the future dart line - Cut on it - Cut both dart intakes out - Close the former darts - Tape - Move the bust point away.
And don’t forget to prepare copies of your basic pattern, as we did with the two-dart designs. Remember, never cut your basic block. Never.
French Dart
Step-by-Step Guide
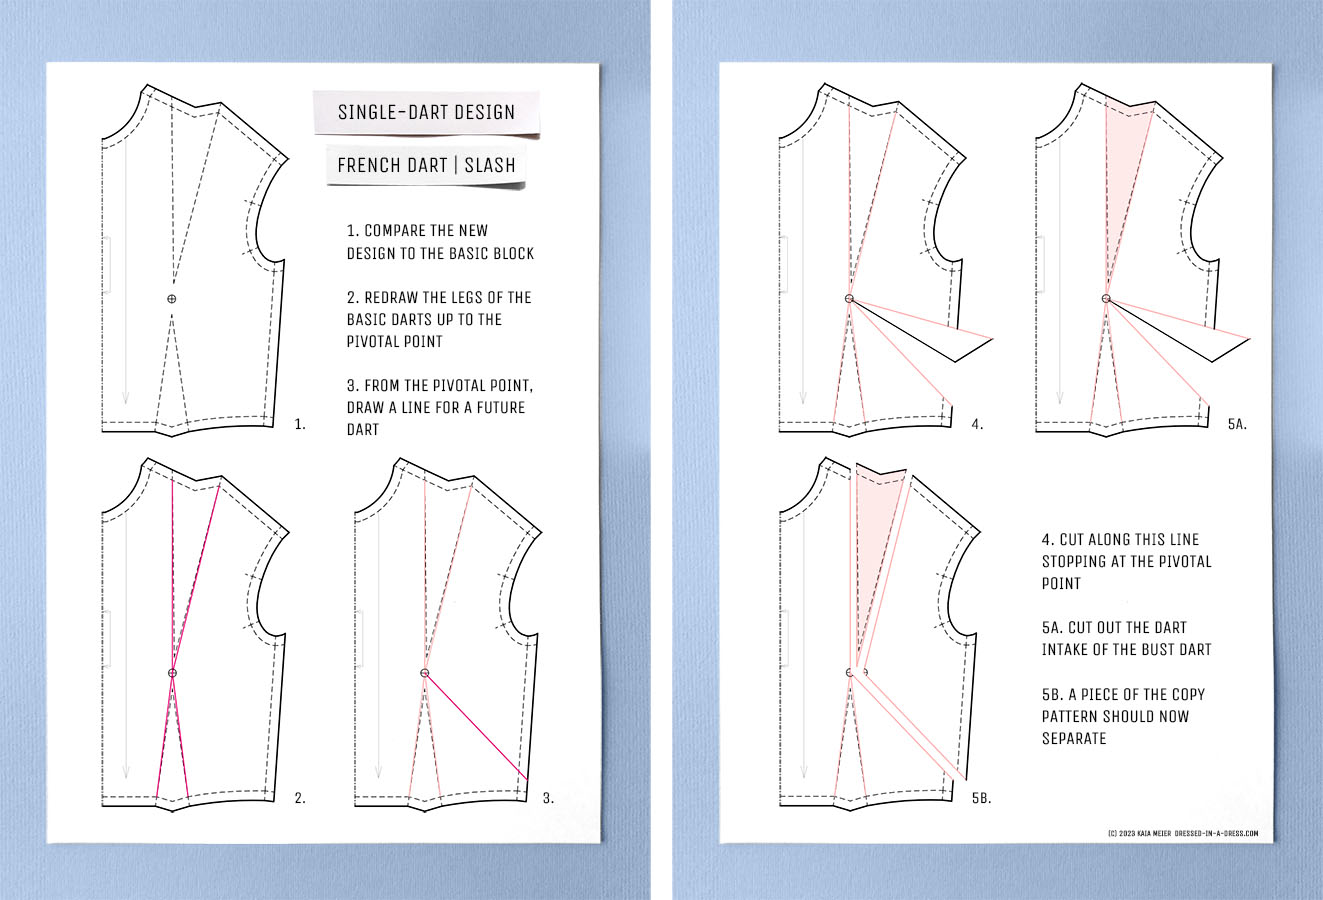
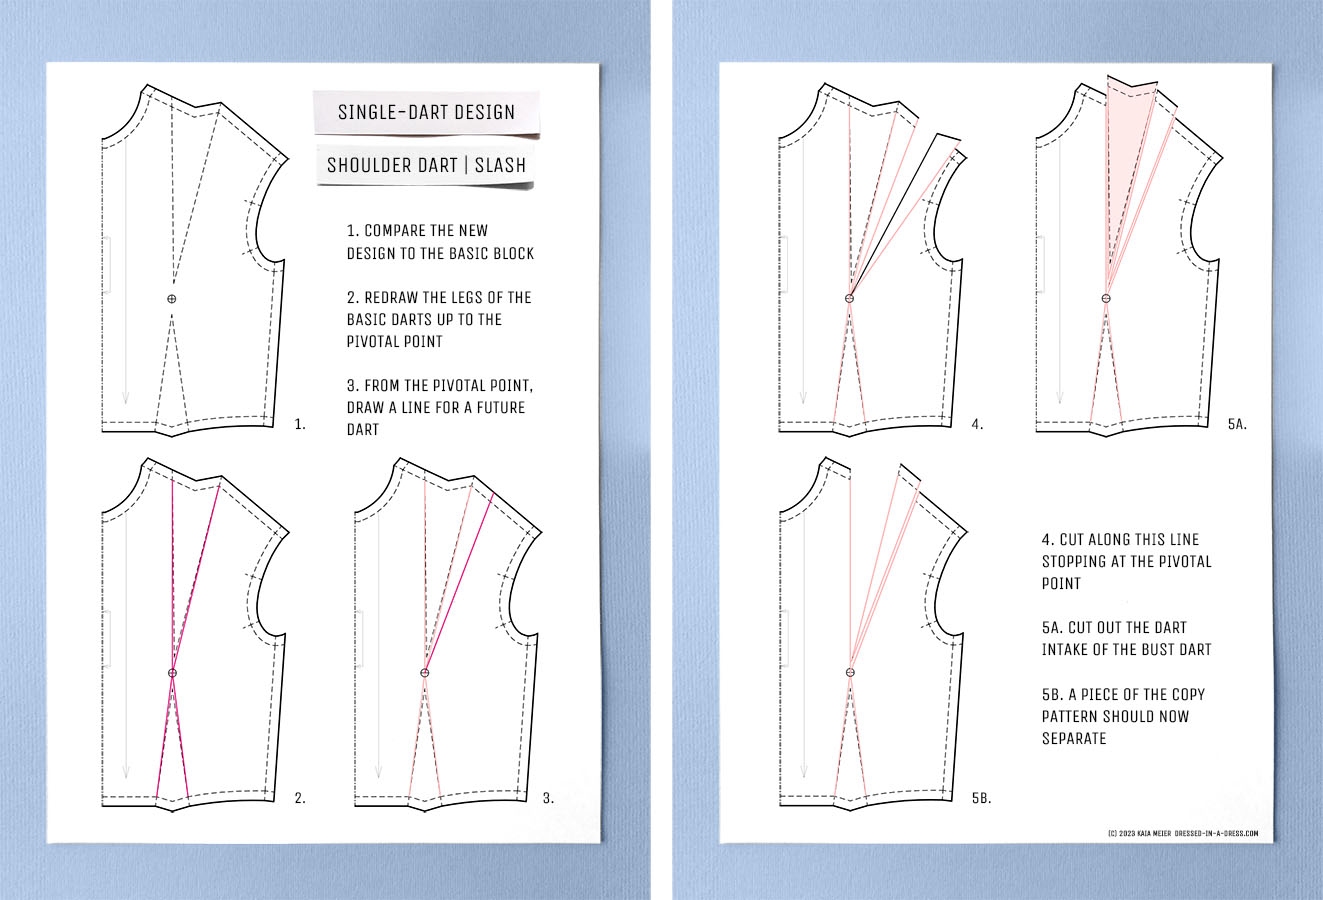
- Compare the new design to the basic block and ask yourself the following questions:
- Does any of the basic darts remain in their place?
- If yes, which one?
- If not, where did it go?
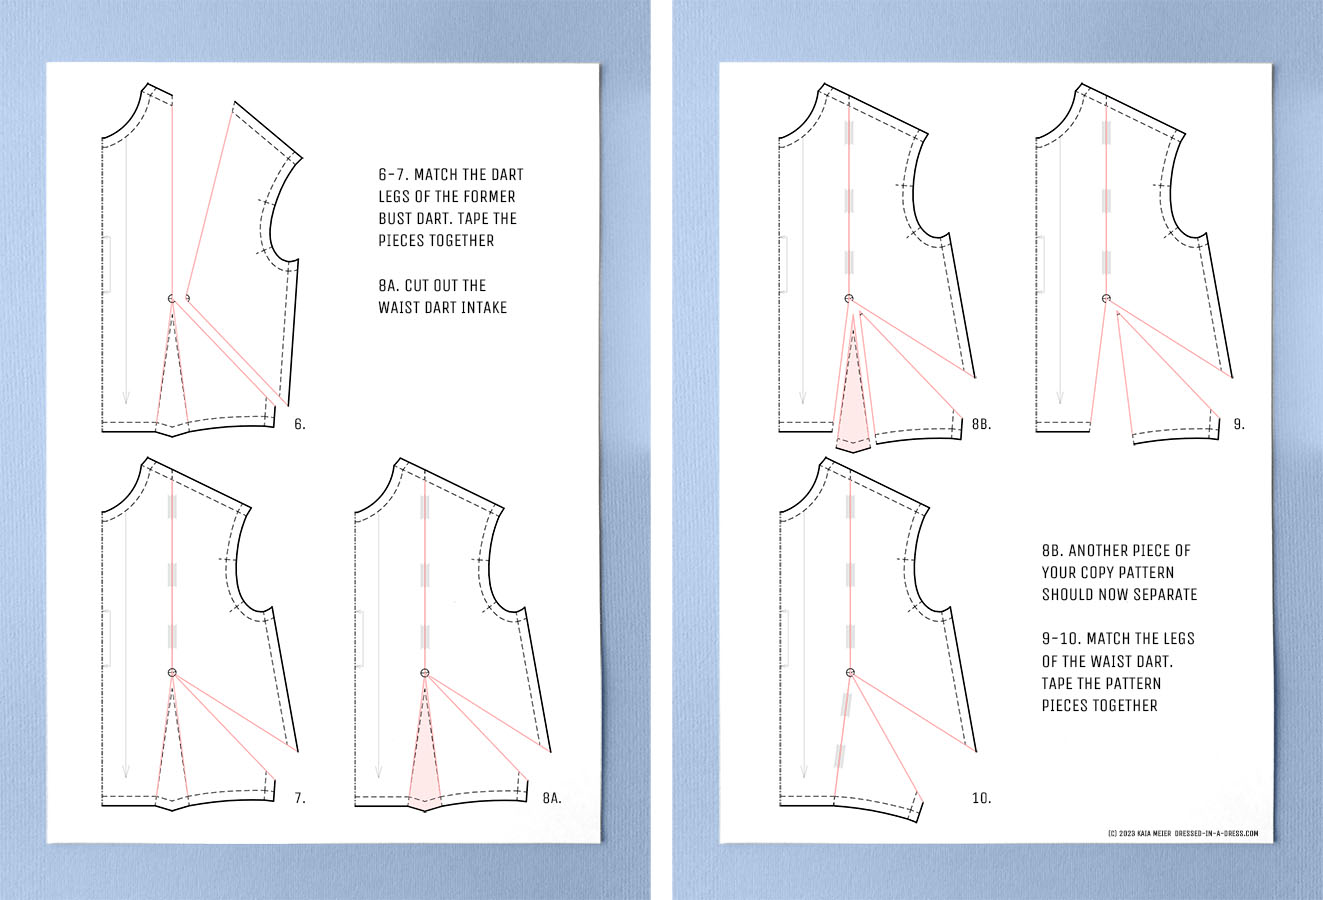
- On your copy pattern, redraw the legs of your basic darts — now, they should end precisely at the pivotal point.
- Draw a straight line from the pivotal point to the lower side where you’d like your new dart to be. This line represents the finished dart that is already sewn. Now we need to cut it apart.
- Cut along this line, stopping precisely at the pivotal point.
A note: in images “4” and “5a”, the pattern section is folded aside to demonstrate that the pieces were cut apart.
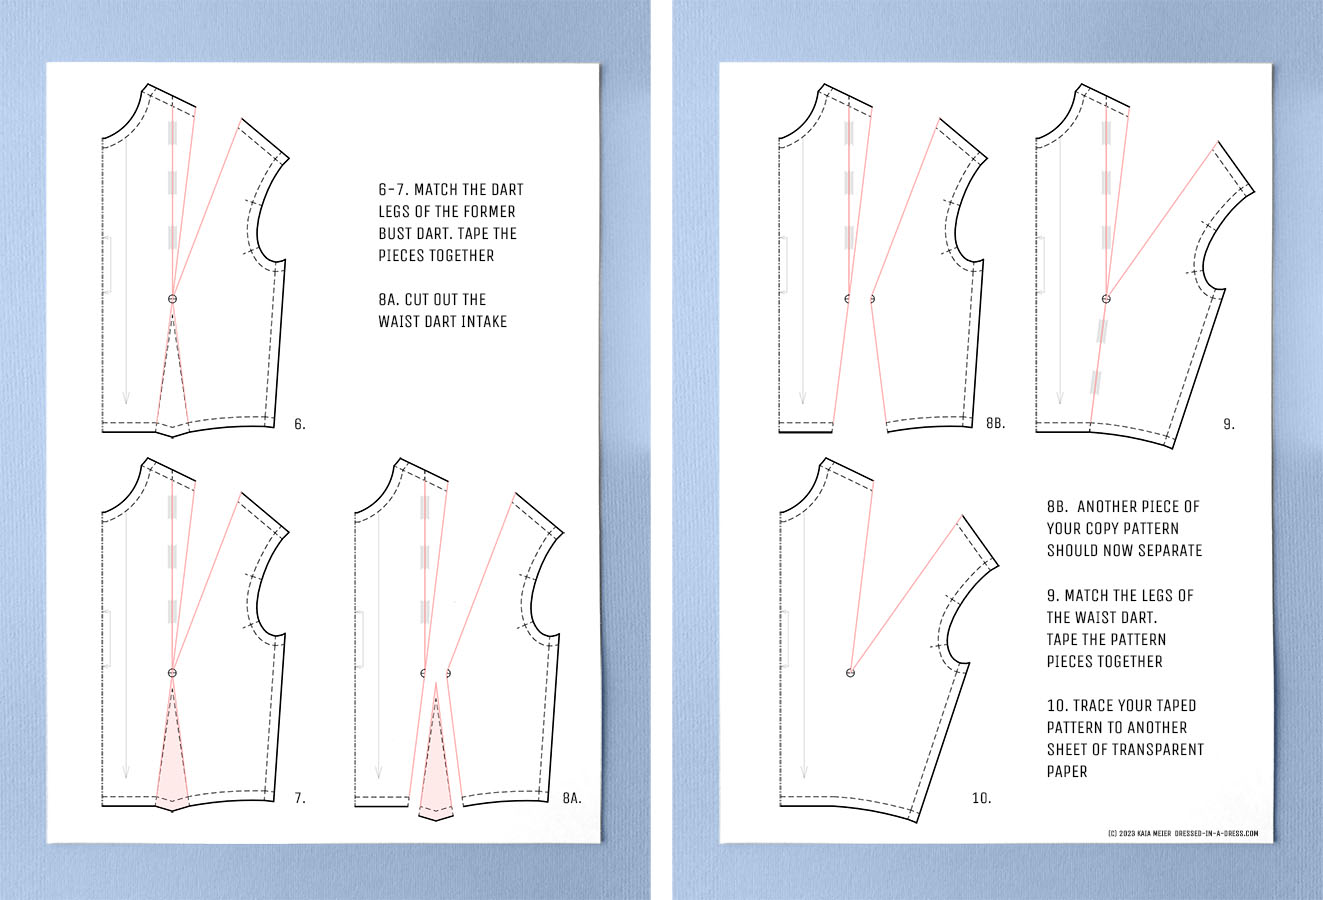
- Cut out the dart intake of the bust dart. A piece of your copy pattern should now separate.
- Match the dart legs of the former bust dart. The shoulder should form a straight line.
- Tape this piece to the pattern so that the former basic dart becomes closed. It will now finally disappear from its old place.
- Cut out the waist dart intake.
- Match the legs of the waist dart.
- Tape the pattern pieces together.
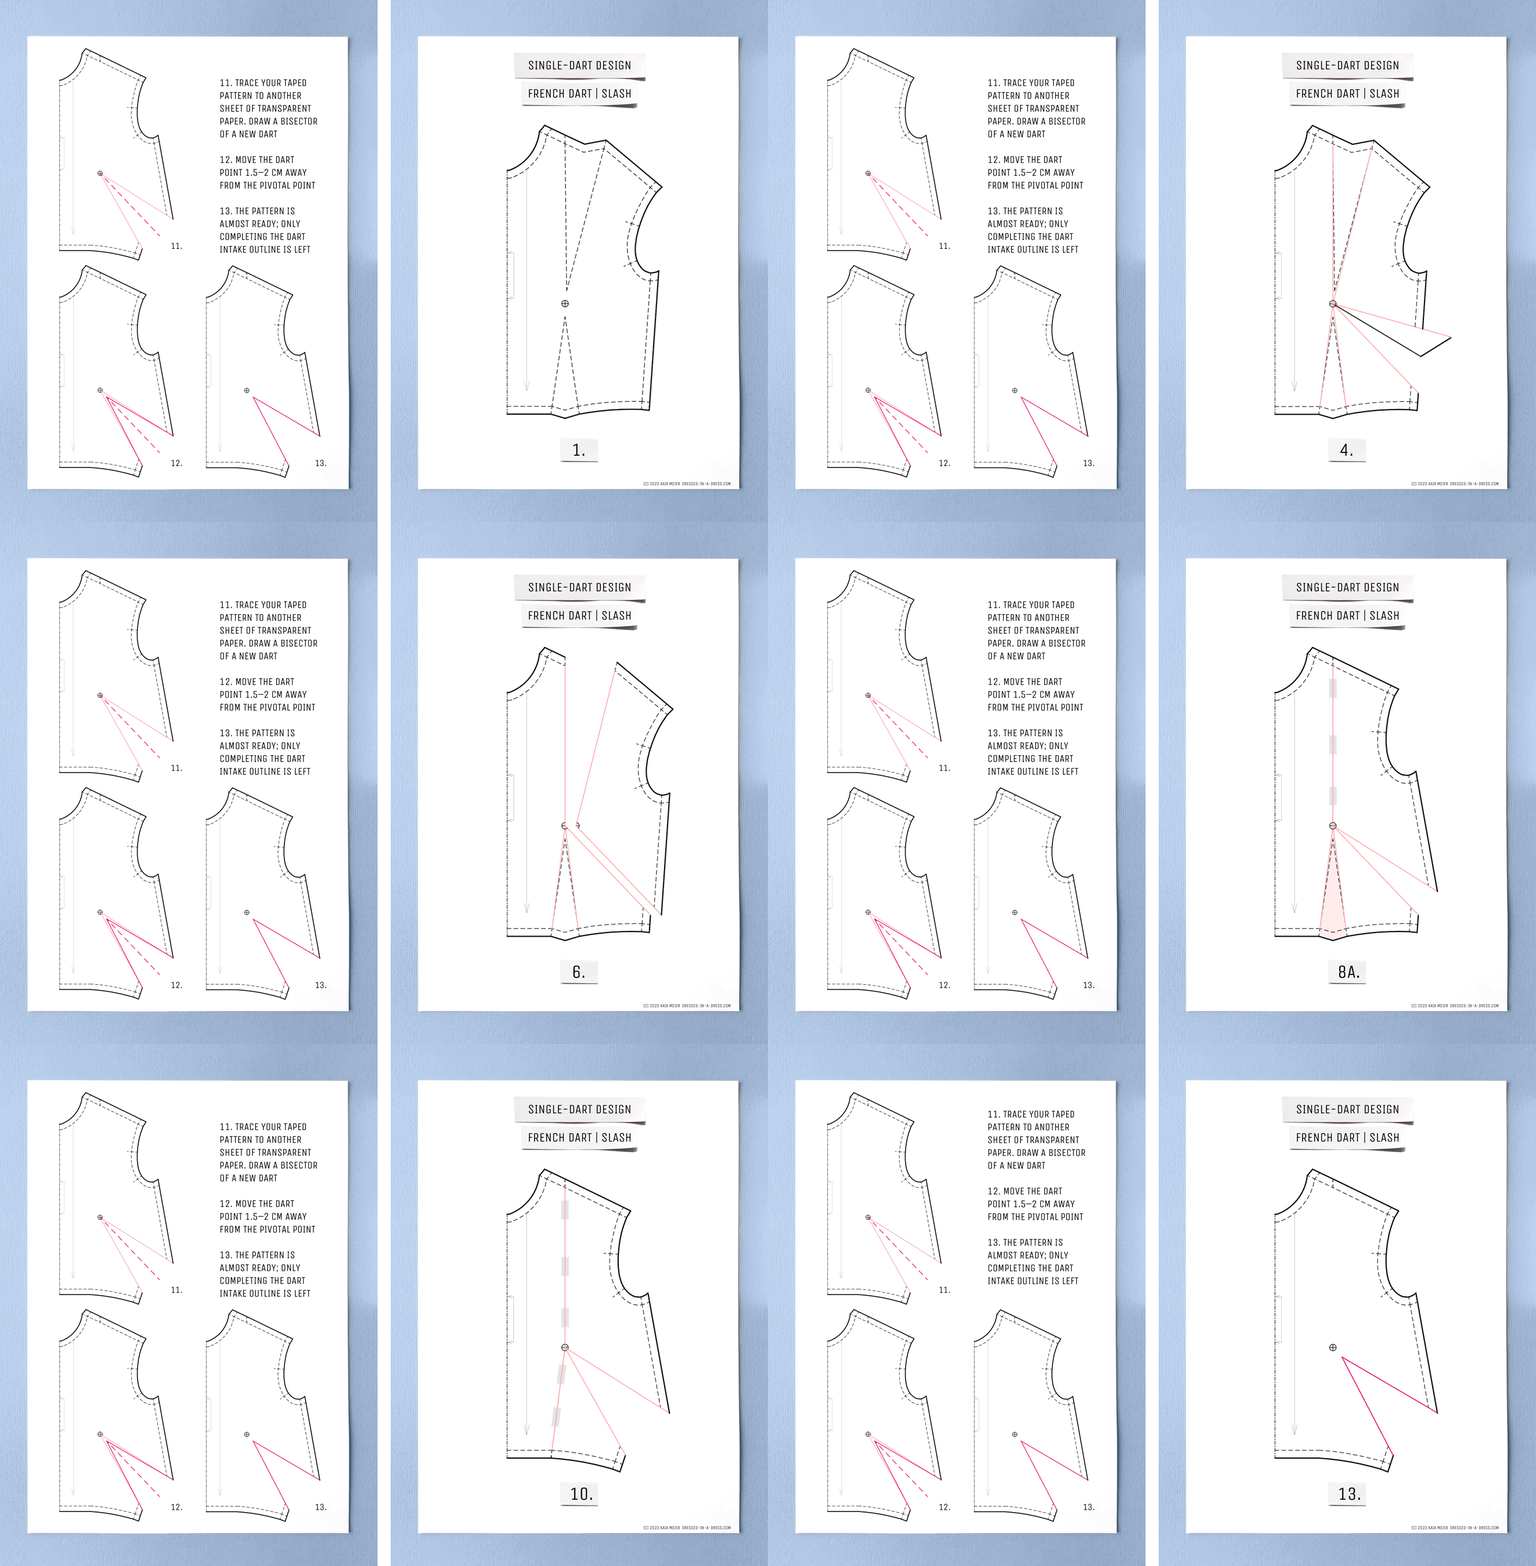
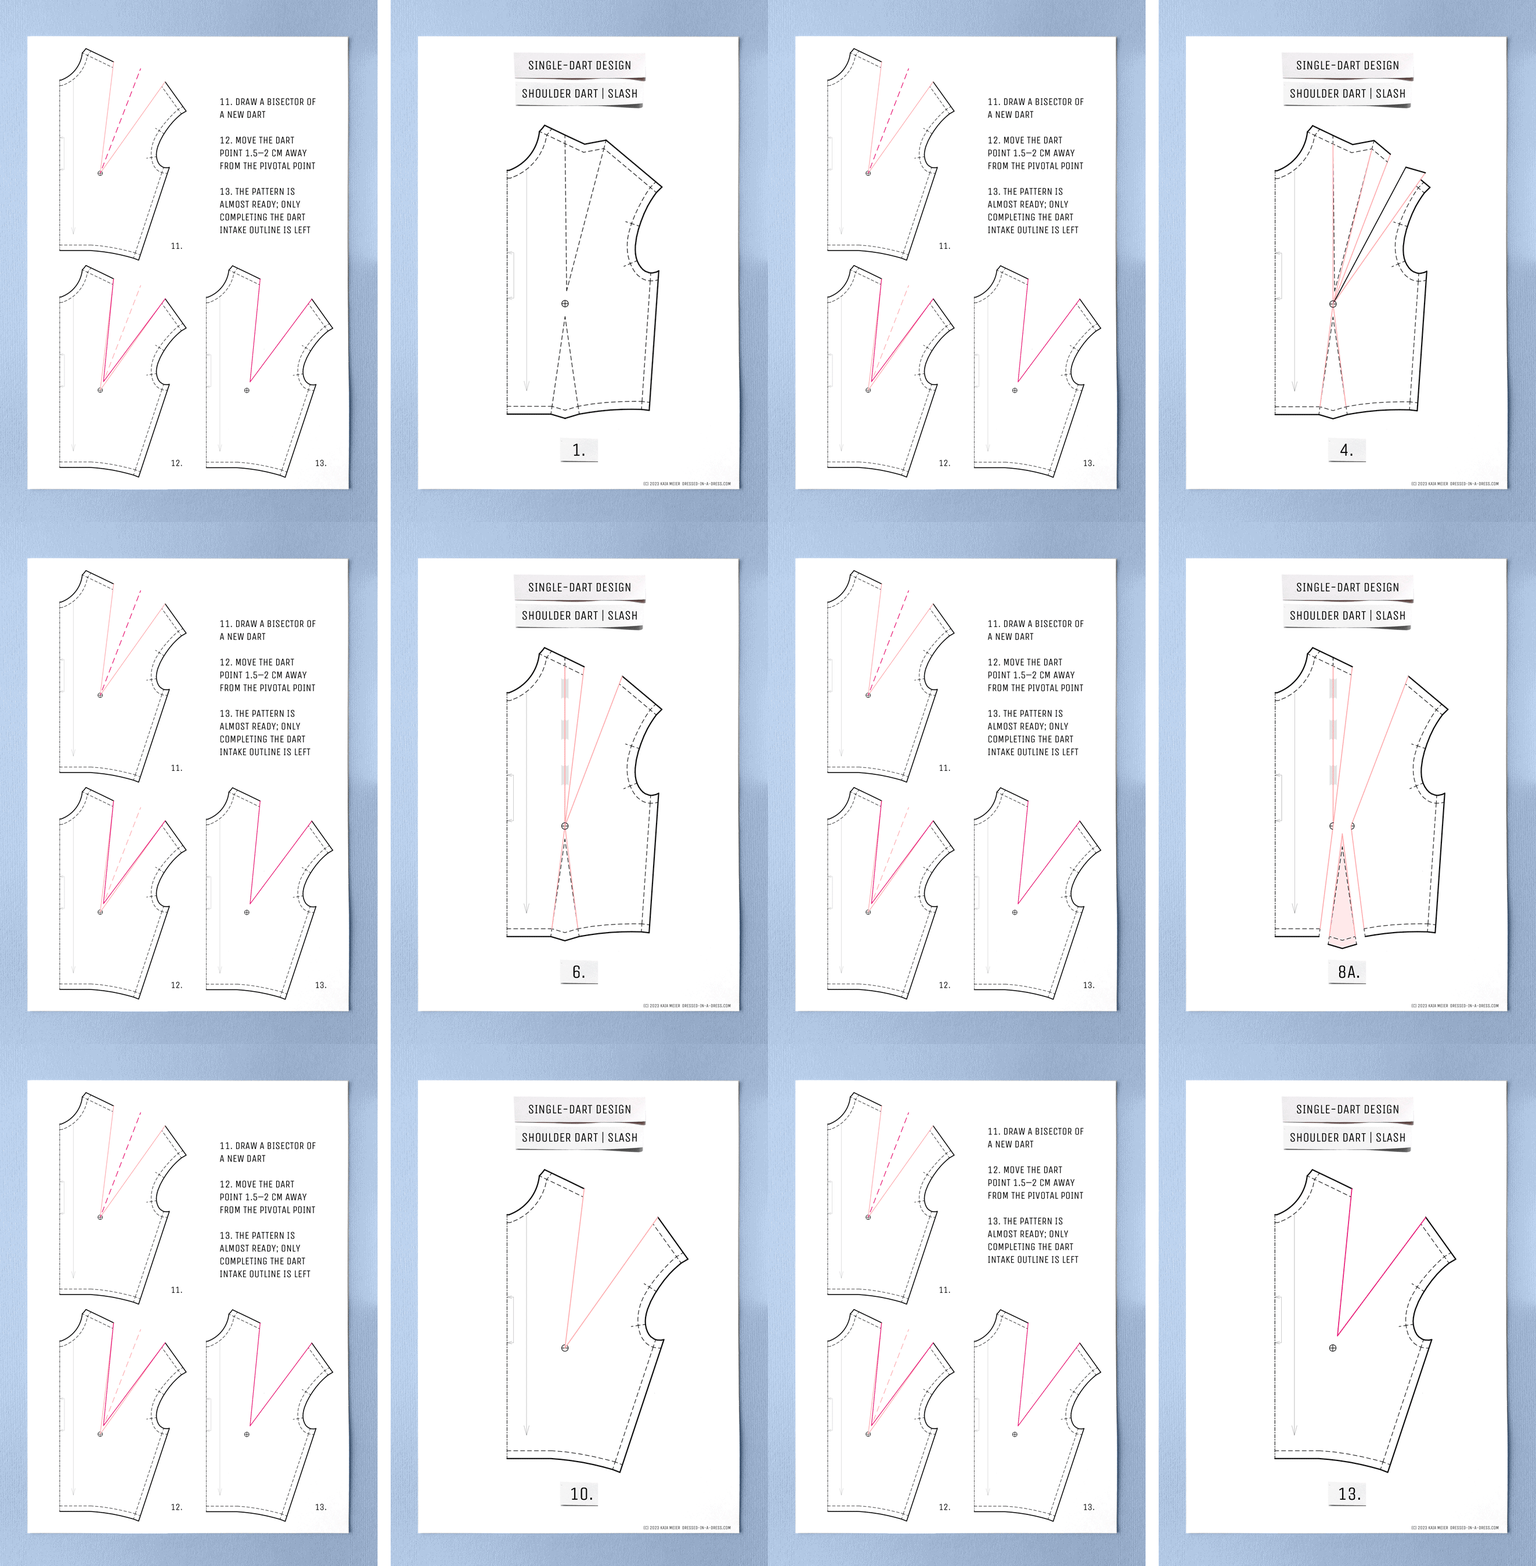
- Trace your taped pattern to another sheet of transparent paper. Don’t forget the notches. Draw a bisector of a new dart.
- Move the dart point 1.5–2 cm away from the pivotal point to avoid puckering when pressing the fabric piece. Sometimes the distance might be 3 cm for larger cup sizes, but one should define that during the fitting.
- The pattern is almost ready; one little thing left is completing the dart intake outline. But we’ll learn about it a bit later.
Waist Dart
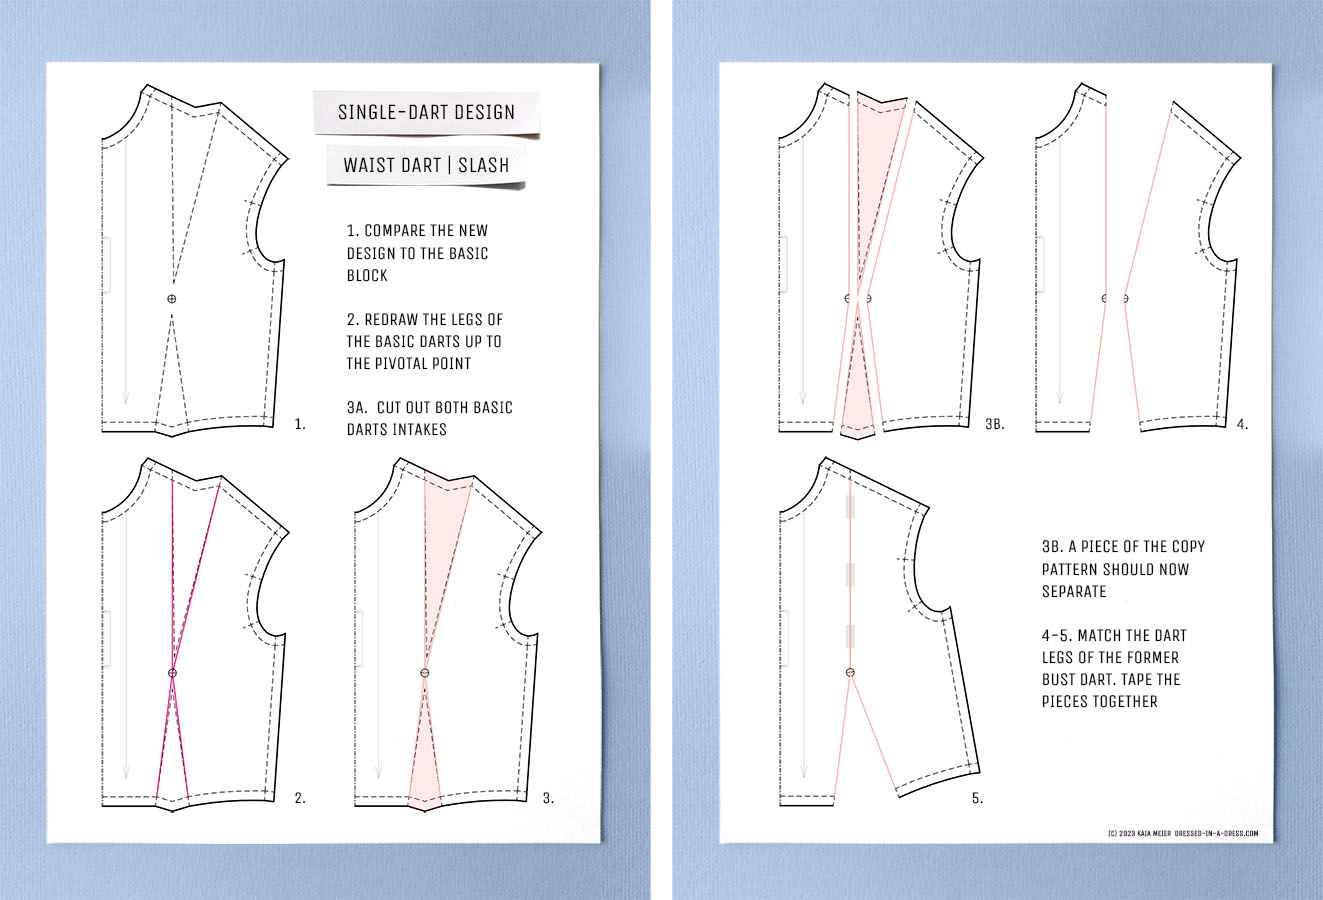
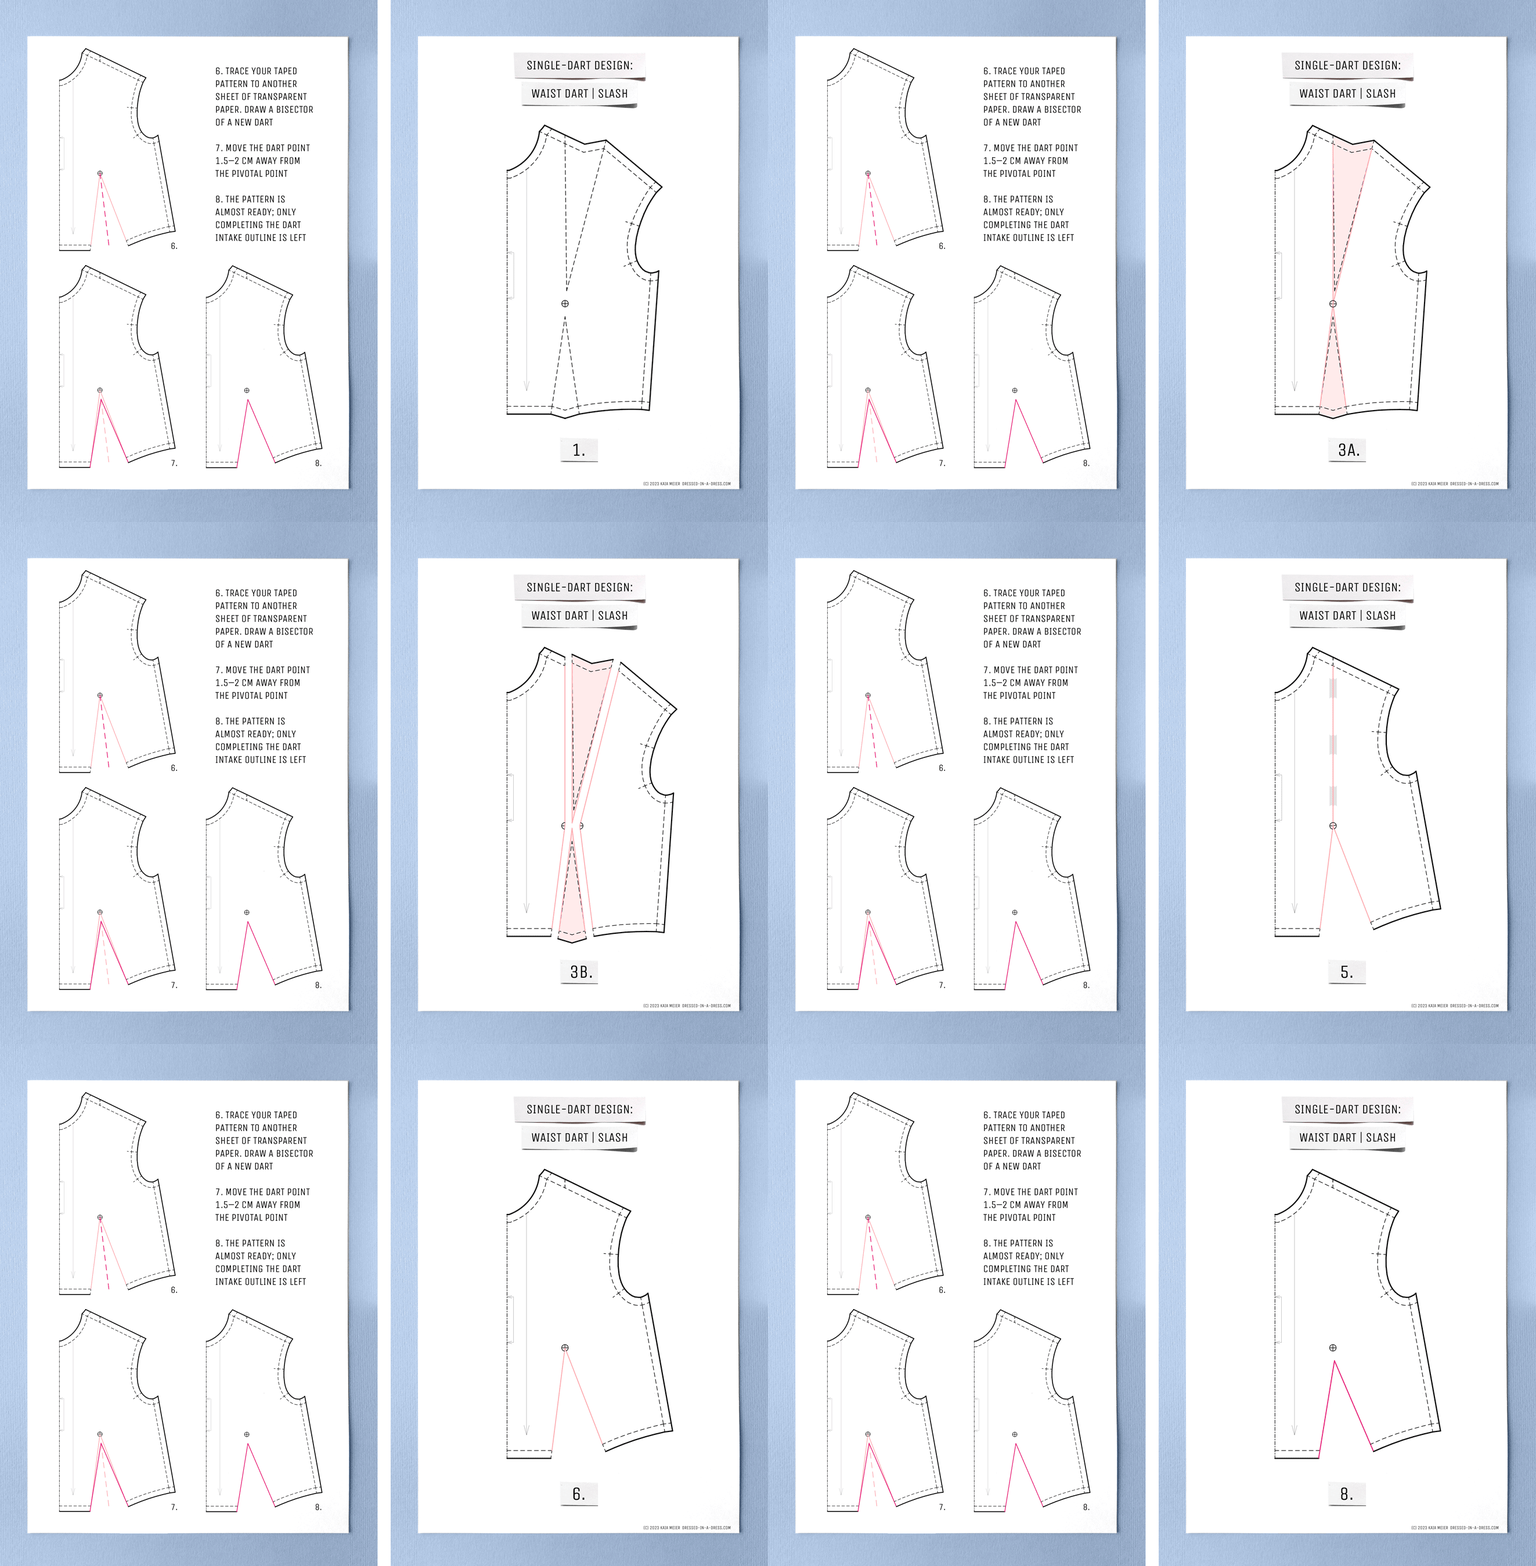
I’ll leave this manipulation and the following one without detailed instruction, as the process is almost identical to the one for the French dart.
In this case, cut out both dart intakes right in the beginning instead of cutting one at a time. Then tape the pattern along the top line and do all the other steps left.
Mid-Shoulder Dart
Here is a piece of advice to help you locate the dart:
To define the dart’s future location, measure the lengths of both shoulder pieces, add up the numbers and divide them in half. Step these cms away from the shoulder tip and draw the new dart line as shown.
Homework
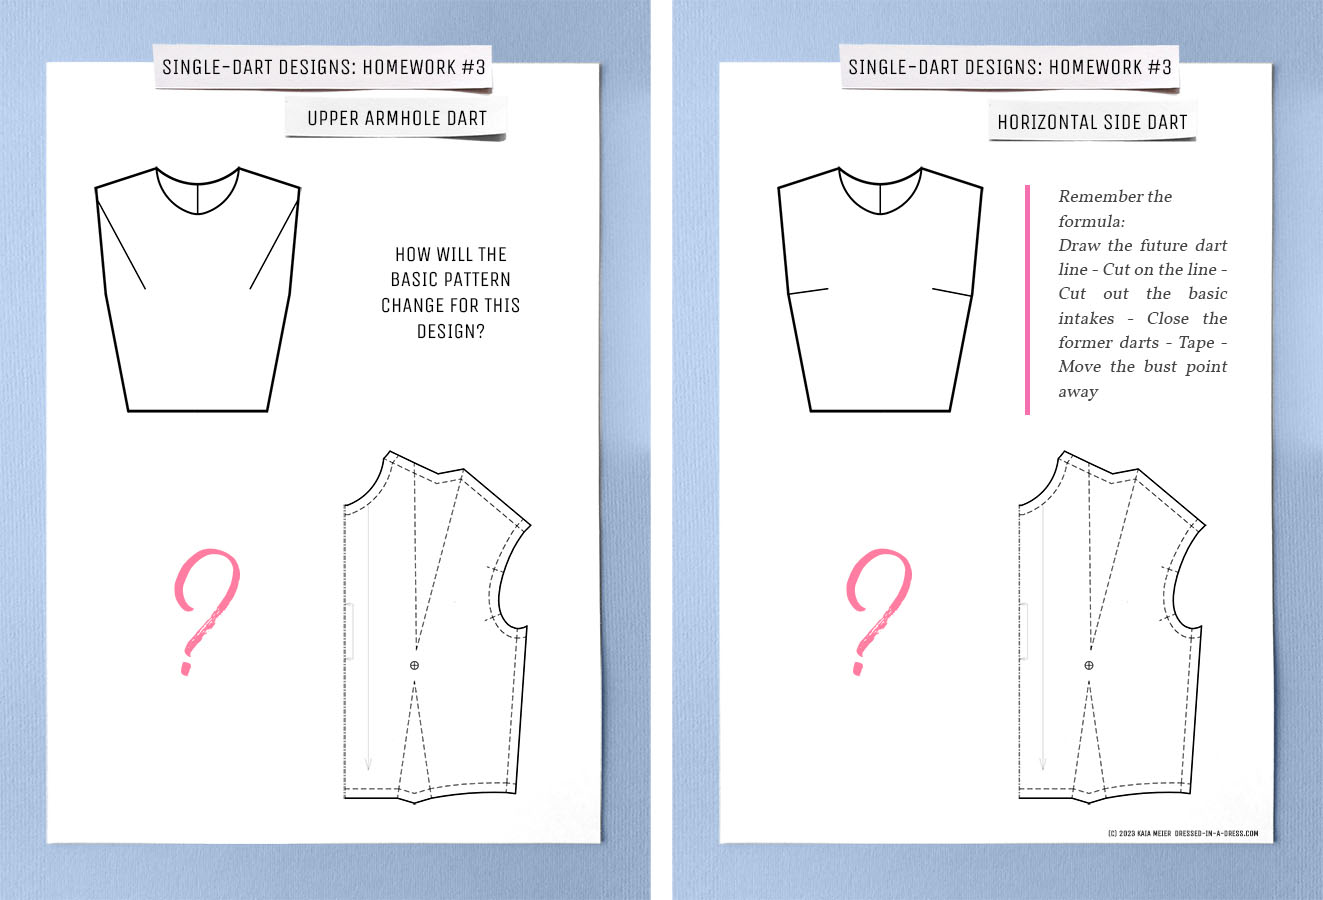
After working on a few designs, you’ll notice that the process of relocating and combining the darts remains consistent across patterns. Learning and remembering through doing is always the best way to ensure the knowledge stays with you for a long time.
And to give you a little more practice, I prepared this homework. You can make one design using the slash method and then work with the pivotal one to complete the second design. Or you can draw both patterns with both methods to level up the skills.
Please note that I emphasise the gap between dart points at the bust point. I do it so no one forgets about moving dart points away from the pivotal one. In real life, the dart point is only 1.5–2 cm away.
Share your results on Instagram with #dressedinadress and #patternmakingseries hashtags and tag me@_kaia_meier, so I can see how you are doing.
This post concludes the part in which we talk about the common manipulations on the front bodice, which, by all means, deserves that much attention and detail. That doesn’t mean the darts topic is closed. We still have the back bodice to discuss, and I’ll dedicate the following post to it. There might be fewer creative options, but they are worth mentioning.
See you soon,
xoxo
Kaia

 My Etsy Store