06. Common Dart Manipulations: Back Waist and Shoulder Darts
Category: Patternmaking Series 25 August 23
Diving deeper into pattern manipulation, we can now focus on the back bodice, where strategic dart placements can transform fit and design. If we think of a basic block dress, the back bodice may seem less inspiring than the front one, but the fact that we don’t see our backs every time we look in the mirror doesn’t mean that this back should be overlooked.
Regarding dart manipulations in the back, there might be fewer options than in the front piece, but there are still various design possibilities that will ensure a proper fit. They might be more functional than aesthetical, but it doesn’t diminish their significance. It’s the little details, the touches, that make the garment fit better, look chic and skillfully made.
In this post, we will learn how to work with both waist and shoulder darts at the back through theory and practice. A little upfront spoiler: unlike the front darts, you can not only relocate but eliminate the back darts in some designs without sacrificing the fit.
So, prepare your basic back block and let’s dive in.
Back Waist Darts
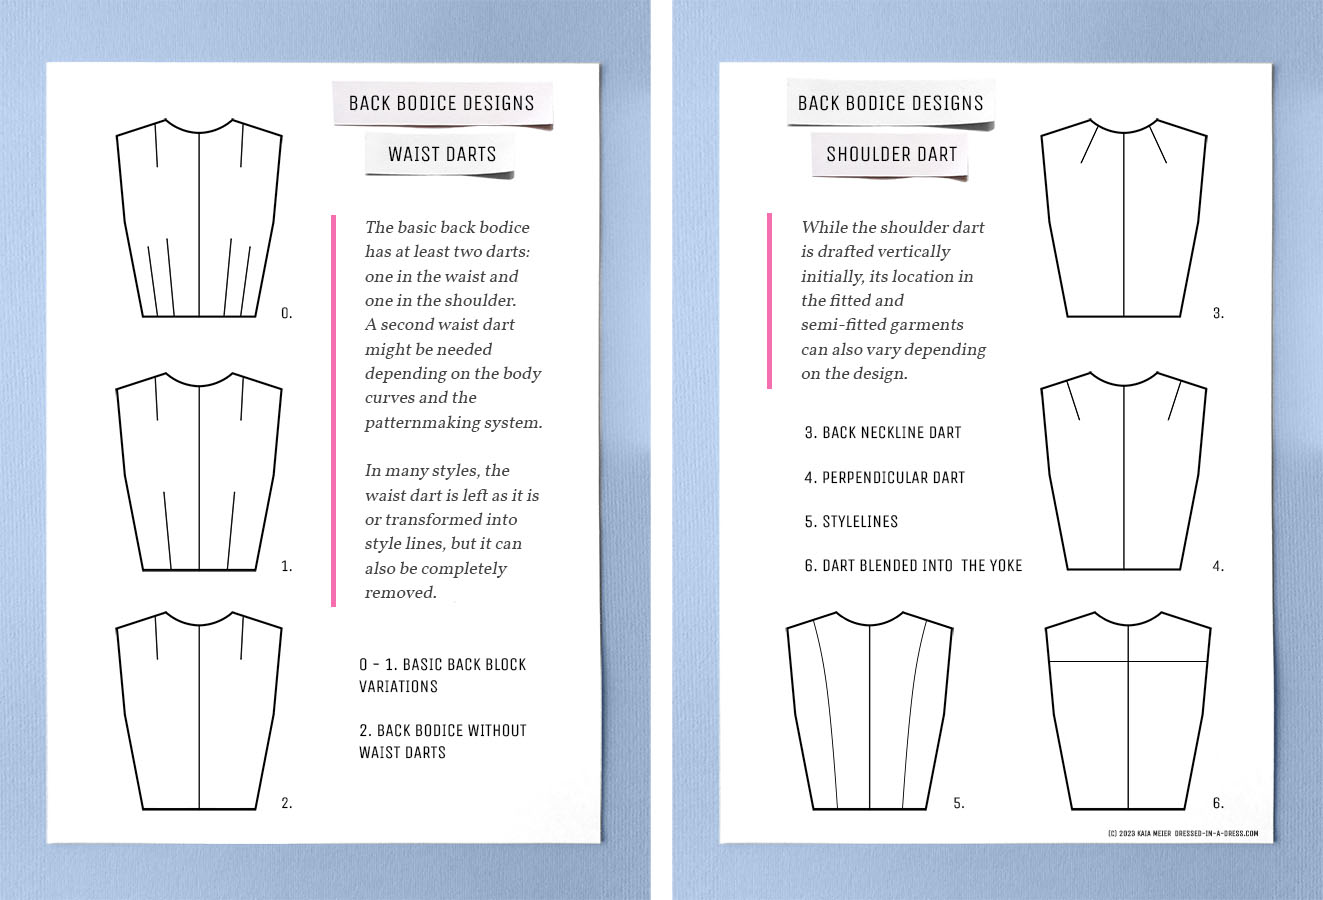
In the 02. Pattern Shapes and Flat Patternmaking post, we learned that the basic back bodice has at least two darts: one in the waist and one in the shoulder. A second waist dart might be needed depending on the body curves and patternmaking system.
In many styles, the waist dart is left as it is or transformed into style lines (princess seams, for ex.), but that is not the only possible manipulation.
Sometimes, additional seam lines bring too much visual clutter, especially for fabrics with a pattern, such as stripes, plaid, dots and flowers. To avoid distorting this beauty, which I am so fond of, I use two strategies:
- In the front bodice, I rotate the darts away from the waistline and to the side, making them less visible.
- In the back, however, I often opt for a design without darts. No worries, I don’t leave the darts unsewn; I remove them* with the help of the slash method. The lower part of the back is relatively flat, so removing the dart here will not compromise the fit.
*Ahead of the probable questions, I’ll note that even though the bust and shoulder darts can be removed in the fitted and semi-fitted designs, the process isn’t straightforward and will most likely hugely affect the fit, especially in the C-cup-plus sizes or in case of the prominent shoulder blades. That’s why eliminating bust and shoulder darts is mainly used in loose-fitting garments, not fitted and semi-fitted ones.
Removing the Back Waist Dart
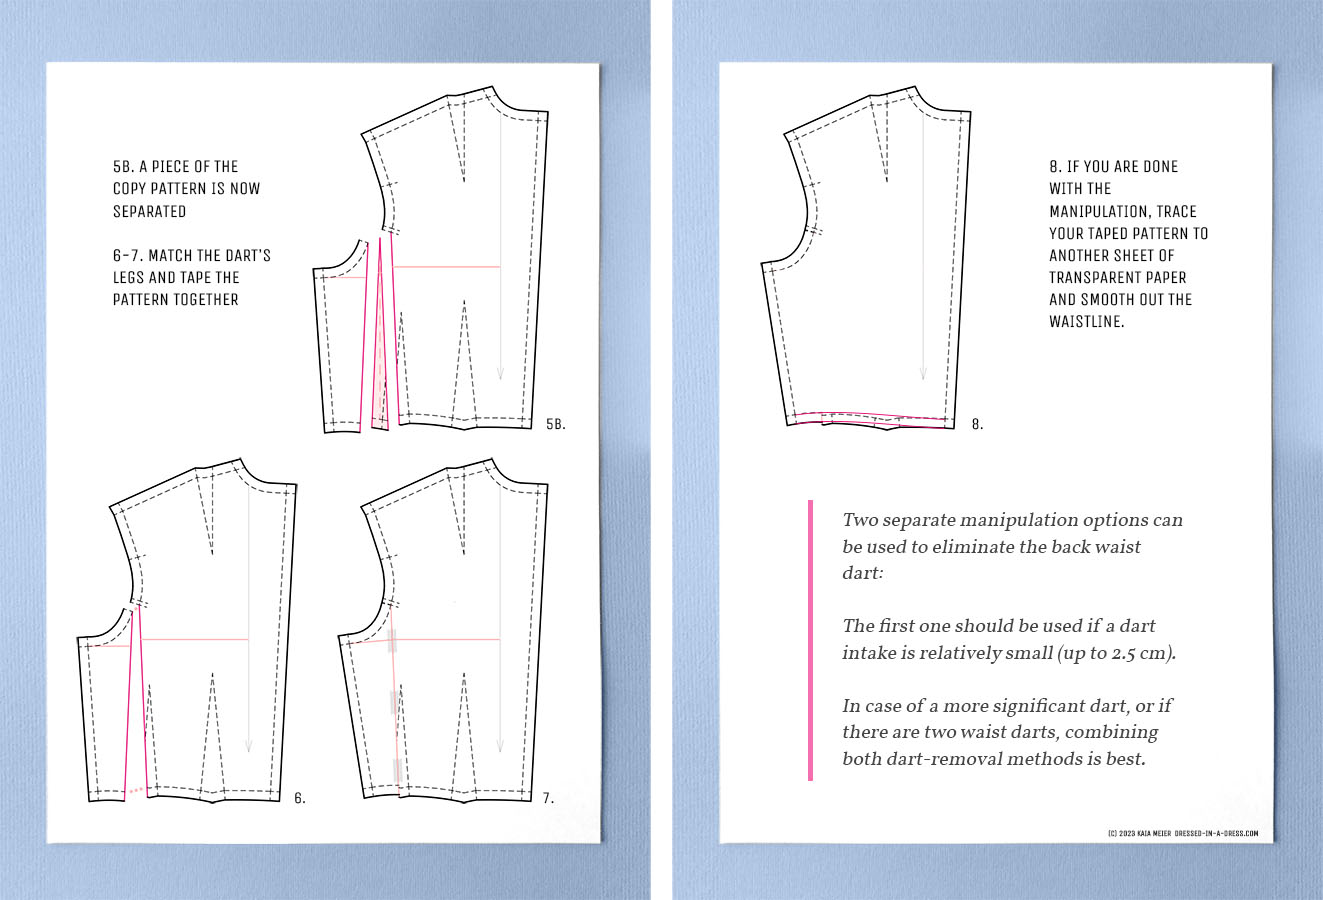
Two separate manipulation options can be used to eliminate the back waist dart. The first one should be used if a dart intake is relatively small (up to 2.5 cm). In case of a more significant dart, or if there are two waist darts, combining both dart-removal methods is best.
If the pattern has only one waist dart with a significant dart intake, it might be a good idea to take an extra step and divide it into two darts before attempting to remove it.
Hidden below the little pink arrow, you can find a mathematical example of how to do that.
The Calculations
Please, note that the numbers I chose do not match the actual darts in the basic block I provided. I just picked a random whole number for convenience.
- Measure the original dart intake. In the case of my example, it is 4 cm.
- Determine the new rough dart intakes by first dividing the original intake by two. 4 / 2 = 2.
- Adjust the final numbers for more balance in the back piece. Typically, the waist dart closer to the side is smaller than the other. So, for my bodice, I would like to have one dart of 1.6 cm and one of 2.4 cm instead of two darts of 2 cm in width. 1.6 + 2.4 = 4 cm.
- Reduce the existing dart to the more significant number you have calculated—2.4 cm and draw its new dart notches.
- Keep 1.6 cm in mind and move to the “Removing a Single (or the First) Back Waist Dart”.
To help with the dart removal process, I prepared illustrations and short descriptions to guide you through every step. If you’d like to read more detailed guidelines, click on the pink text marked with an arrow.
Removing a Single (or the First) Back Waist Dart
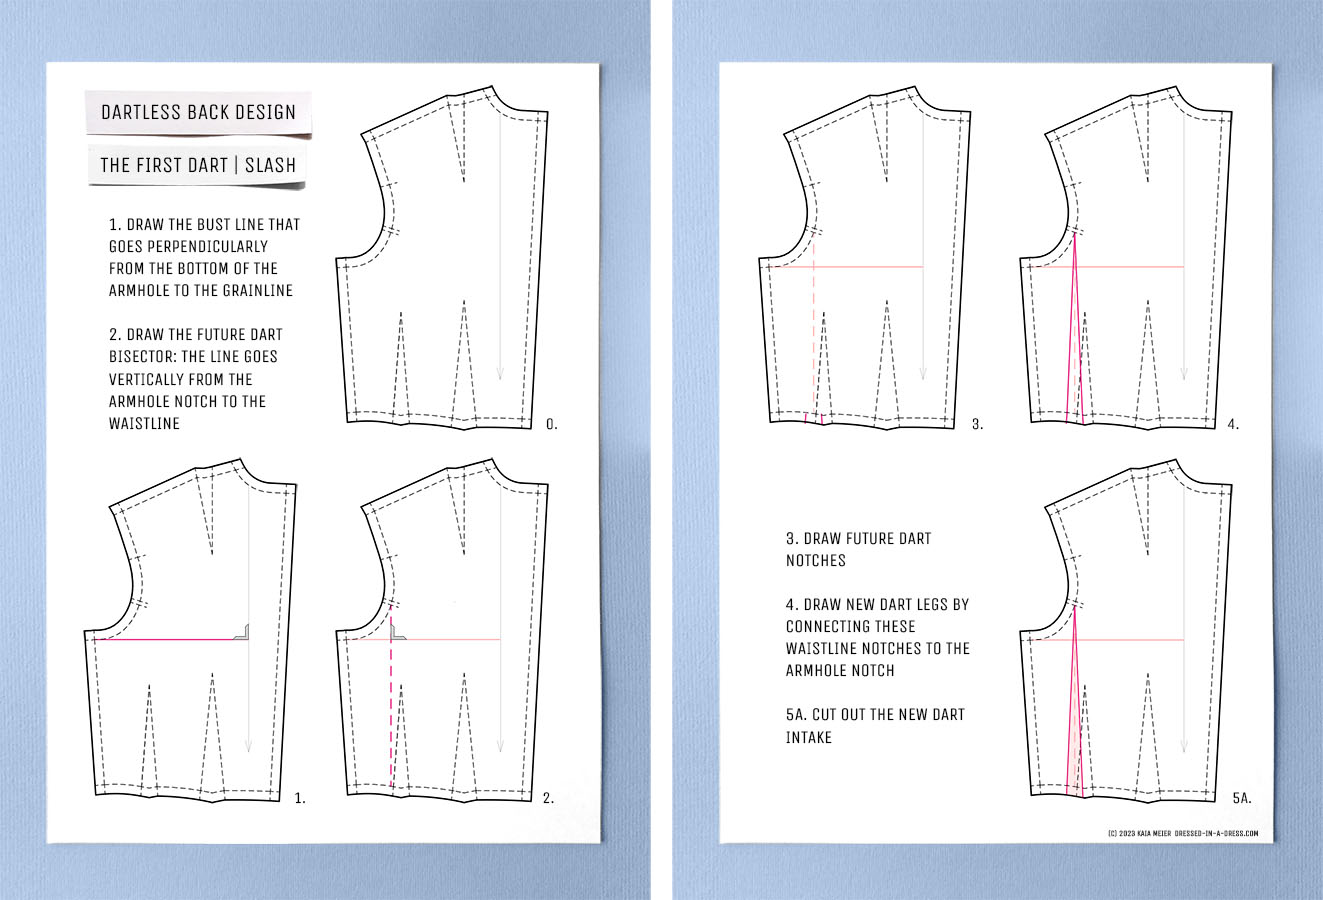
The basic dart is moved to the side to be positioned almost under the back armhole notch for construction purposes. Then it is closed with the help of the slash method. Once the manipulation is done, the dart’s new location will ensure the waistline is less distorted than it could be with the dart in its original place.
As you see in the illustrations below, my back bodice has two darts. If you have just one, ignore the right dart and follow the instructions applying the steps to your only dart.
Step-by-Step Guide
Draw the bust line that goes perpendicularly from the bottom of the armhole to the grainline.
Draw the future dart bisector: the line goes vertically from the armhole notch to the waistline. It is perpendicular to the bust line.
Draw future dart notches:
a. For the existing dart: Move the dart notches to the side so that the dart’s centre matches the new vertical bisector.
b. If you are splitting one big dart into two: divide the second dart intake that you already keep in mind by 2. Here’s my example: 1.6 / 2 = 0.8 cm. Draw new dart notches on the waist seamline, stepping these cms to the side from the vertical bisector.
Draw new dart legs by connecting these waistline notches to the armhole notch.
Cut out the new dart intake and snip at the armhole notch so that the pattern pieces become separated.
Match the dart’s legs.
Tape the pattern together. If you are planning to remove another dart, stop here.
If you are done with the manipulation, trace your taped pattern to another sheet of transparent paper and smooth out the waistline.
REMOVING THE SECOND BACK WAIST DART (IF APPLIES)
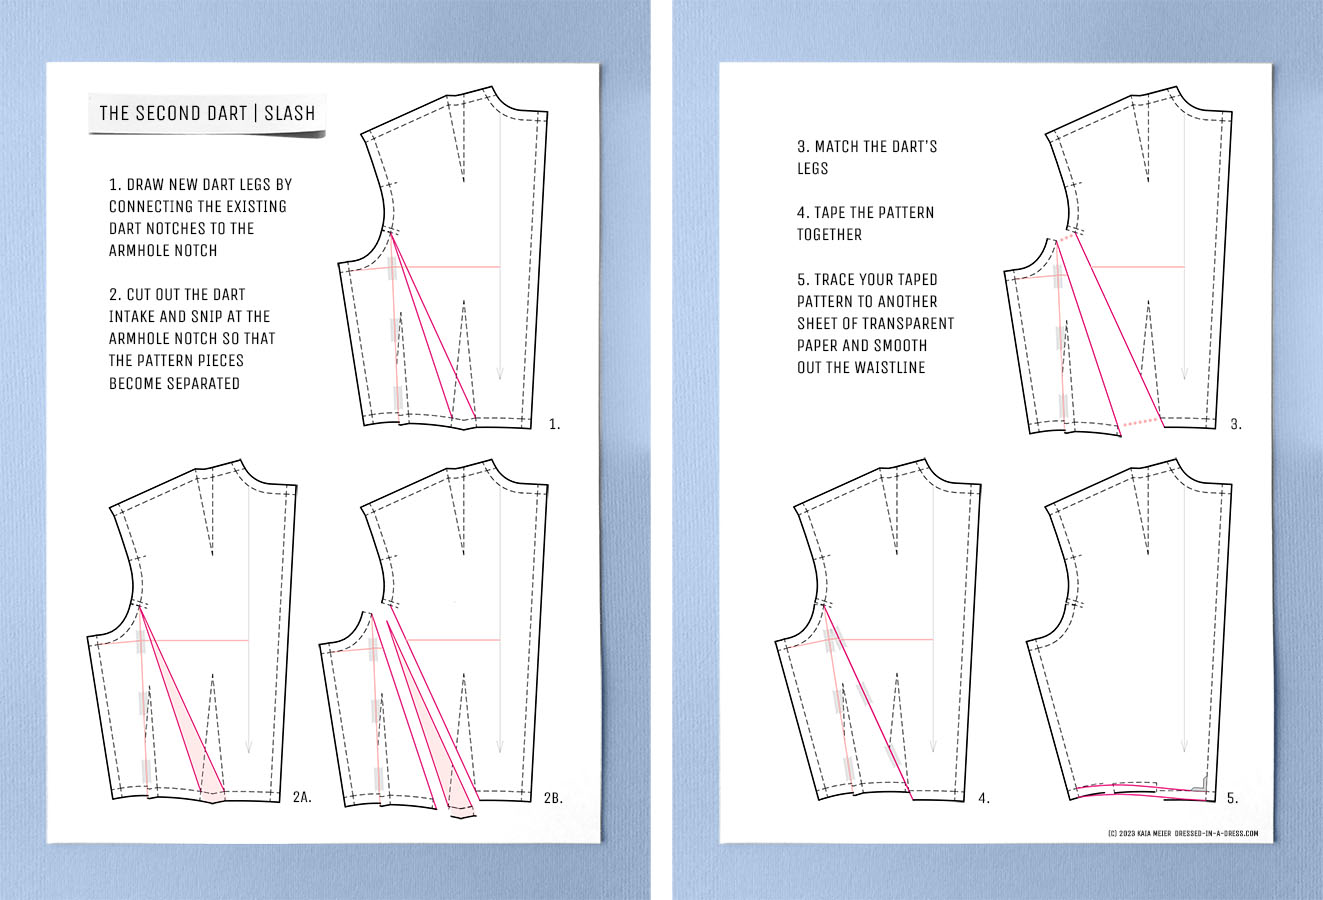
In this scenario, the dart remains in its original place and is also eliminated by slashing and taping the pattern. Unfortunately, the initial location of a dart will lead to a more pronounced deformation of the waistline once the dart is removed. Using this option as an addition to the first one is best.
Step-by-Step Guide
- Draw new dart legs by connecting the existing dart notches to the armhole notch.
- Cut out the dart intake and snip at the armhole notch so that the pattern pieces become separated.
- Match the dart’s legs.
- Tape the pattern together.
- Trace your taped pattern to another sheet of transparent paper and smooth out the waistline.
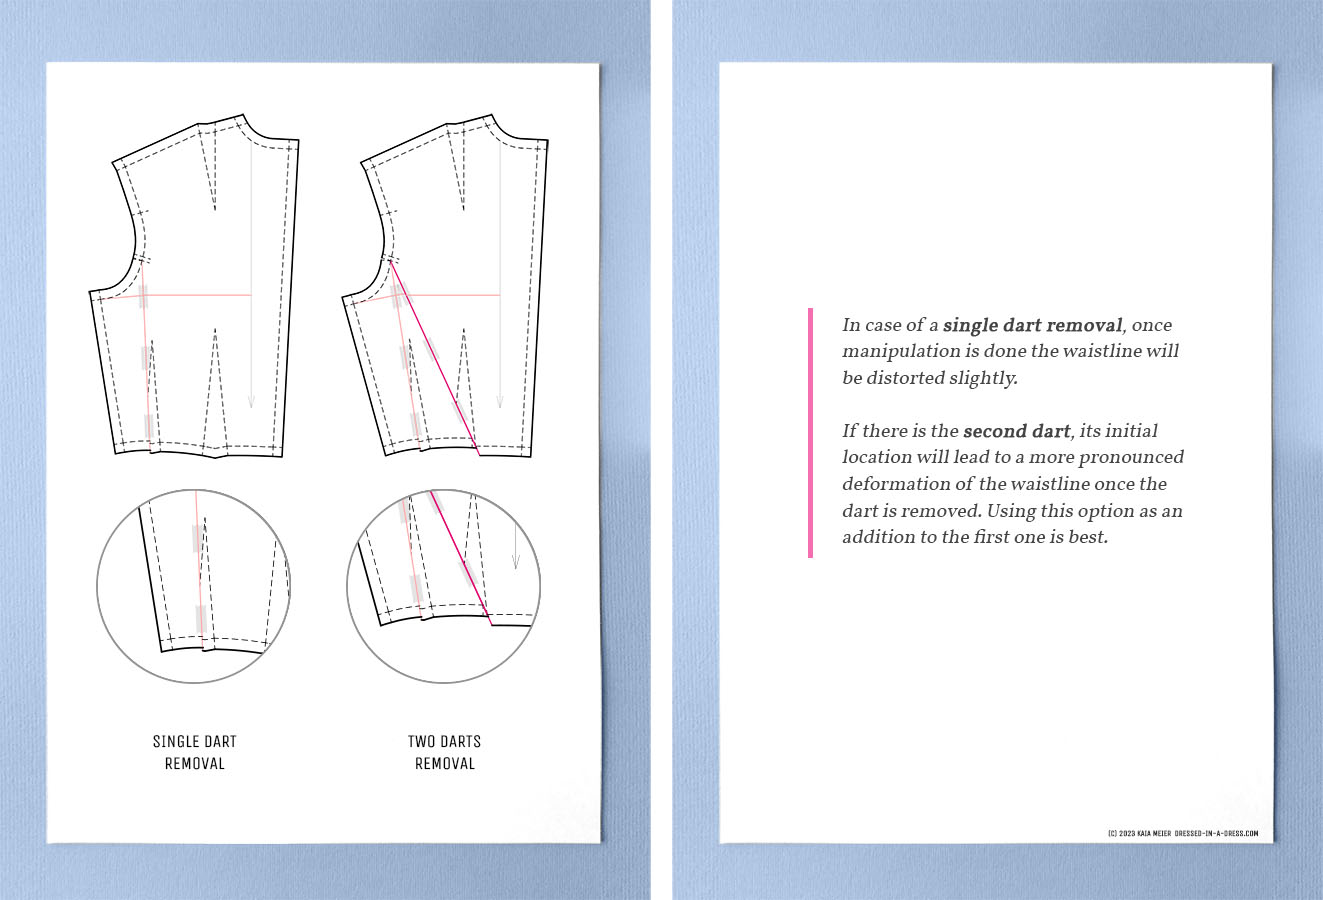
In case of a single dart removal, once manipulation is done the waistline will be distorted slightly. If there is the second dart, its initial location will lead to a more pronounced deformation of the waistline once the dart is removed. Using this option as an addition to the first one is best.
The Shoulder Dart
Even though it is relatively small and sometimes inconspicuous, the shoulder dart plays a significant role in properly fitting garments in the upper back area.
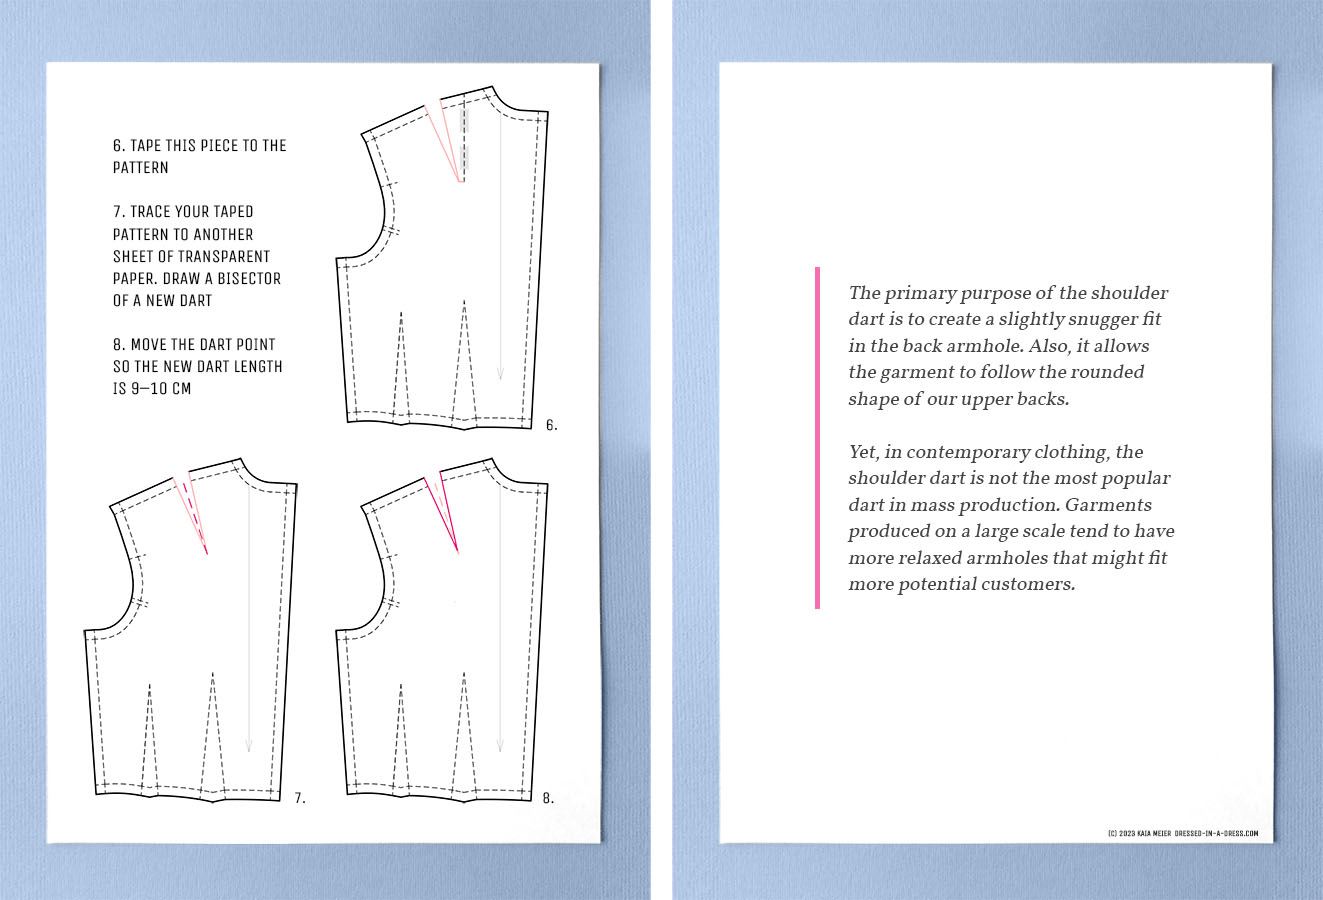
The primary purpose of the shoulder dart is to create a slightly snugger fit in the back armhole. Also, it allows the garment to follow the rounded shape of our upper backs.
Yet, in contemporary clothing, the shoulder dart is often overlooked because no matter how much it benefits the fit in the shoulder area, it is not the most popular dart in mass production. Garments produced on a large scale tend to have more relaxed armholes that might fit more potential customers. Another reason is that each company’s fit models might have straighter backs than most women, so they might not need this dart.
Something to remember: the rounder the upper back—the bigger the dart. And vice versa.
Usually, this dart is placed close to the middle of the shoulder, with its point aimed at the shoulder blade. It’s hard to say there is an average dart width for everyone as it depends on the one’s body and the patternmaking system used, but here are some approximate numbers:
- Standard upper back: 1.5–2 cm;
- Straight upper back: 1.5 cm and less;
- Round upper back: 2.5 cm and more.
The standard length of the dart is around 9–10 cm, but it can also be slightly shorter in the case of a straight back and a narrow dart.
While drafting the basic block, starting with a more or less standard dart width is a good idea. Then you can make a test garment and see if the dart may need to be adjusted to enhance the fit in the shoulder and neckline area.
Shoulder Dart Manipulation
While the shoulder dart is drafted vertically initially, its location in the fitted and semi-fitted garments can also vary depending on the design. Here are the options:
- Back neckline dart. Placing the shoulder dart at the back neckline is a design feature and works exceptionally well for backs with spine curvature. By positioning the dart in this manner, you can achieve a more tailored fit in the upper back area, ensuring the fabric contours smoothly along the spine’s natural curves. This placement option provides functional and aesthetic advantages, creating a comfortable and visually appealing garment.
- Dart perpendicular to the shoulder seam. This precise dart placement ensures the back armhole fits snugly and avoids any sagging or excess fabric. By following the rounded shape of the upper back, this dart placement contributes to improved comfort and enhances the overall silhouette of the garment.
- Transforming shoulder dart and waist into style lines. Another option is to transform the shoulder and waist darts into style lines. This approach creates distinctive design details and visual interest in the garment. By incorporating these style lines, you can eliminate the need for traditional darts while maintaining the desired fit. This technique offers versatility in design and allows for possible fit alterations.
- Blending shoulder dart into the back yoke. By merging the back shoulder dart into the yoke seam, one can achieve a seamless transition and eliminate disruptions in the fabric’s pattern. This technique ensures a precise fit in the upper back area and leaves enough room for possible alterations. Blending the shoulder dart into the back yoke adds a sophisticated touch to the design, resulting in a visually appealing and well-constructed garment.
By exploring different shoulder dart placement options, such as blending it into the back yoke, you can tailor the fit and design of your garments to meet specific requirements while incorporating unique elements that elevate the overall aesthetic. Consider these variations based on your sewing project and desired outcomes. Now, let’s delve into the practical implementation of these options.
In the following examples, we will focus on the first two options and utilise the slash method to relocate the dart. Prepare enough copies of the basic block, as we will cut into them for these demonstrations.
A tiny side note: the back block doesn’t have pivotal points, unlike the front with its bust dart. These points exist in the initial bodice draft but are only sometimes transferred to the finished basic block. But worry not; we can do without them and work with the dart point instead.
Back Neckline Dart
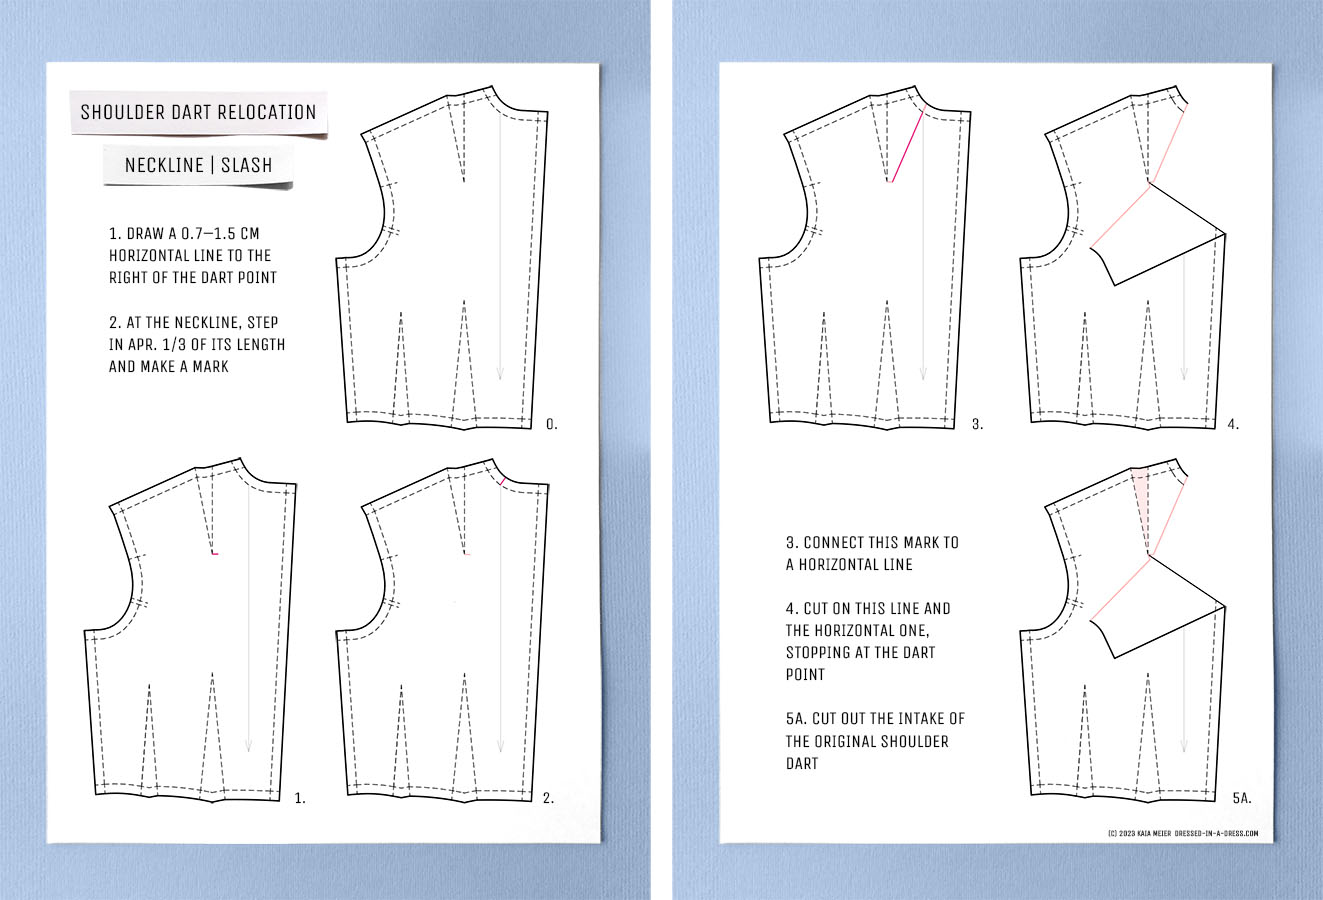
Step-by-Step Guide
- Draw a 0.7–1.5 cm horizontal line to the right of the dart point. The wider the shoulder, the bigger the number. This little line will help us cut the pattern.
- At the neckline, step in apr. ⅓ of its length and make a mark.
- Connect this mark to a horizontal line as shown. This line represents your future dart.
- Cut on this line and the horizontal one, stopping at the dart point.
- Cut out the intake of the original shoulder dart. A piece of your copy pattern should now separate.
A note: in images “4” and “5a”, the pattern section is folded aside to demonstrate that the pieces were cut apart.
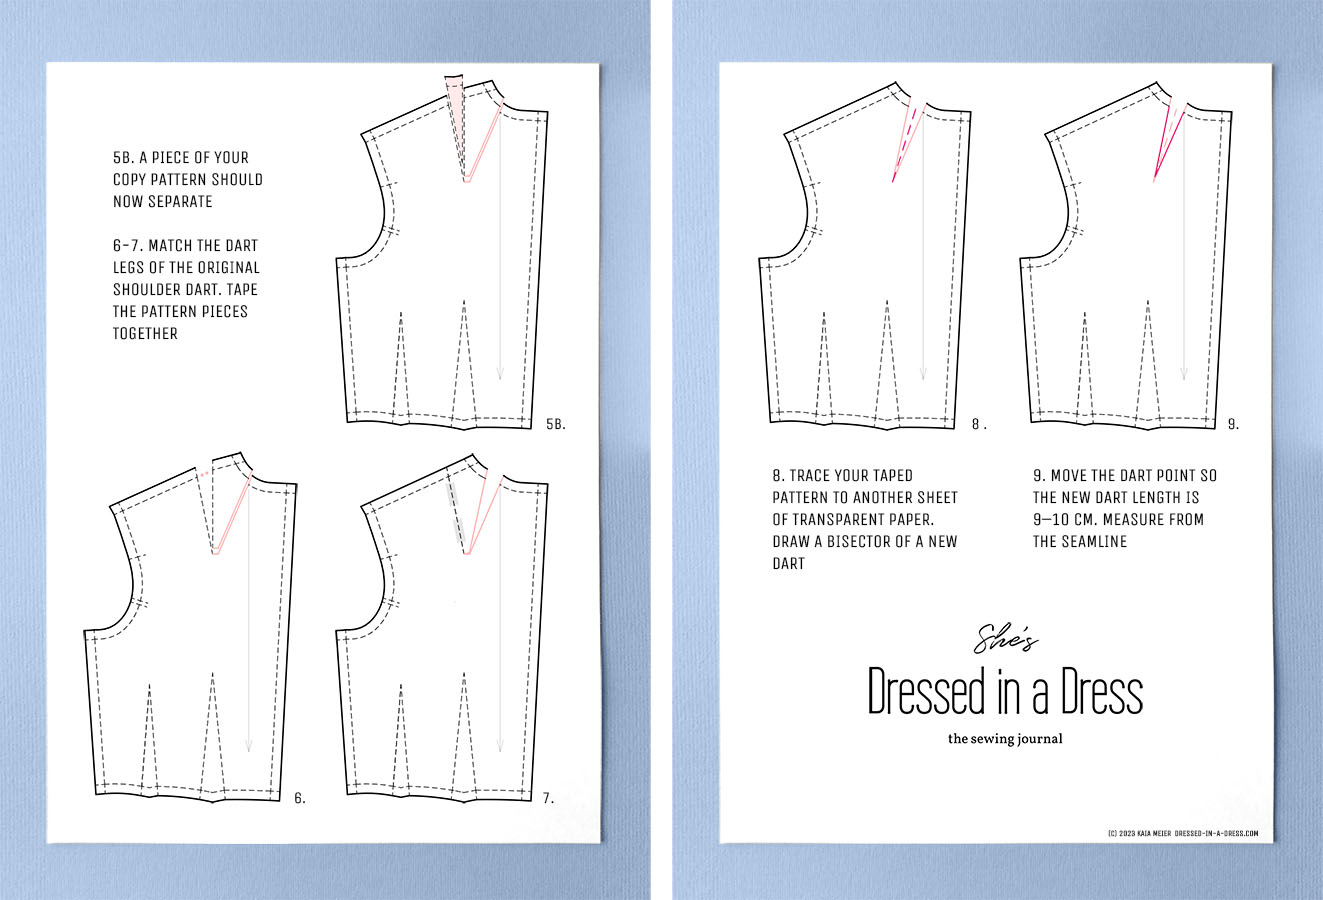
- Match the dart legs of the original shoulder dart. The shoulder should form a straight line. There will be a little gap and overlap at the original dart point, but don’t worry about it.
- Tape the pattern pieces together so that the former basic dart becomes closed. It will now finally disappear in its old place.
- Trace your taped pattern to another sheet of transparent paper. Don’t forget the notches. Draw a bisector of a new dart.
- Move the dart point so the new dart length is 9–10 cm. Measure from the seamline.
- The pattern is almost ready; we’ll complete the dart intake later.
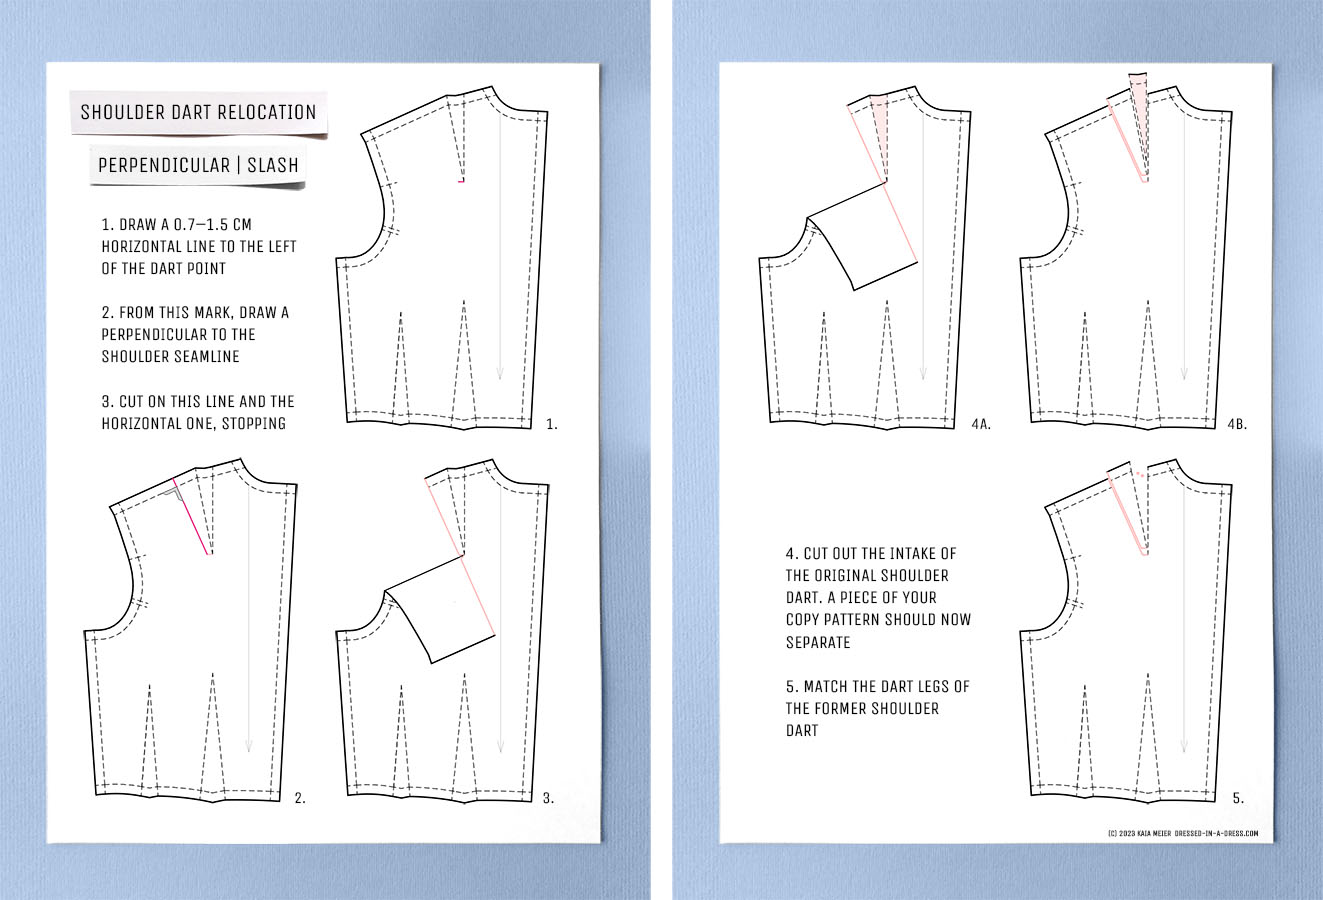
Dart perpendicular to the shoulder line
The manipulation process is similar to the one described above.
Step-by-Step Guide
- Draw a 0.7–1.5 cm horizontal line to the left of the dart point. The wider the shoulder, the bigger the number. This little line will help us cut the pattern.
- From this mark, draw a perpendicular to the shoulder seamline. This line represents your future dart.
- Cut on this line and the horizontal one, stopping at the dart point.
A note: in images “3” and “4a”, the pattern section is folded aside to demonstrate that the pieces were cut apart.
- Cut out the intake of the original shoulder dart. A piece of your copy pattern should now separate.
- Match the dart legs of the former shoulder dart. The shoulder should form a straight line. There will be a little gap and overlap at the former dart point, but don’t worry about it.
- Tape this piece to the pattern so that the former basic dart becomes closed. It will now finally disappear in its old place.
- Trace your taped pattern to another sheet of transparent paper. Don’t forget the notches. Draw a bisector of a new dart.
- Move the dart point so the new dart length is 9–10 cm.
- The pattern is almost ready; we’ll complete the dart intake later.
And now, this post can officially be the wrap-up of the Common Dart Manipulation part. But fear not; we still have a couple of topics to discuss so that you can finalise your altered patterns. In the following posts, among other things, we’ll learn how to complete the dart intake, check pattern edges and choose seam allowances.
In the meantime, if you’d like to refresh the memories and take a look at previous posts, here is the list of the topics we’ve covered so far:
- Patternmaking Series: Introduction
- 01. The Block Patterns
- 02. Pattern Shapes and Flat Patternmaking
- 03. Common Dart Manipulations: Two-Dart Designs. Slash Method
- 04. Common Dart Manipulations: Two-Dart Designs. Pivotal Method
- 05. Common Dart Manipulations: Single-Dart Designs
For now, continue practising with your patterns. The theory is great, but practice is the fastest way to master the skill. Don’t be afraid to experiment and explore different variations; you’ll be on your way to becoming a skilled patternmaker.
See you,
xoxo
Kaia
