Lace & Embroidered Fabric. Part 2. Techniques for Sewing
Category: Fabrics 23 September 19

There are no certain rules for every exact lace because everything depends on the tread type, the background and overall quality, but there are some common guides for all laces.
Pattern choice
When choosing the pattern and design let the fabric determine what it’ll be like. Don’t pull and force it or cut it into multiple pattern pieces, that can destroy the motifs. Let the fabric show its beauty.
For laconiс fitted silhouettes use heavy laces like Alencon and Cluny. Lightweight ones, such as Chantilly, will be perfect in full skirts and sleeves or ruffles.
Technically, lace has no grainline, so you can cut it lengthwise or crosswise, depending on the design.
When working with galloon lace I cut it crosswise and place one scalloped edge at the hem and the other one on the sleeve, the bodice goes right between them.
Once you chose the design, make a toile, because after the lace is cut there is little margin for fitting and changes. And it is much easier to baste and fit the muslin than lace.
Fabric Preparation
Since most laces are delicate, they require dry-cleaning and don’t need any heavy pre-shrinkage. But if the lace is washable and I combine it with other fabrics that are also washable, I preshrink the lace with a steam-iron or dump it in cold water and let dry.
In my wedding dress I’m using an embroidered lace with cotton lining. The last one is lightweight and looks like it has copper coating. I’m still considering if I can wash the dress or not (NOT, I think, but I hate the smell after dry cleaning so much..).
The lace garments don’t need facings or interfacings, but if you want to add body and strength to the fabric, you may use tulle netting as underlining.
Lining can also work this way – it will perfectly hide the inner construction of the garment.
Cutting
Before making the pattern layout I cover my table with contrasting cloth, unfold the lace and study the lace design. I place the most noticeable motifs on the CF and CB and centre of the sleeve cap, if possible.
Scalloped borders run on the hem and the sleeve – though in this situation the fabric’s width determines the length of these two. Depending on the lace design, borders can be trimmed from fabric and sewn to the garment as a decorative edging, so the skirt and sleeves can become longer.
If you are working with the lace like mine, here is a helpful list for a better and fasted cutting:
- Draw full pattern pieces on transparent paper, so the motifs will be visible when you make a layout. For paired details, like sleeves, cut left and right ones. Start with bigger pieces, place the patterns on the fabric, balance the motifs and fix it in place with long pins or weights.
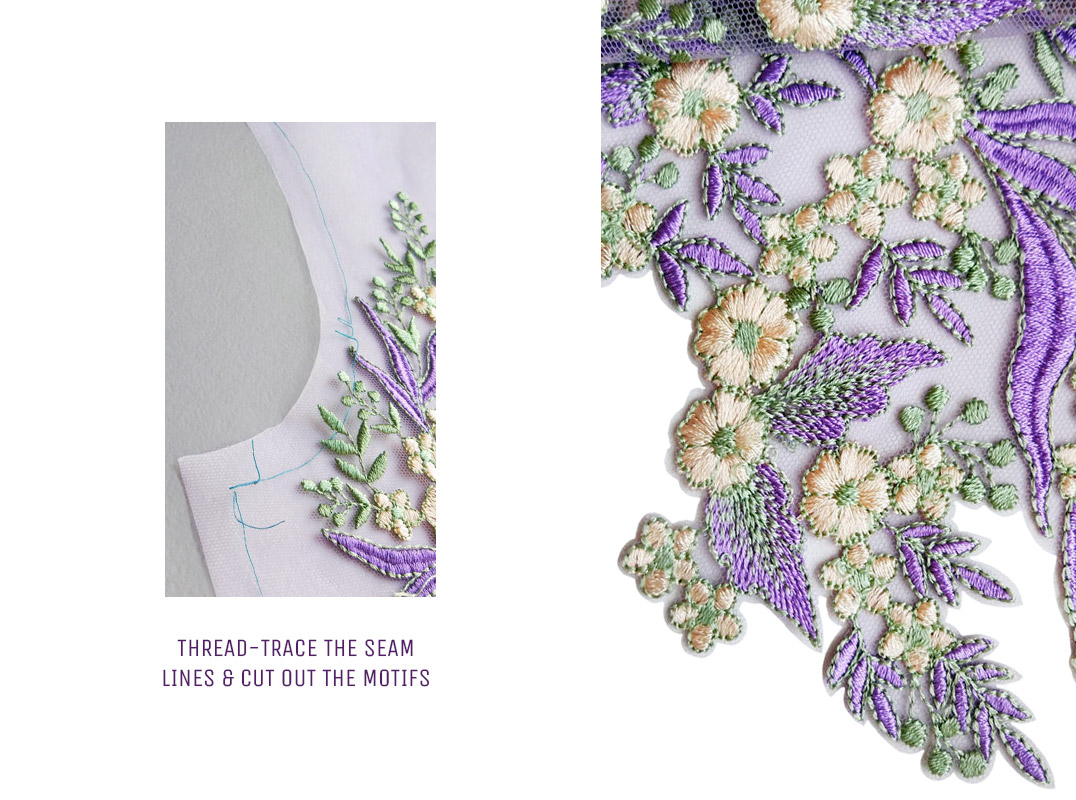
- In most case, chalk or soap lines won’t be visible on lace fabric. You can thread-trace the stitching lines and notches with long and short basting stitches. Yes, it takes time and patience, but it is worth it because stitching lines will be easy to match afterwards.
- If you are planning to use a special lapped seam, cut around the motifs with sharp small scissors, leaving 6 mm seam allowance. On net areas, leave you regular seam allowance. Mine is 12 mm. Then trim away the net on scalloped edges.

On Instagram, fine lace seller told me I could use soldering iron instead. Unfortunately, I didn’t try this, because I had already finished cutting at that time. Though it sounds amazing.
Sewing
There are two ways for choosing seams: one is relatively easy, fast, noticeable and made by machine and the other one is time-taking, hardly seen, couture and hand-sewn.
The first Scenario
Like seams on other see-through fabrics, seams on lace should be narrow and inconspicuous. A double-stitched seam works well for straight lines. It is a narrow version of a French seam.
To make it you can use two straight stitch lines 3 mm apart or a combination of a straight and zig-zag stitching. Just watch the motifs match. An overlocked seam can work for lace too, but it will give the garment a manufactured look.
A transitional option from the first scenario to the second one is a lapped seam with zig-zag stitching. It is practically invisible because its stitches to follow the outline of the motifs. Read below on how to prepare the seamlines.
The Second Scenario
Most couture lace garments are sewn by hand with applique (or lapped) seams or narrow plain seams, that are hand-overcast or bound. A narrow plain seam is a good choice for areas with stress or for those without motifs.
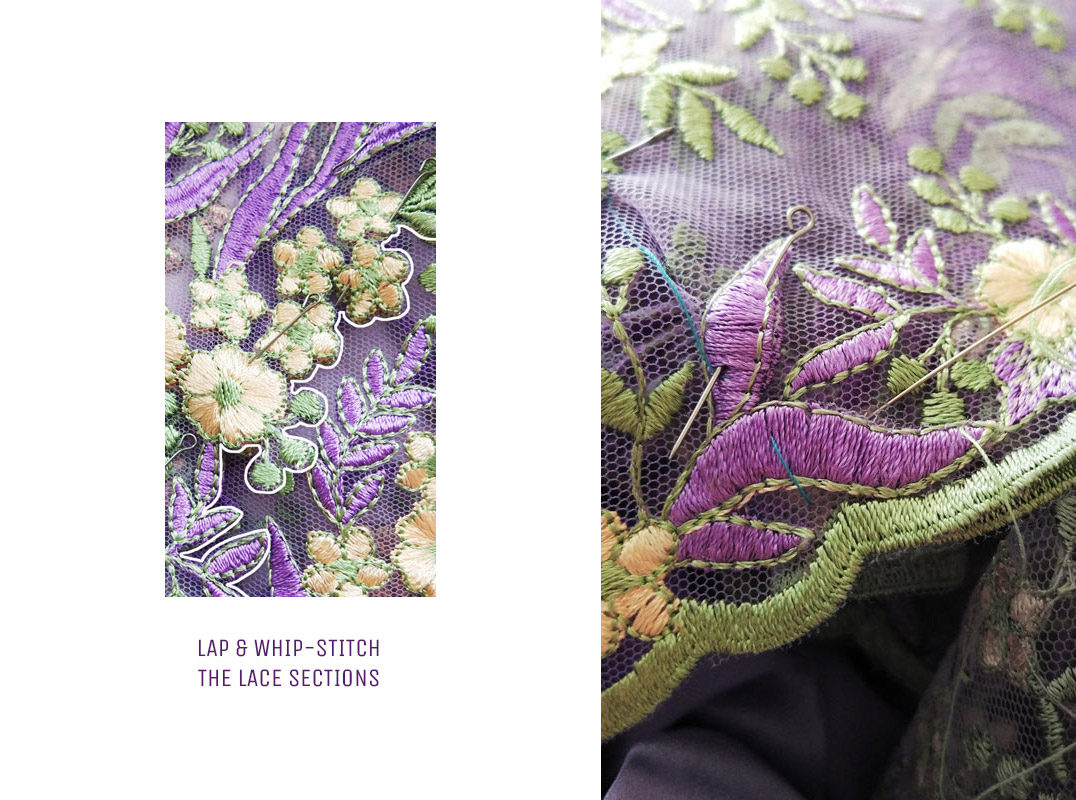
The applique seam conceals the seamlines among motifs, it is inconspicuous, but if to take a close look, small hand stitches will run somewhere close to the seamline. This seam is made by whipstitching a cut lace edge to another piece of lace.
Applique seam
To make this:
- Lap the sections, aligning the tread-traced stitching lines, and pin. For the seam to be inconspicuous lap part of the seam in one direction and part in the other. It sounds a lot easier than it really is, but the fabric will show what to do. Each time I switch the direction I cut the net a bit, so the fabric doesn’t pull.
- After you are happy with the motifs’ positioning, baste them in place with diagonal stitches.
- If there are some motif-less spots cut the other motifs from the scrap and cover them.
- Then sew the new line with small whipstitches (for the machine-sewn version use zig-zag) on the motifs’ outline. It takes time, my fingers get pinned and the thread gets knotted, but it is ok. To prevent it, I waxed and ironed the thread, but it became more visible to me, so I refused this idea.
- Once you finish the stitching, trim excess lace on the lap and underlap.
- Then make the second row of whipstitching on the inside.
- In the end, carefully remove basting stitches and tread tracing and press the garment wrong side up on the padded surface.

Good ideas always come at the end:
I could use different colours for thread tracing and basting – it would be easier to remove them and not get confused. Hope you will use this and let me know, how it worked.
Yours,
Kaia
