How to Sew a Bow Collar for a Blouse
Category: Tutorials 01 February 21
Bow collars pop up in the first row of a fashion scene relatively often. They are loved and presented by luxury brands like Gucci and Saint Laurent.
I still remember the Gucci “Guilty” advertisement, which stole my heart forever and Saint Laurent 2020–2021 Autumn–Winter collection with its bow-tie blouses and power-jackets is at the top of my favourites so far.
The bow collar can look modest, but it also may be seductive, revealing that tiny bit of a collarbone. Feminine and luxurious, it brings ’70-s vibes to one’s favourite blouse pattern. Cut it from the same fabric or not and make it narrow or extremely wide with the soft drapes. You are a designer here, after all. And this illustrated tutorial will accompany you on the way.
The Design
1. Decide on the design & proportions
Is the collar wide and long enough to make a double wrap and a puffy bow? Or, maybe it’s narrow and forms a small neat knot? Design options are up to you. For example, the ends of the collar can be wider than the middle part. In this case, you will need to cut two separate pieces for the collar and its inner facing.
More often, the bow collar appears to be a single piece rectangle. If you need extra length for a dramatic effect or don’t have that much fabric left, you can add a CB seam.
Also, don’t forget about the collar’s ends: they can be cut straight or diagonally. In this tutorial, I use the straight one-piece collar with square ends as an example.
2. Determine the dimensions
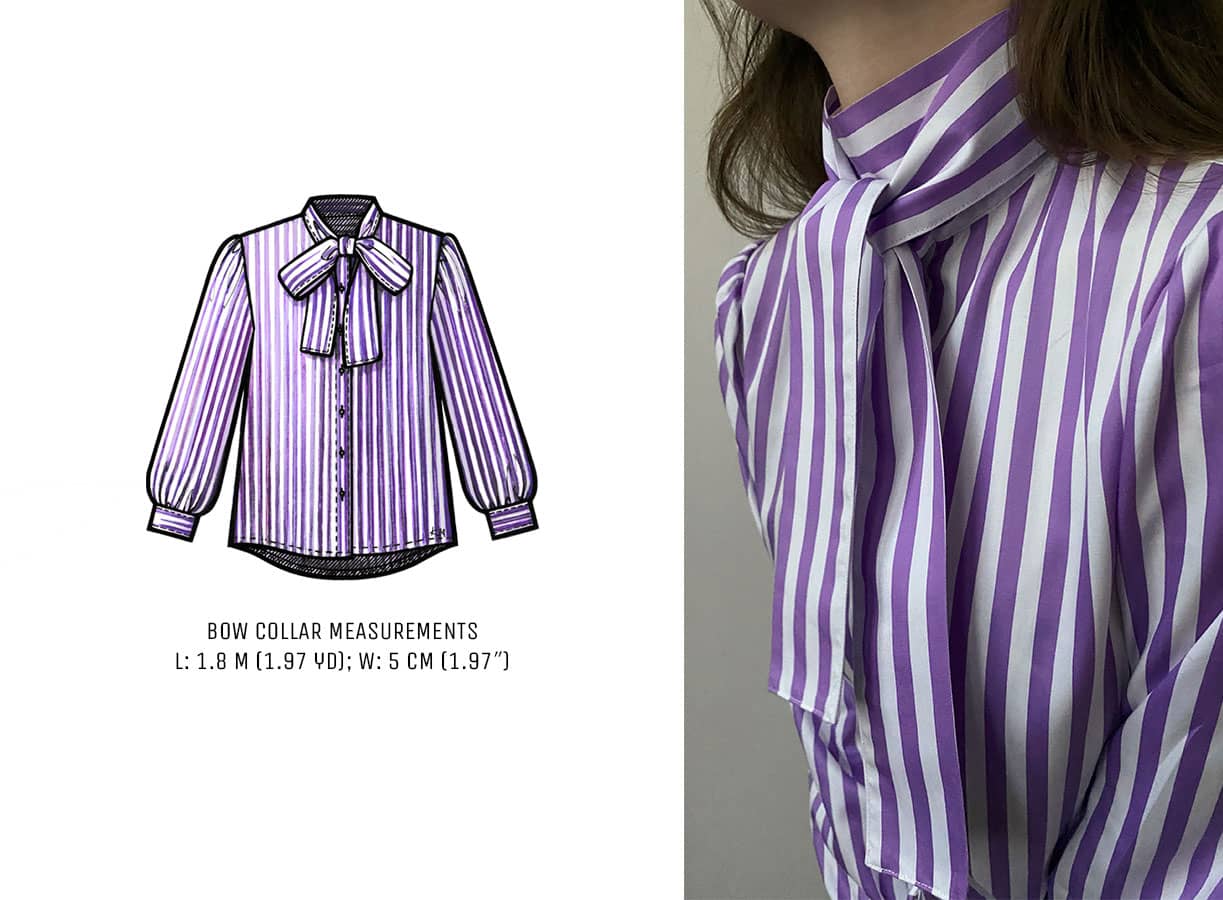
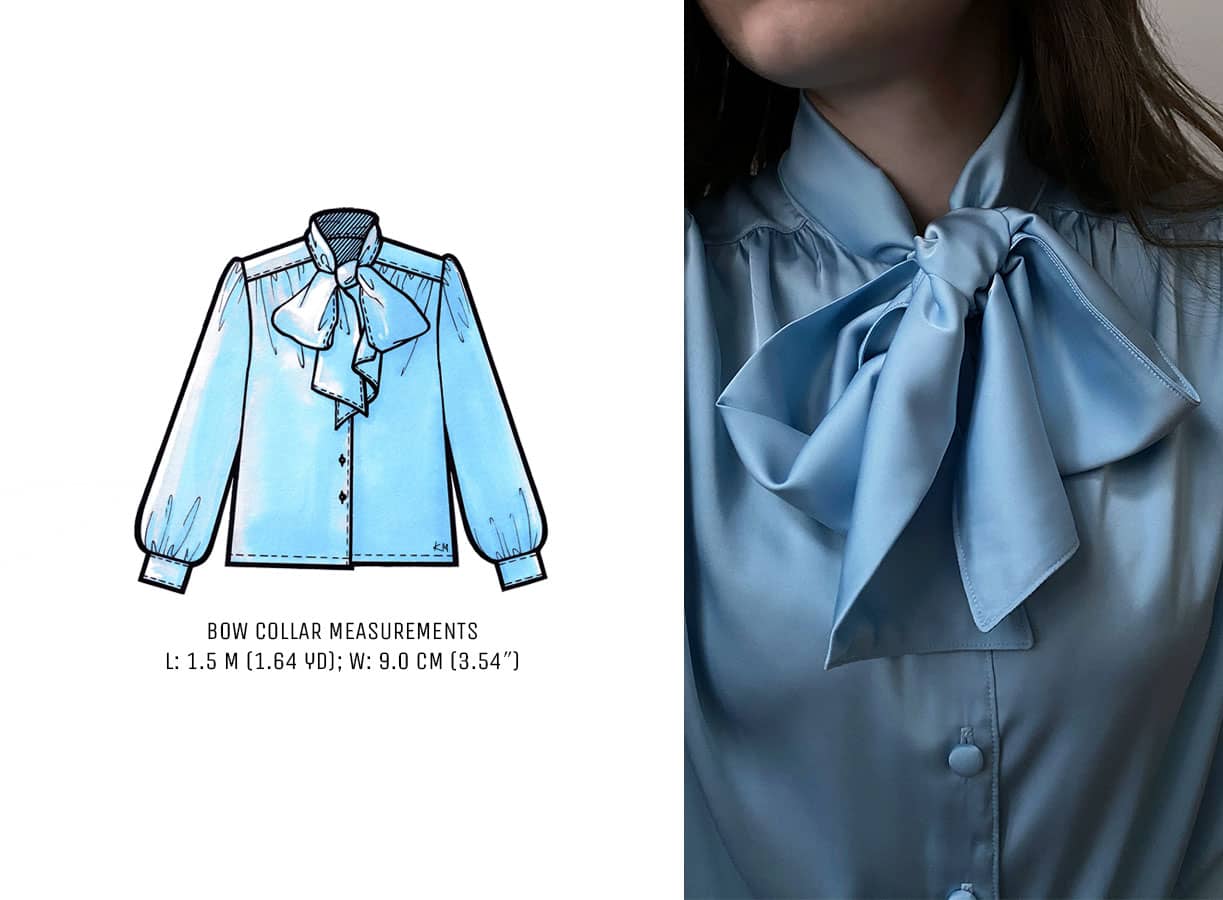
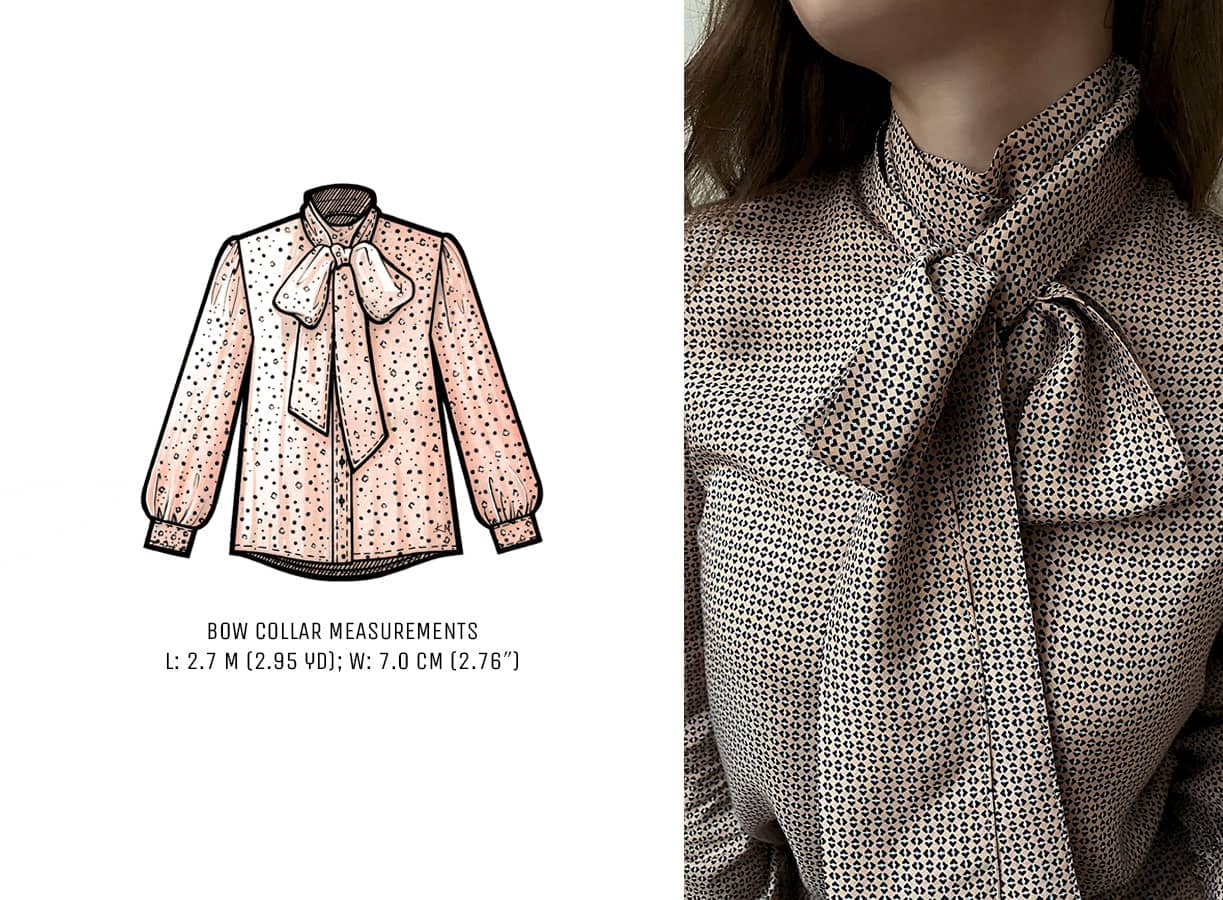
Usually, the width (W) of the finished collar is around 5–10 cm (2ʺ–4ʺ). But you are free to go beyond these numbers for a special effect.
As for the length (L), you can choose any number of centimetres or meters you like. I can only note that in my case, it’s convenient to have a collar of at least 1.5 m (1.64 yds) to make a nice bow.
Below you can check pictures of my bow-collar blouses for length and width references.
Cutting
If your collar is based on a rectangular shape like mine, you don’t need to make a paper pattern, as you can draw directly on the fashion fabric.
You can cut it on the lengthwise or crosswise grain depending on the print, length of the collar and amount of fabric available. Sometimes this collar can even be cut on the bias for better drape.
To make sure the collar won’t become shorter and narrower when finished, don’t forget to add seam allowances to the length and width you have chosen. I would suggest adding 0.6–1.2 cm (1⁄4–1⁄2ʺ) all around the collar piece. The best idea is to go with the seam allowance equal to the one of the neckline, as it makes sewing much more manageable.
If the fabric does not fray, I usually go with 0.6 cm (1⁄4ʺ), as I’m always short of fabric and it’s more convenient for sewing curves, but if you are not that confident in sewing yet, you might find 0.6 cm (1⁄4ʺ) a bit challenging to work with.
So, let’s pretend, I decided to go with a 1.2 cm (1⁄2ʺ) seam allowance for both the collar and the neckline. In my case, I will cut the rectangle of the following size:
Metric: (L + 1.2 cm + 1.2 cm) x (W × 2 + 1.2 cm + 1.2 cm)
Imperial: (L + 1⁄2ʺ + 1⁄2ʺ) x (W × 2 + 1⁄2ʺ + 1⁄2ʺ)
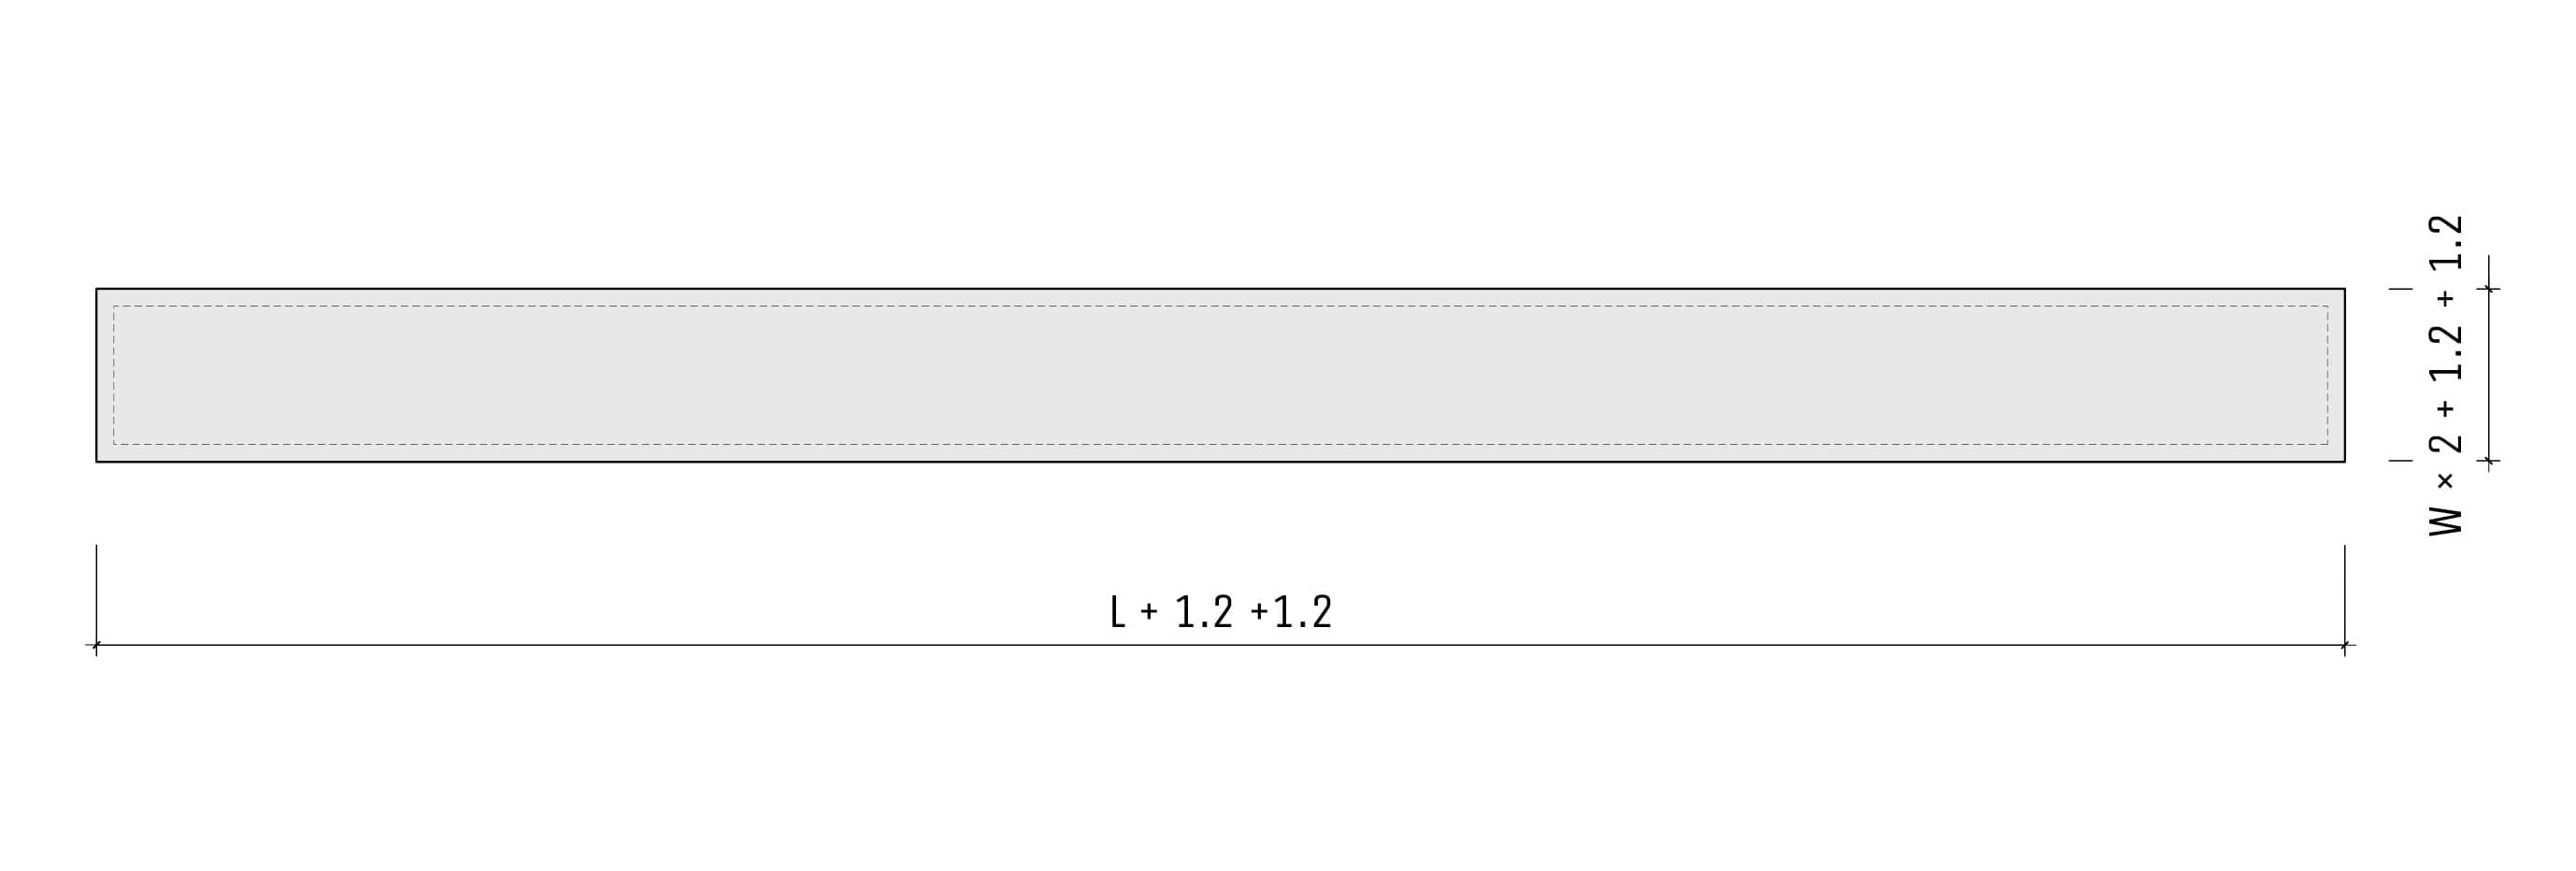
You don’t need to draw both stitching and cutting lines—remember what seam allowances you choose and go with cutting lines only.
Sewing
1. Make the placket
There are many types of button plackets, and their patterns may vary, but for a more straightforward explanation, I will use a simple single-fold packet as a reference in this post. Later you can adjust and apply this method to other types of packets.
In this example, the right front packet will be 2.5 cm (1ʺ) wide when finished, and the left one will be only 2 cm (0.8ʺ). I choose different widths to ensure that the left packet’s stitching won’t be visible when the blouse is buttoned up.
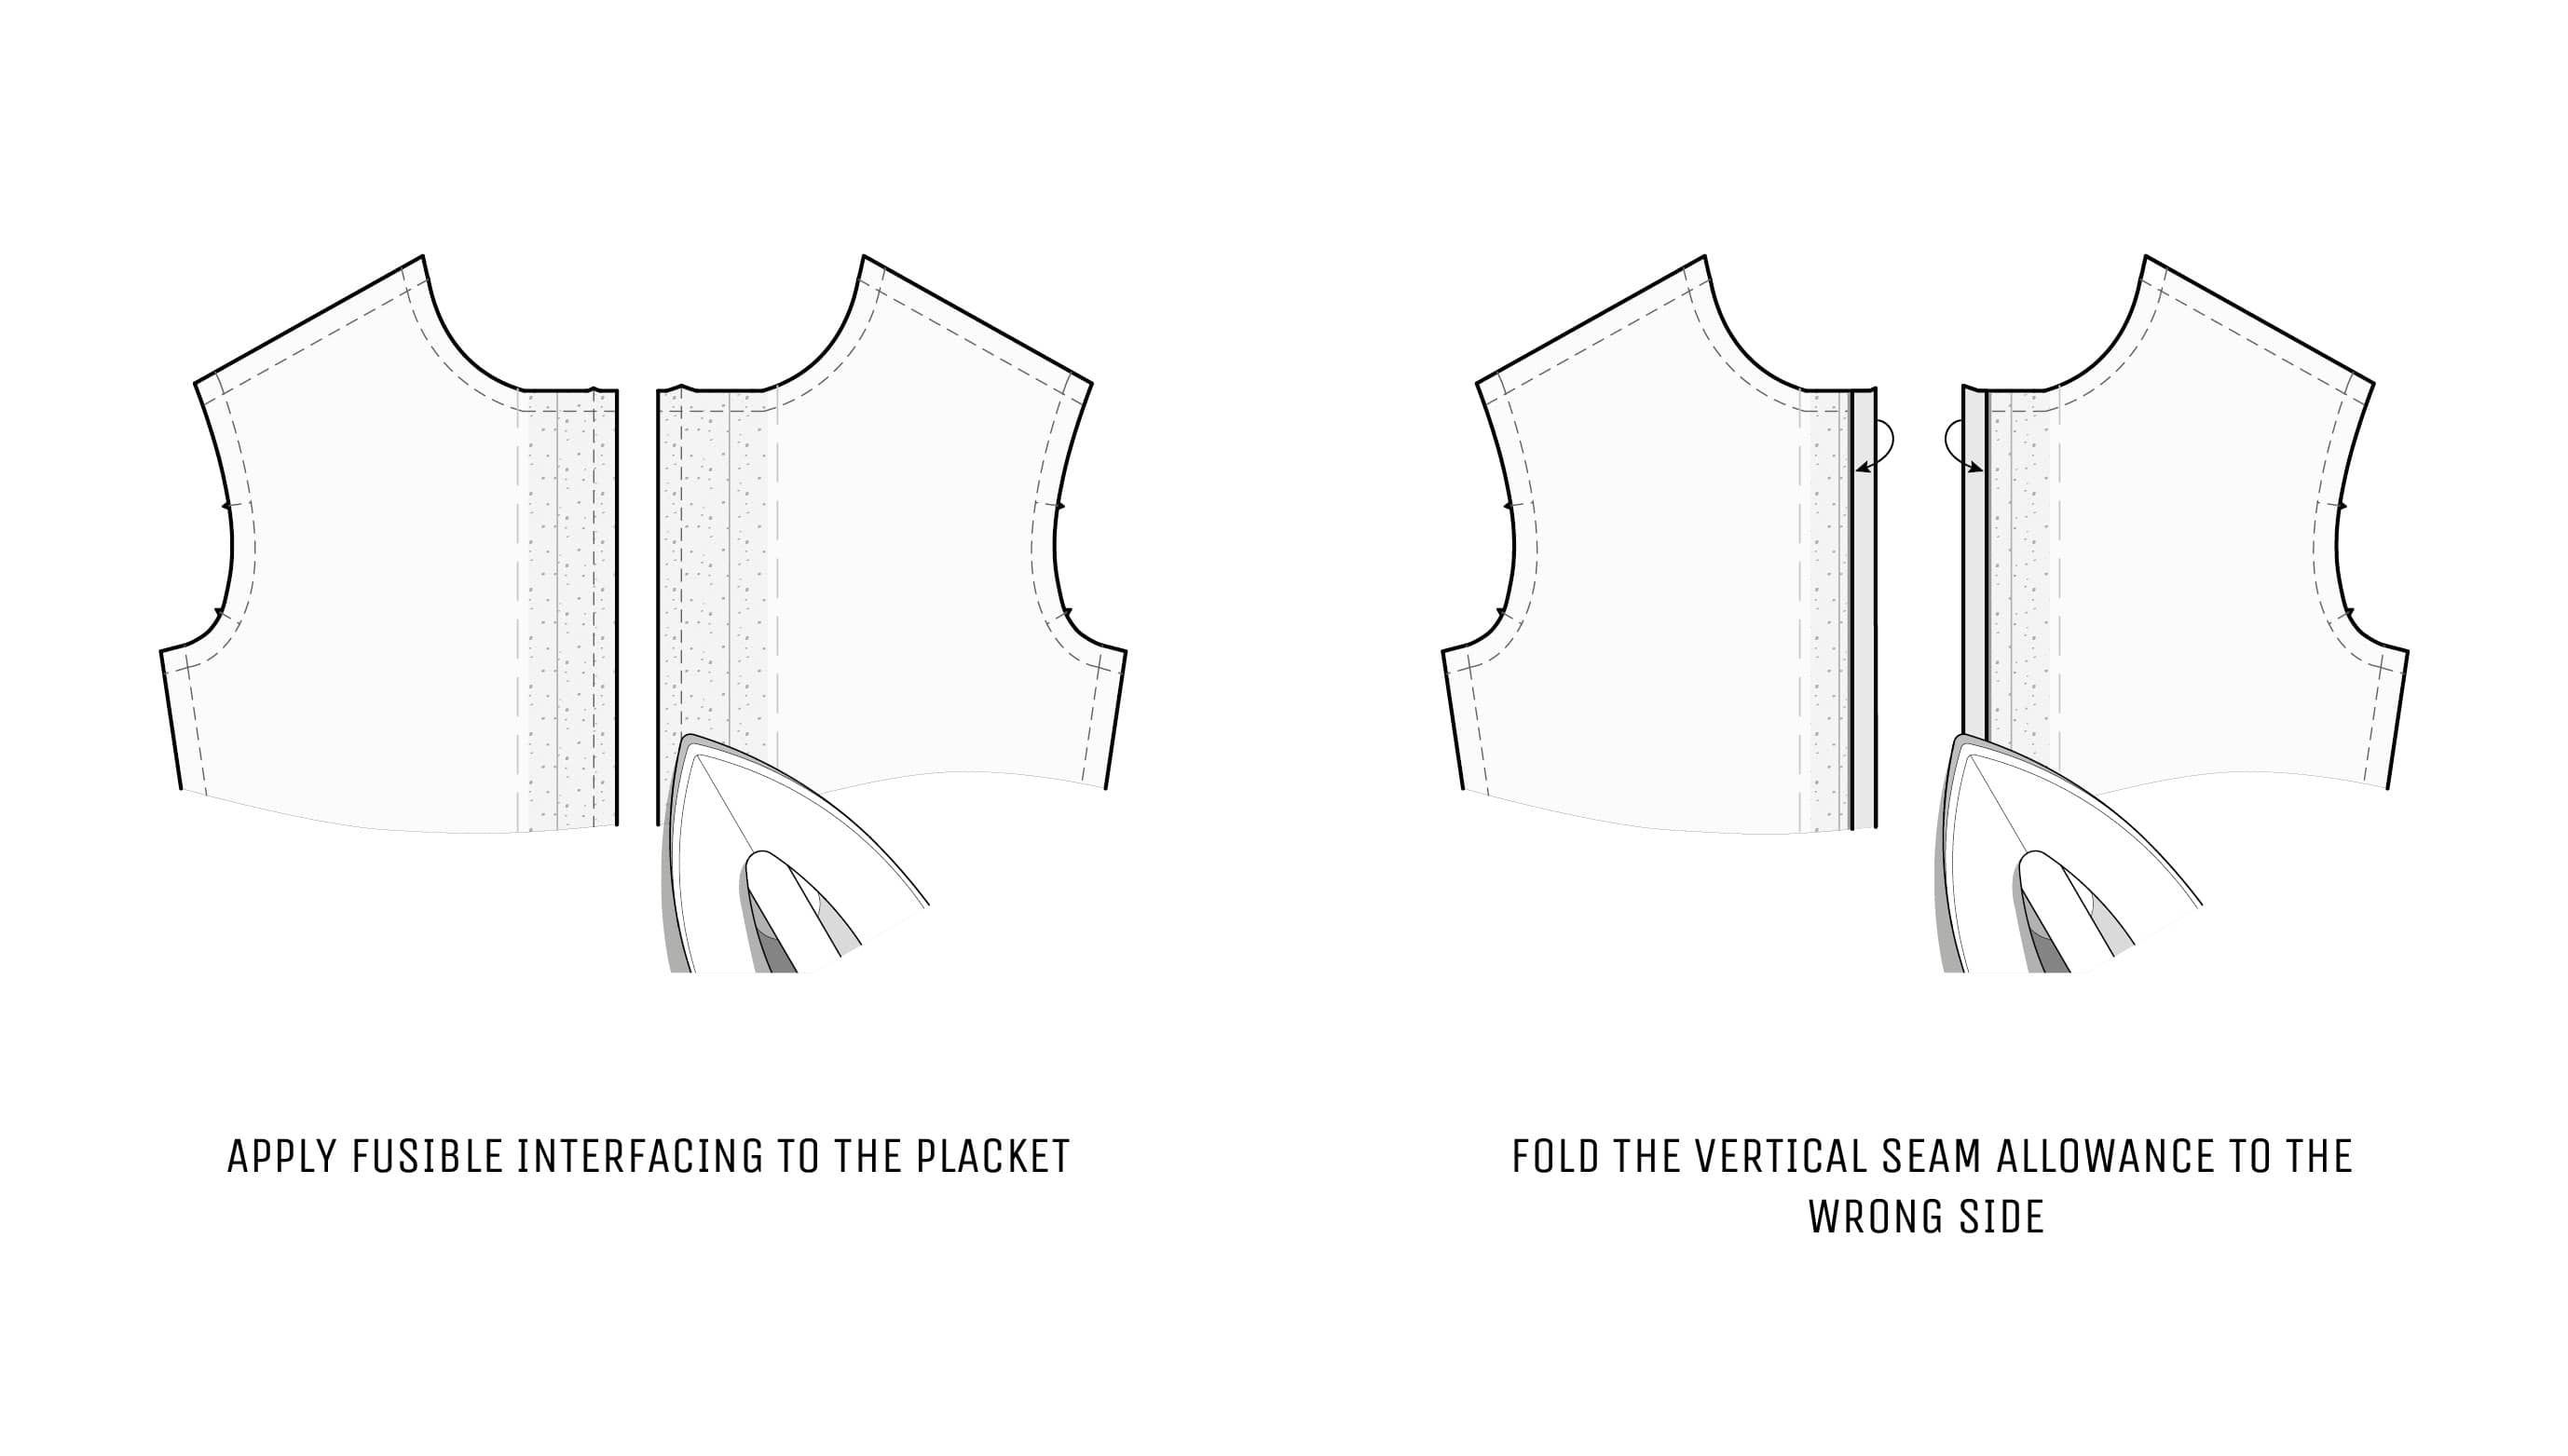
At first, apply fusible interfacing to the wrong side of the packet. Then, fold the vertical seam allowance to the wrong side, press and baste in place if necessary.
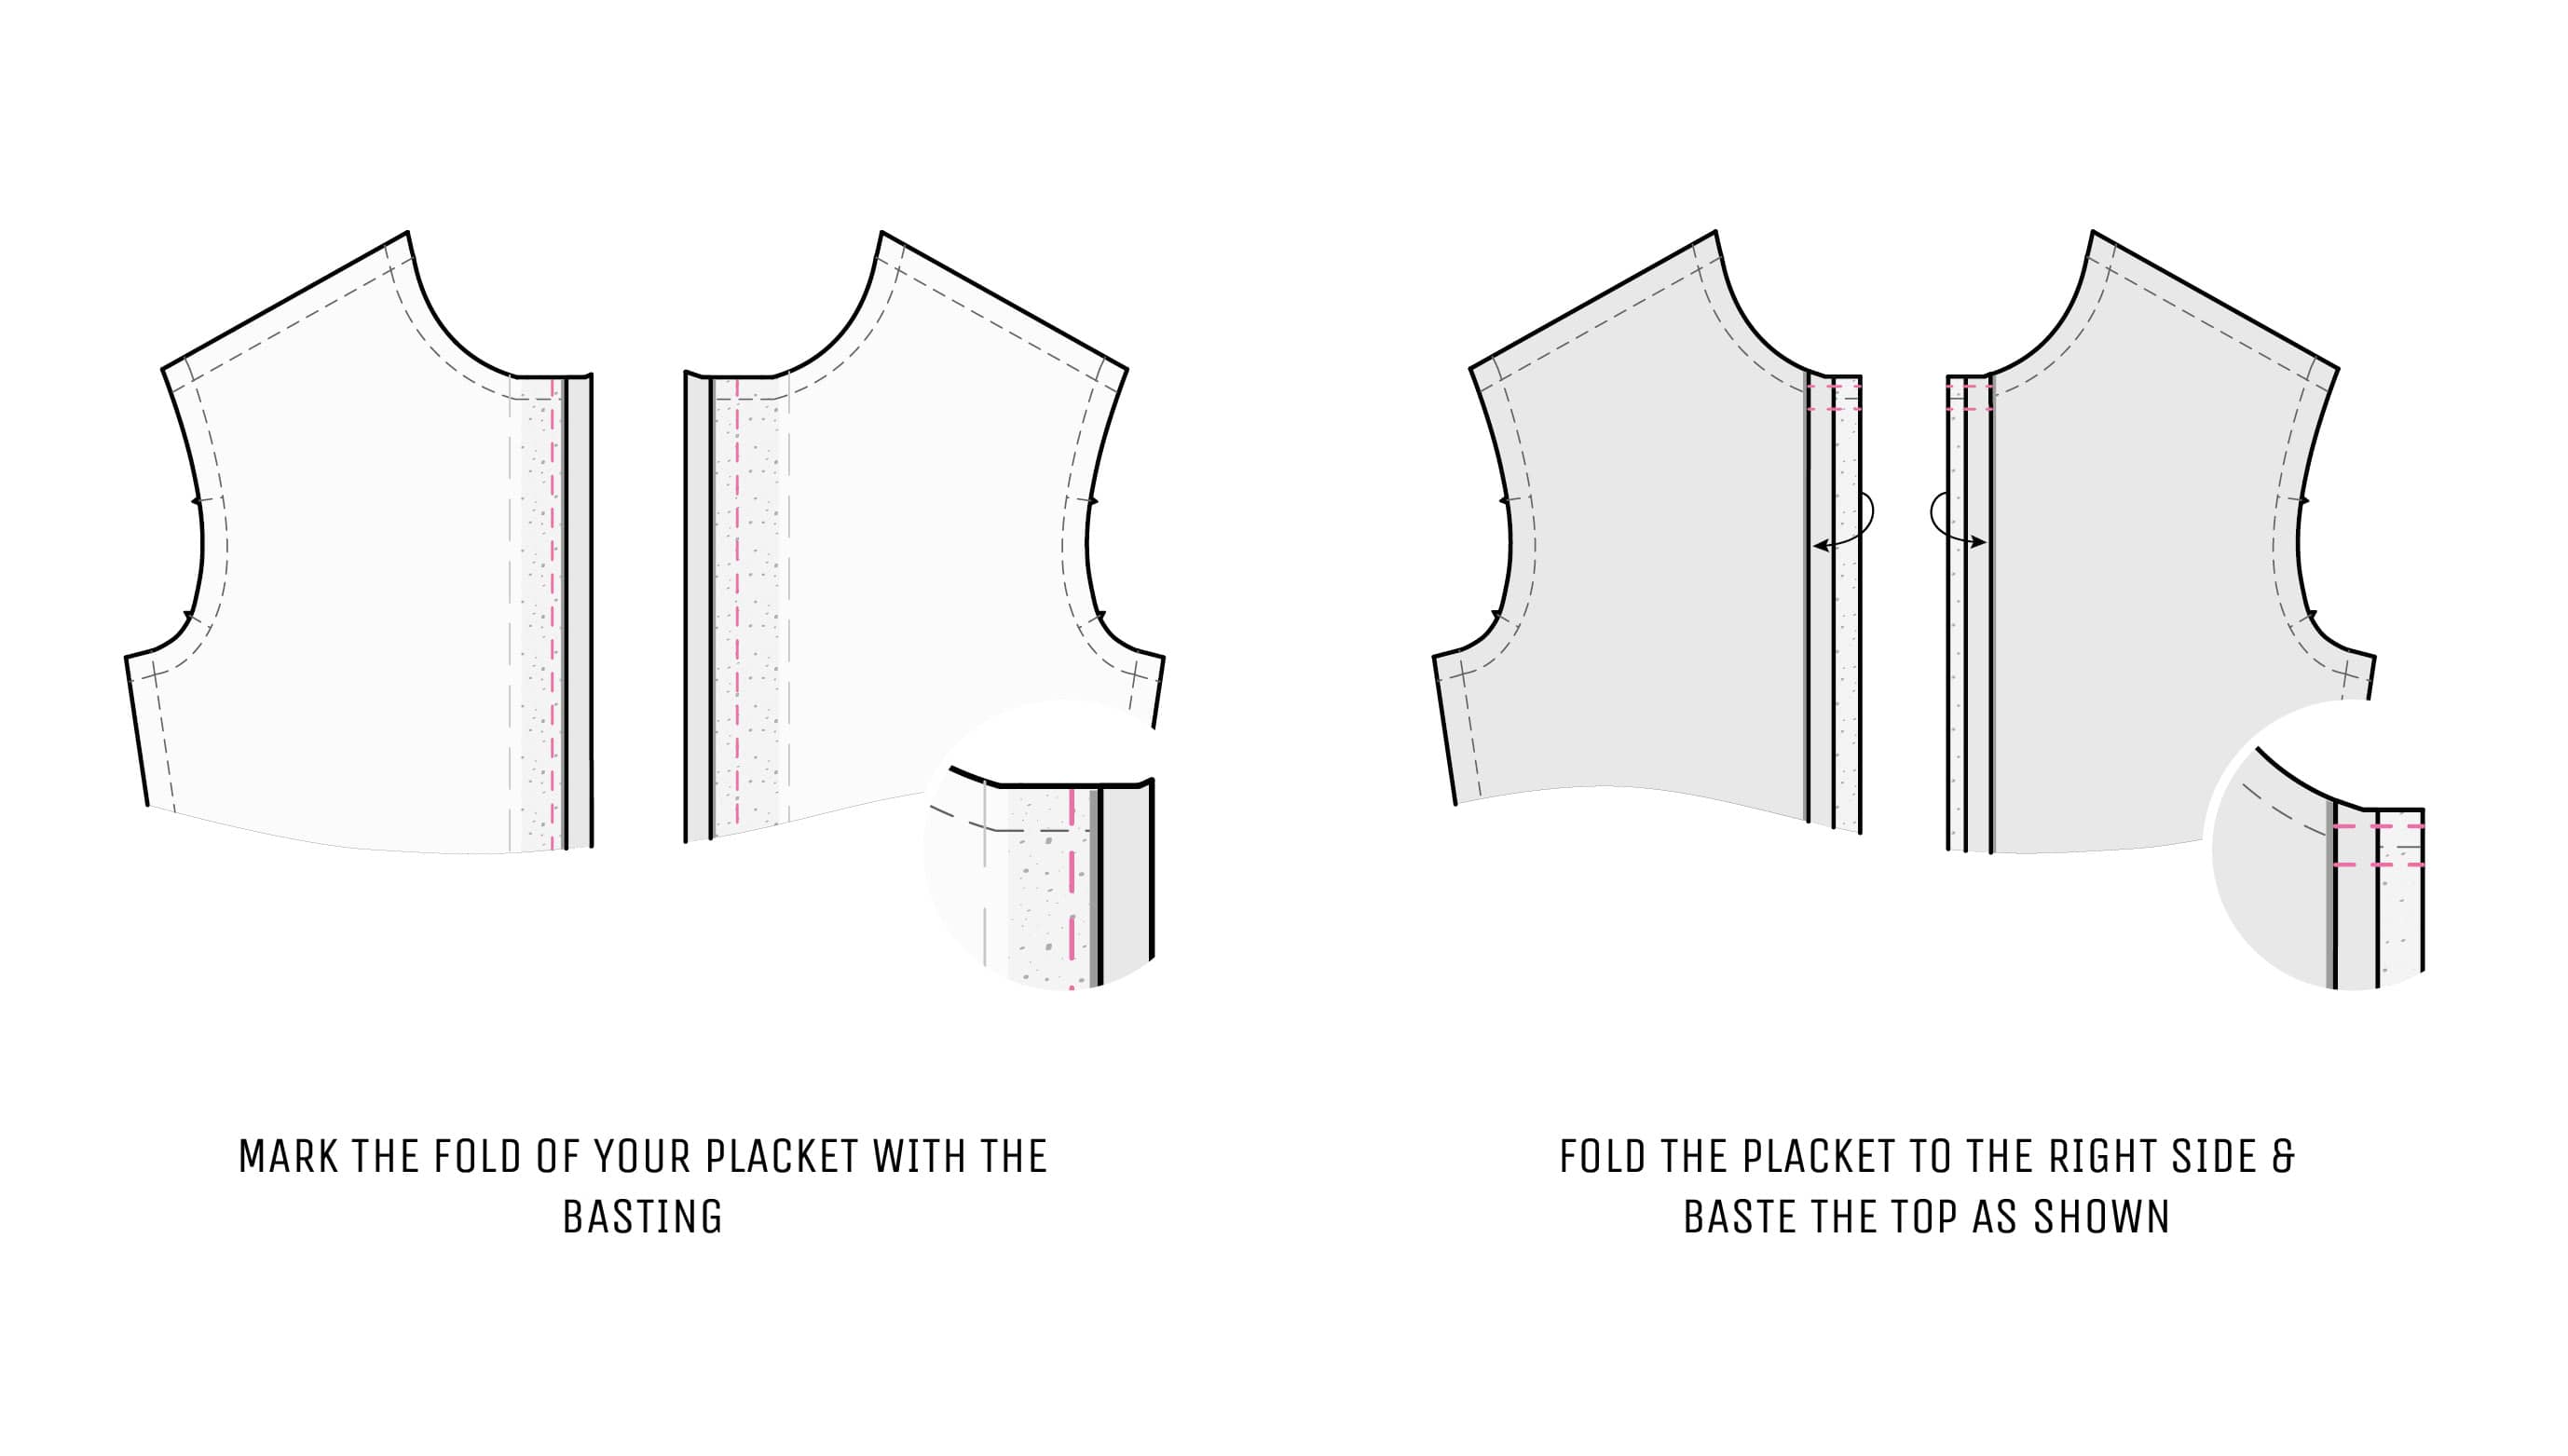
Now we will finish a small part of the neckline, which remains free from the collar so that you could easily tie the bow. On the wrong side, mark your placket’s fold with the basting thread or a chalk line. Fold the placket to the right side and baste the top part as shown.
On the neckline seam allowance, draw a vertical line 1.5 cm (5⁄8ʺ)* away from the placket fold. Draw the small part of the neck seamline between this mark and the fold. Now you have two chalk lines that form the letter “L”.
Stitch on these lines and make neat backstitches at the corner. This will prevent the fabric from fraying and tearing. You could use smaller stitches instead.
Cut a neat notch at the corner as shown and trim seam allowances to 0.6 cm (1⁄4ʺ). Remove basting and turn the placket right side out, making sure you have nice corners and press.
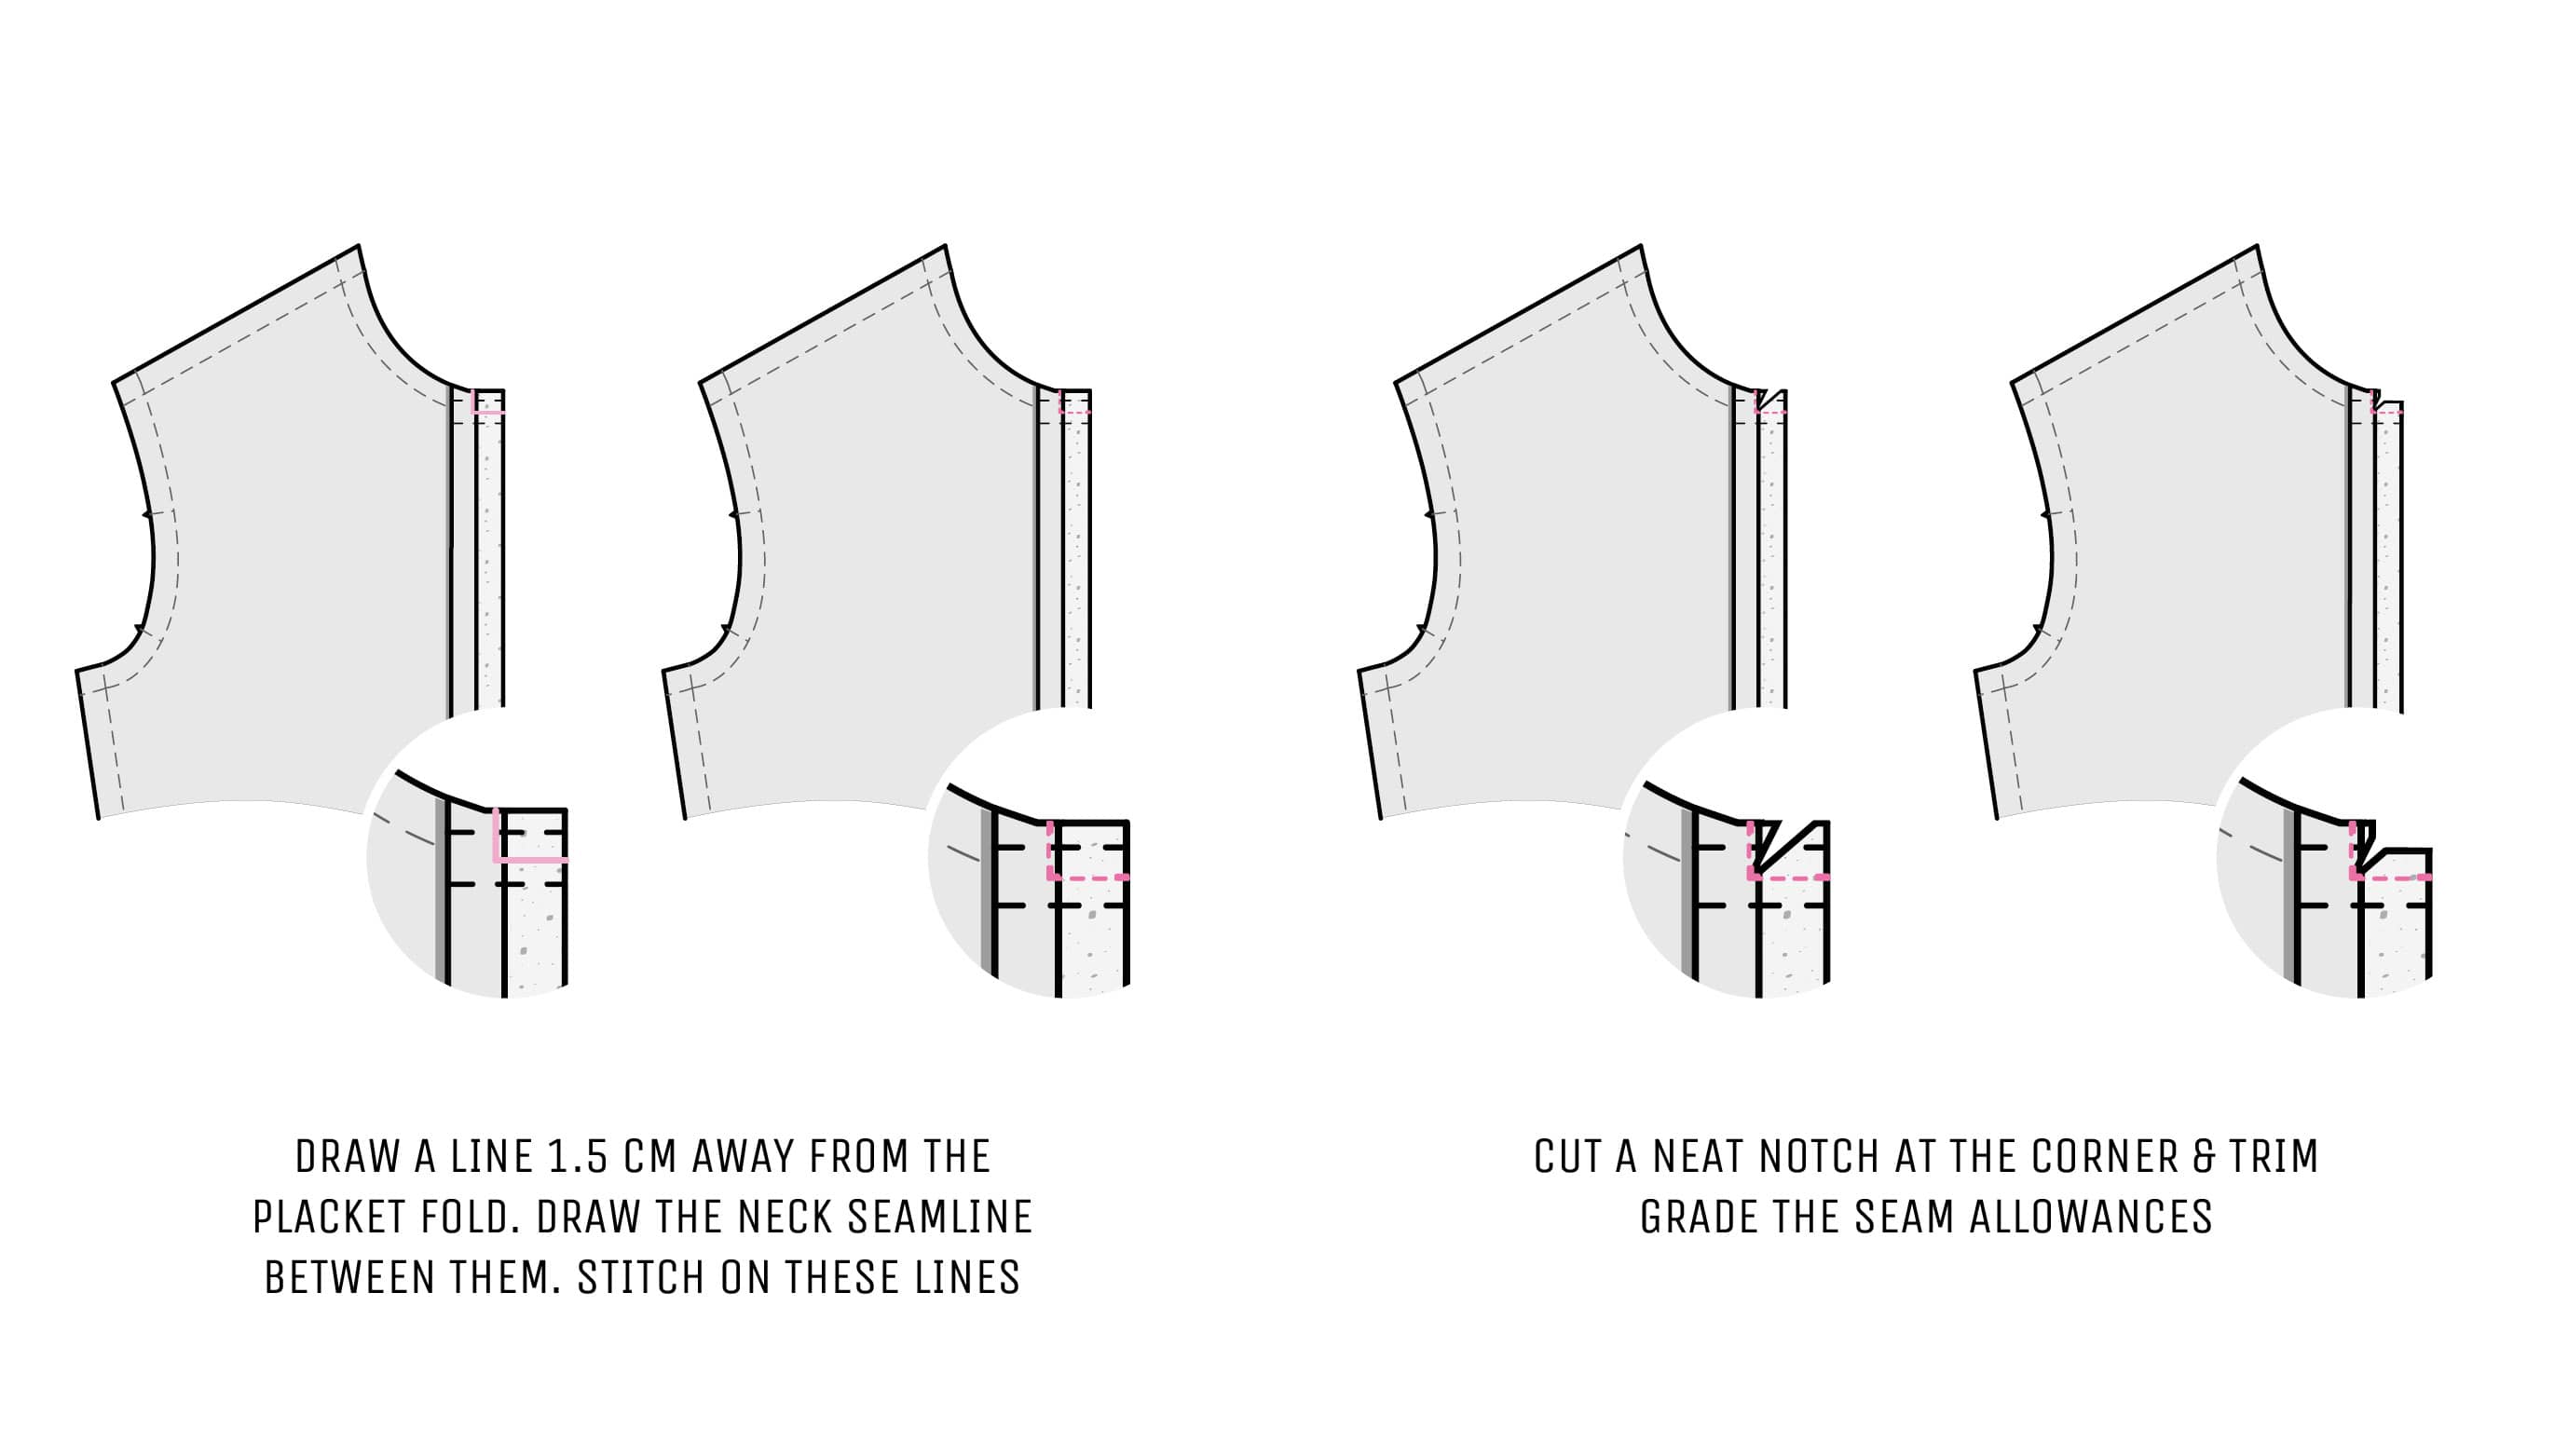
*The idea is to leave at least 0.5 cm (a scant 1⁄4ʺ) of the placket outside of this “L”. Since my smaller placket is 2 cm (0.8ʺ) wide, I will stitch only 1.5 cm (5⁄8ʺ) of it. If you choose a wider one of, let’s say, 3 cm (1 3⁄16ʺ), you will need to stitch 2.5 cm (1ʺ) and so on.
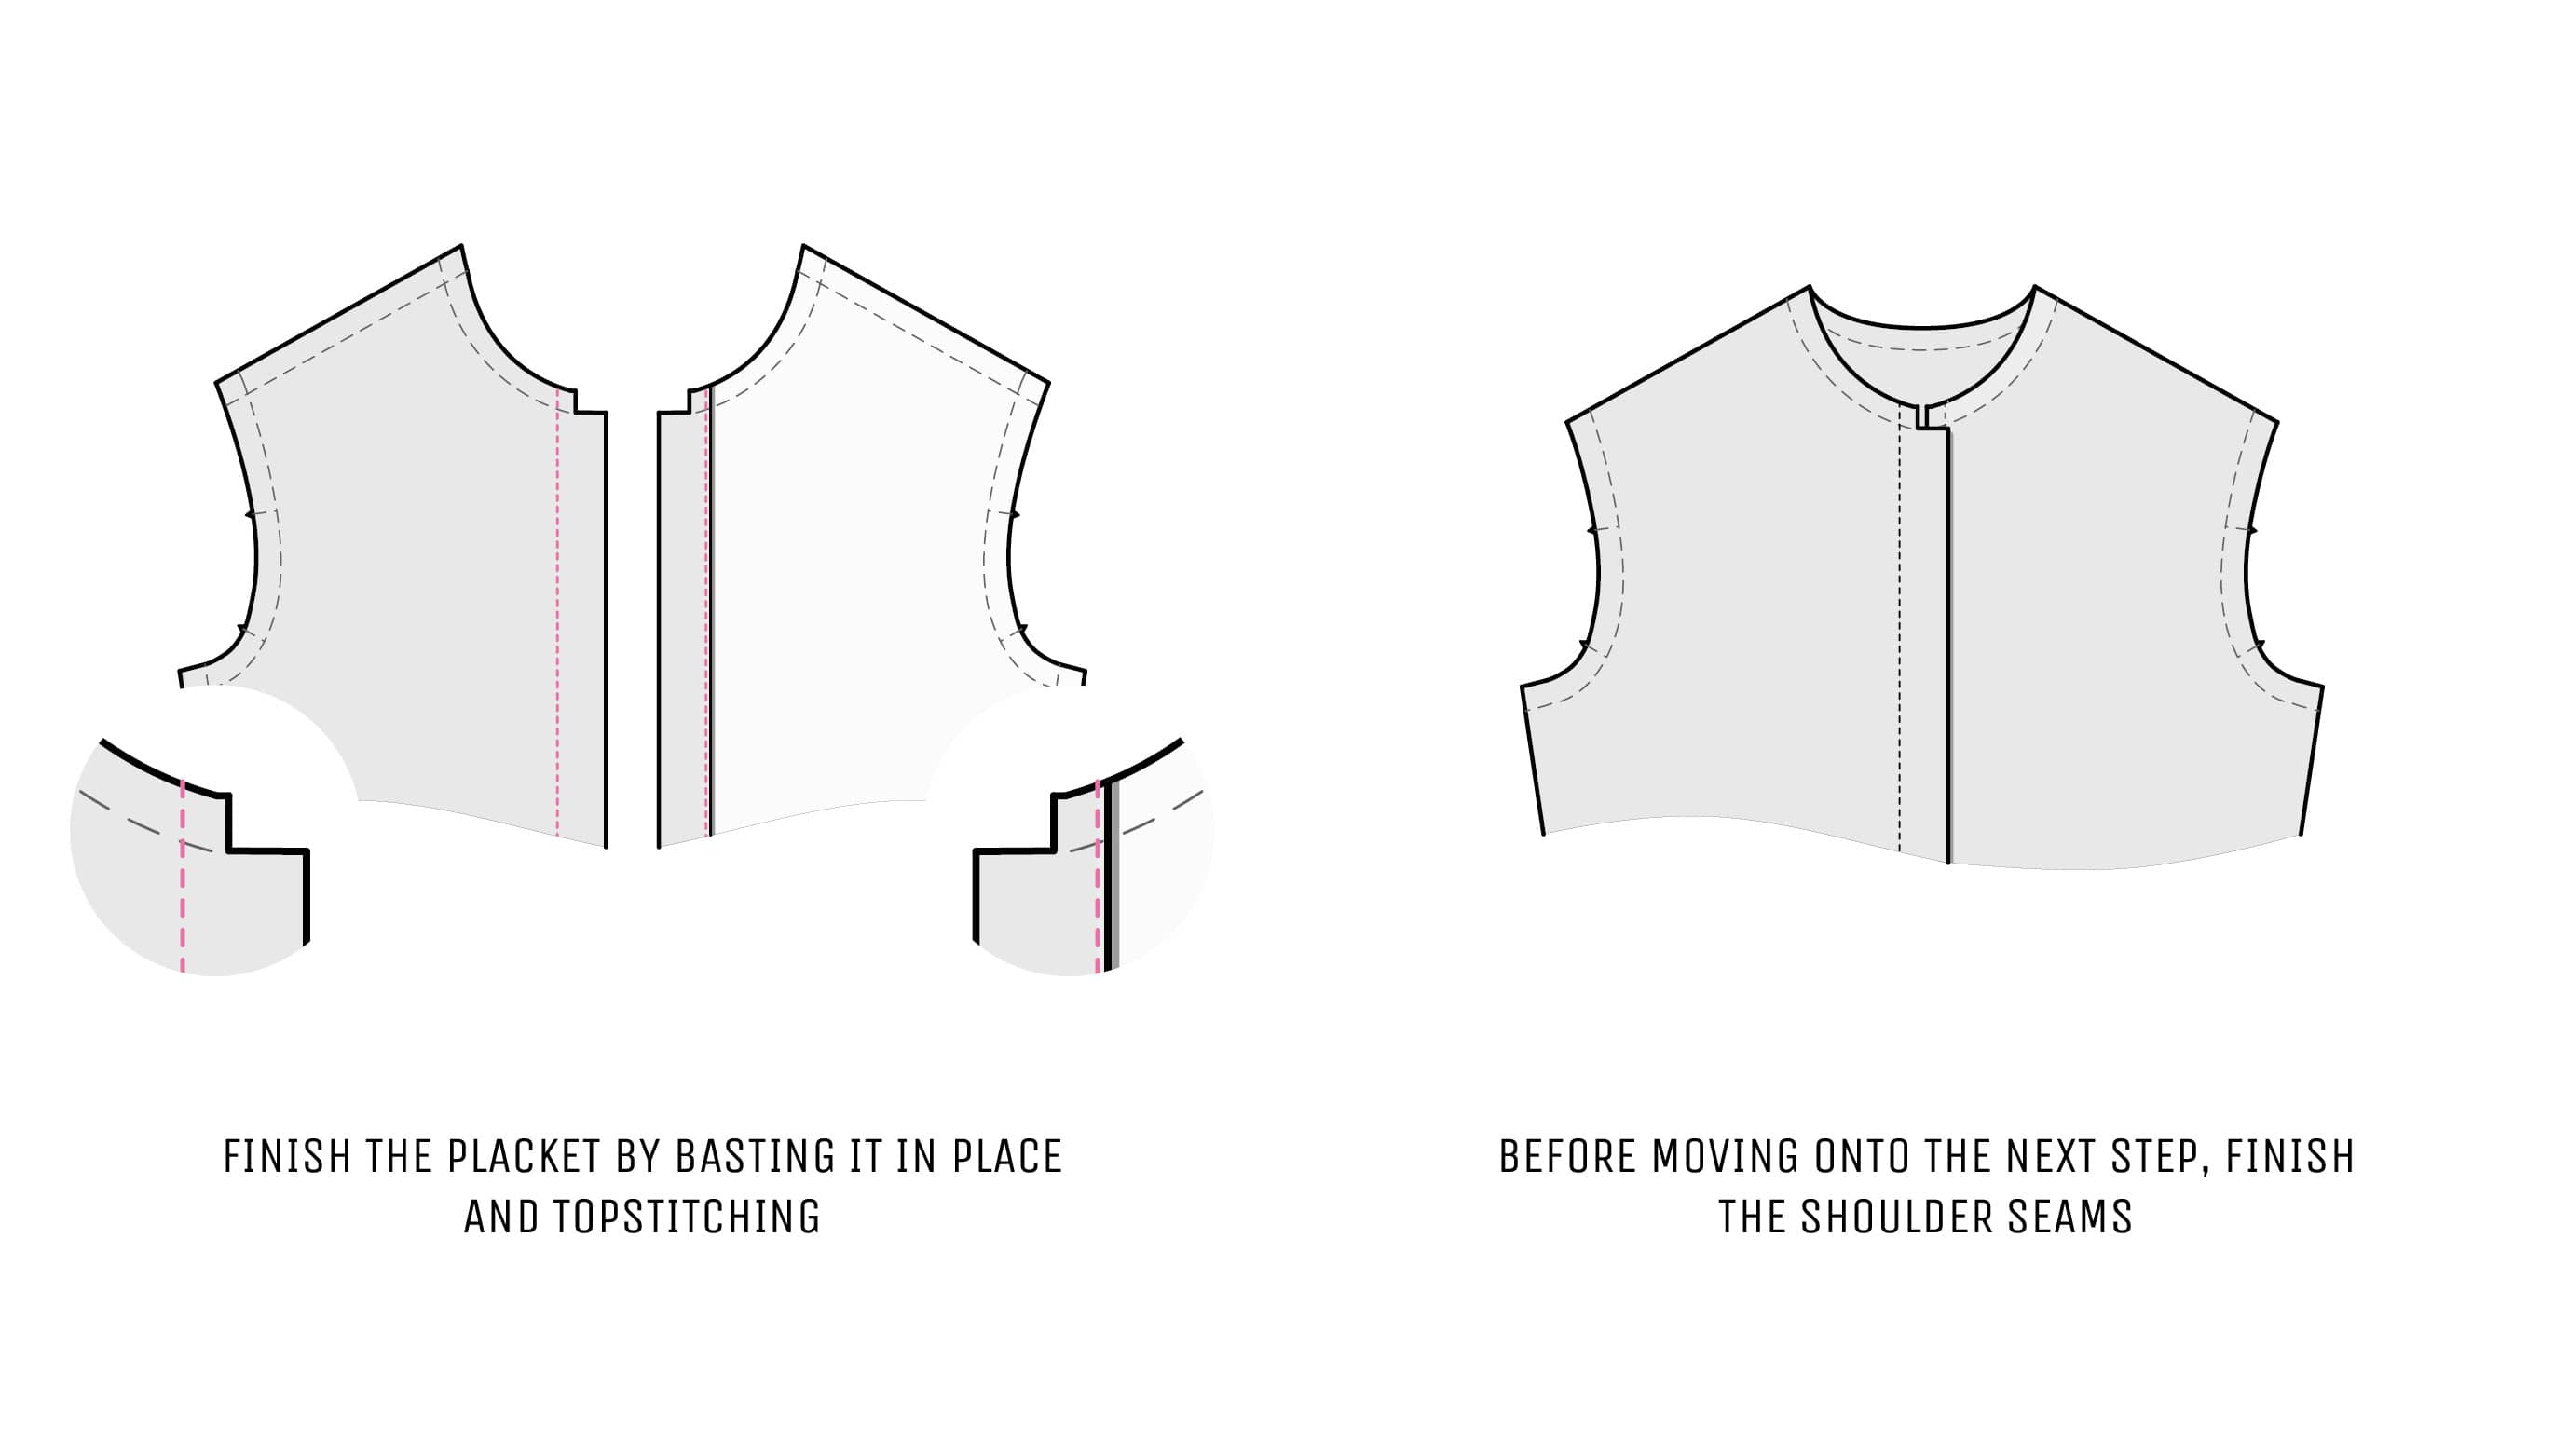
Baste the placket in place and topstitch according to your design. You can topstitch both inner and outer edges.
2. Attach the collar
At this point, the shoulder seams of your blouse should be sewn and pressed.
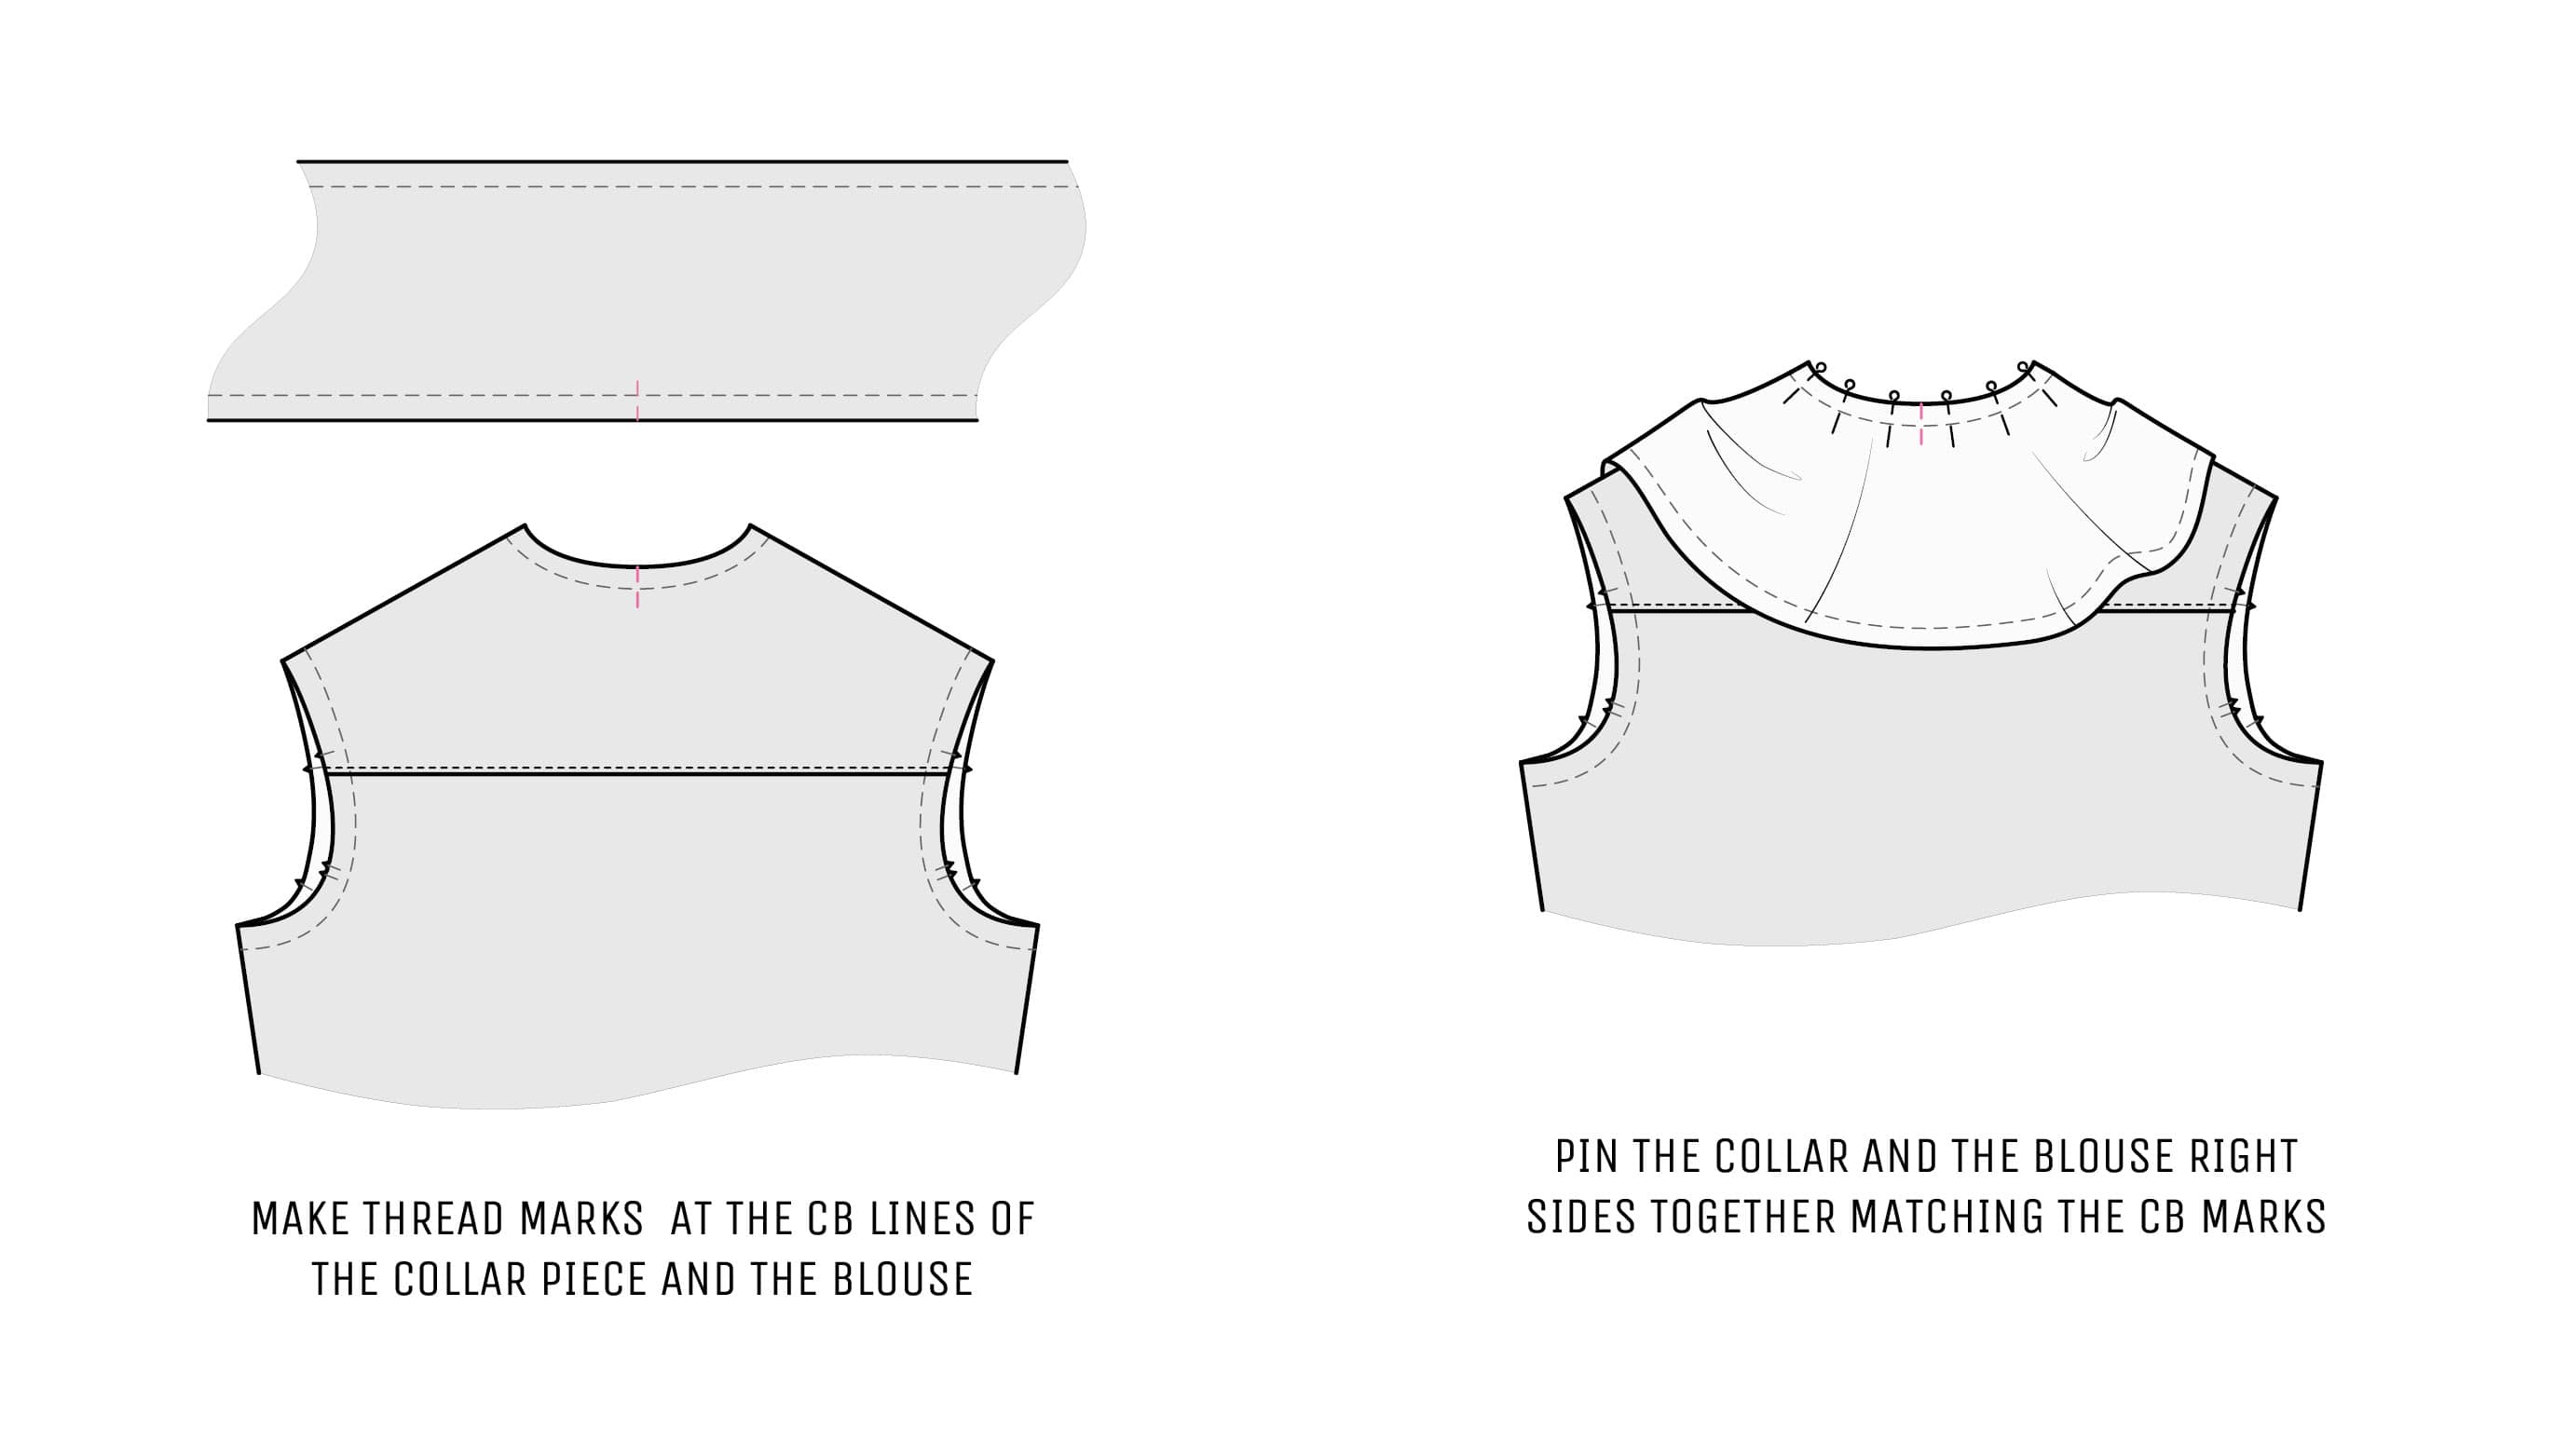
Make thread marks at the CB lines of your collar piece and the blouse back piece. Place the collar and the blouse right sides together and match the CB marks. Baste or pin along the neckline.
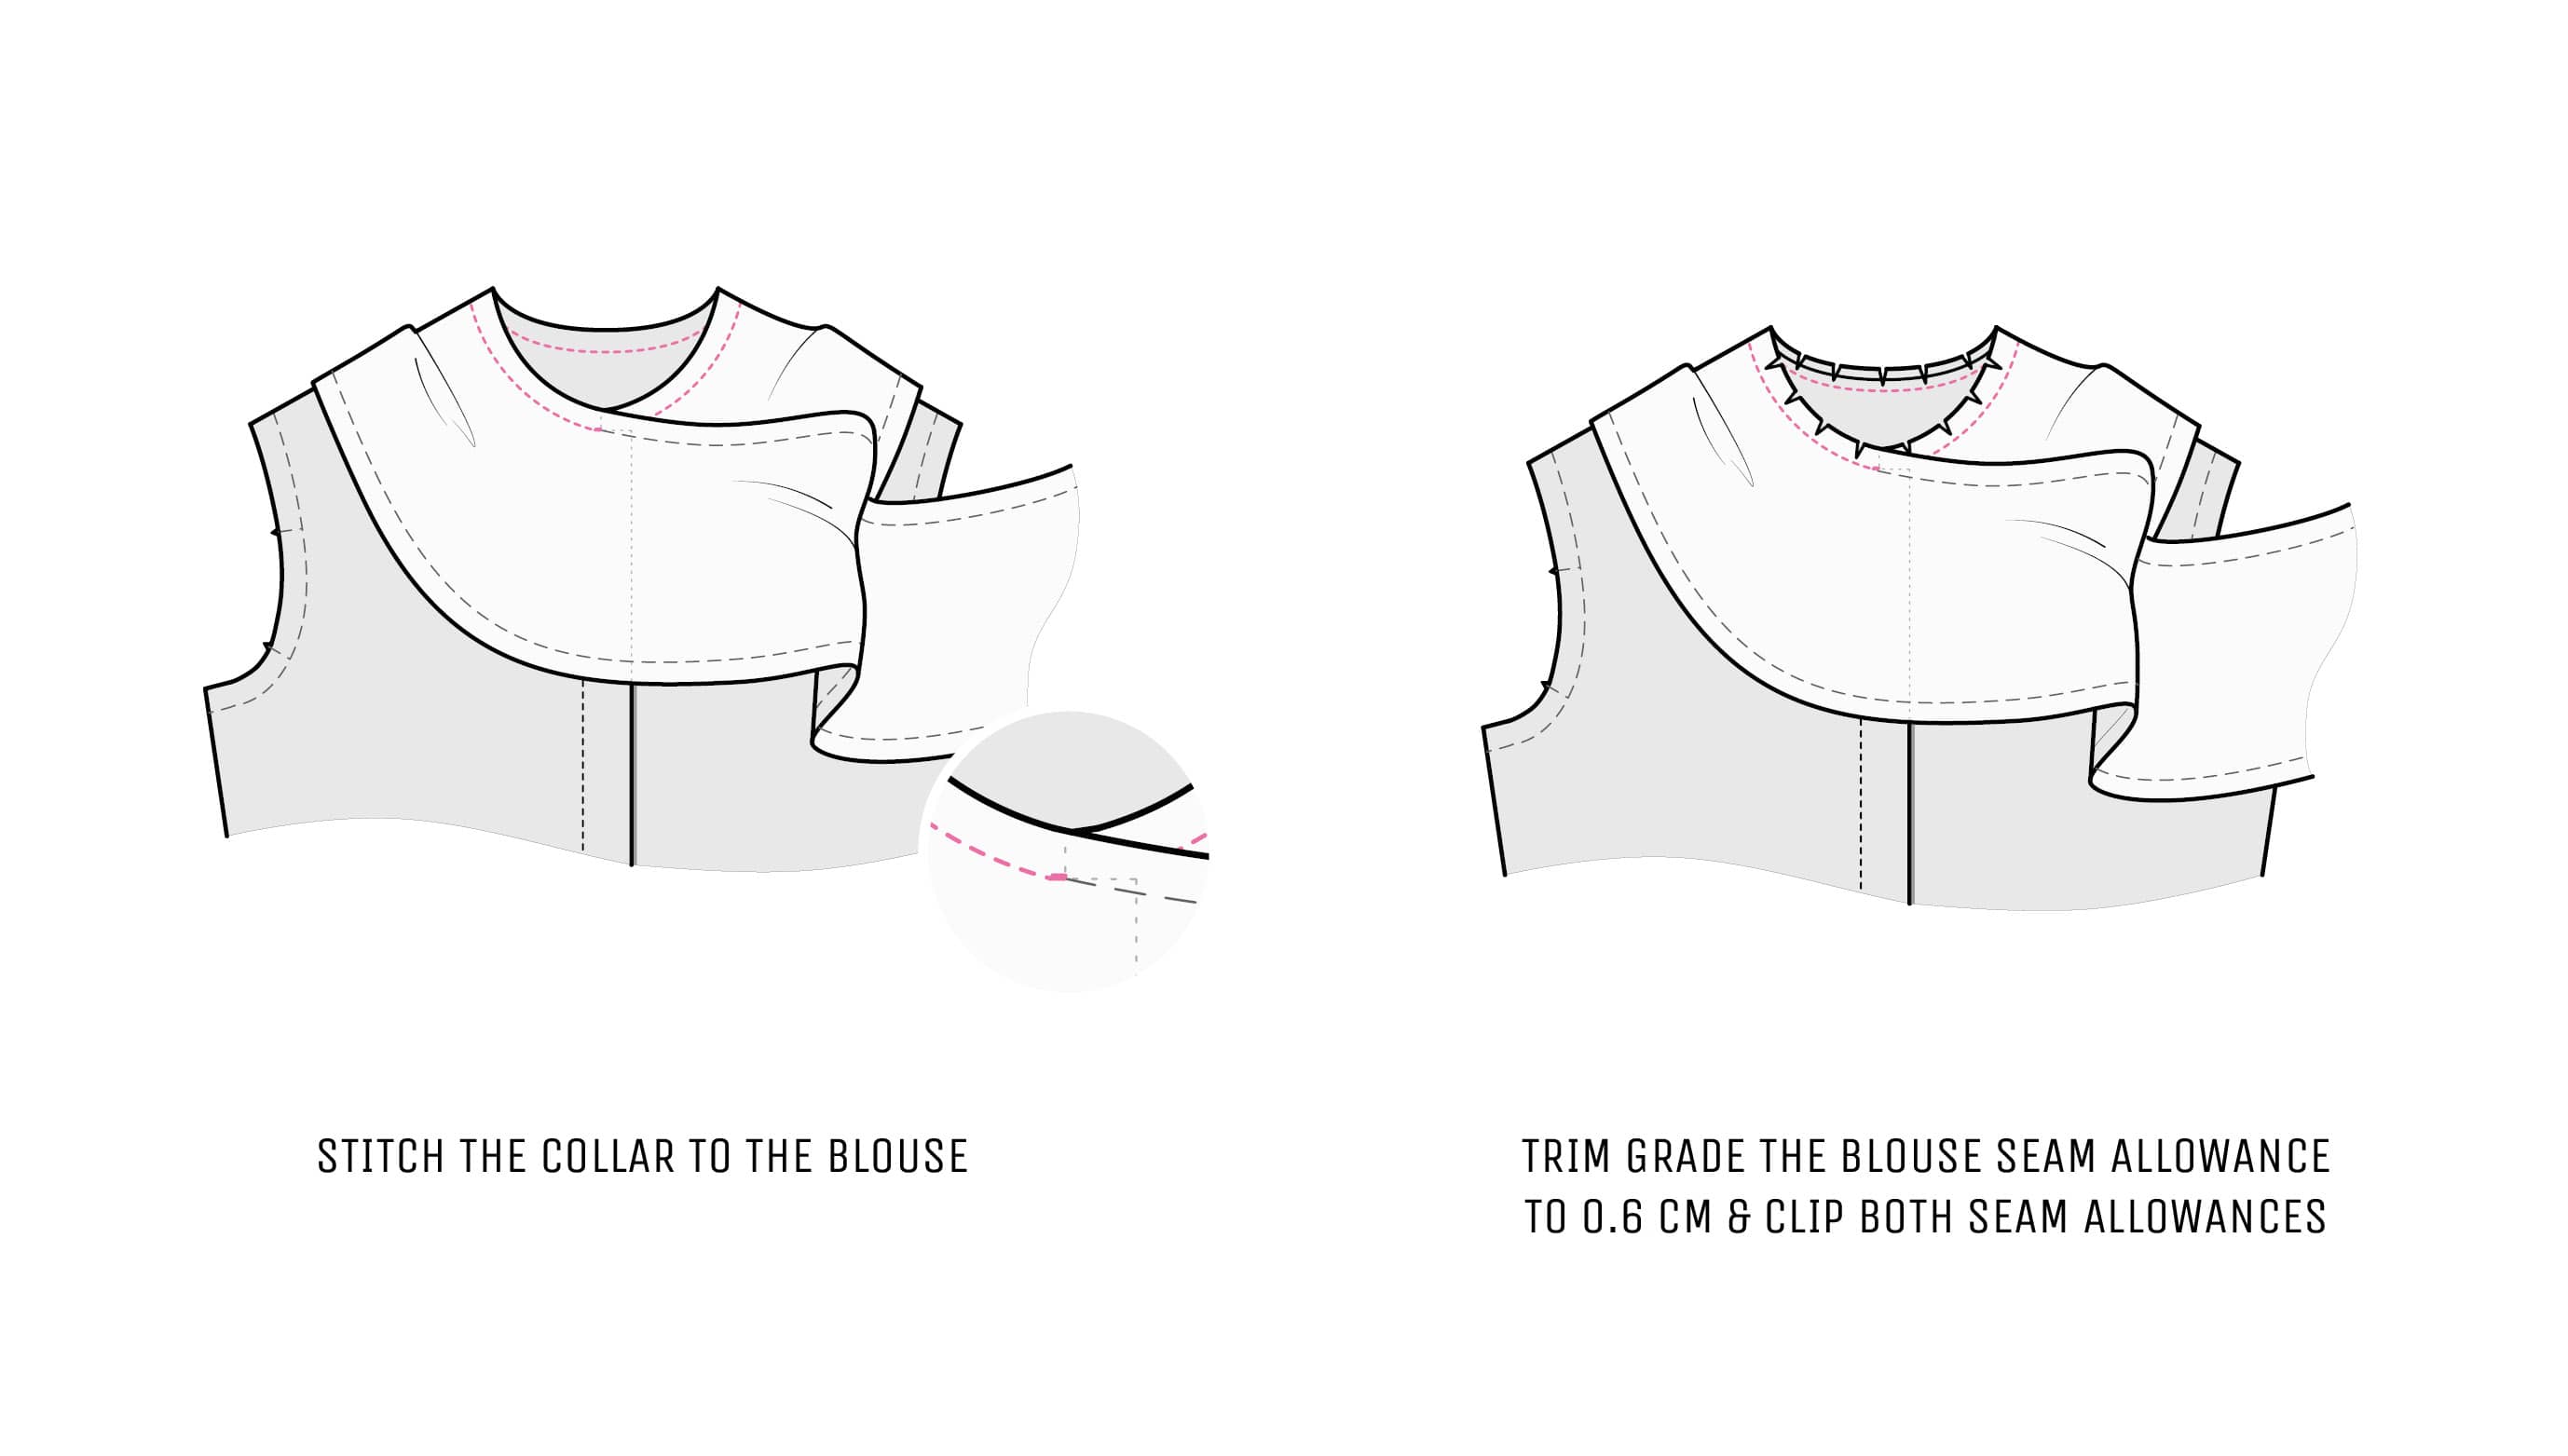
Starting right at the junction of the placket and the neckline seam allowance, stitch the collar to the blouse. Stop precisely at the opposite placket junction.
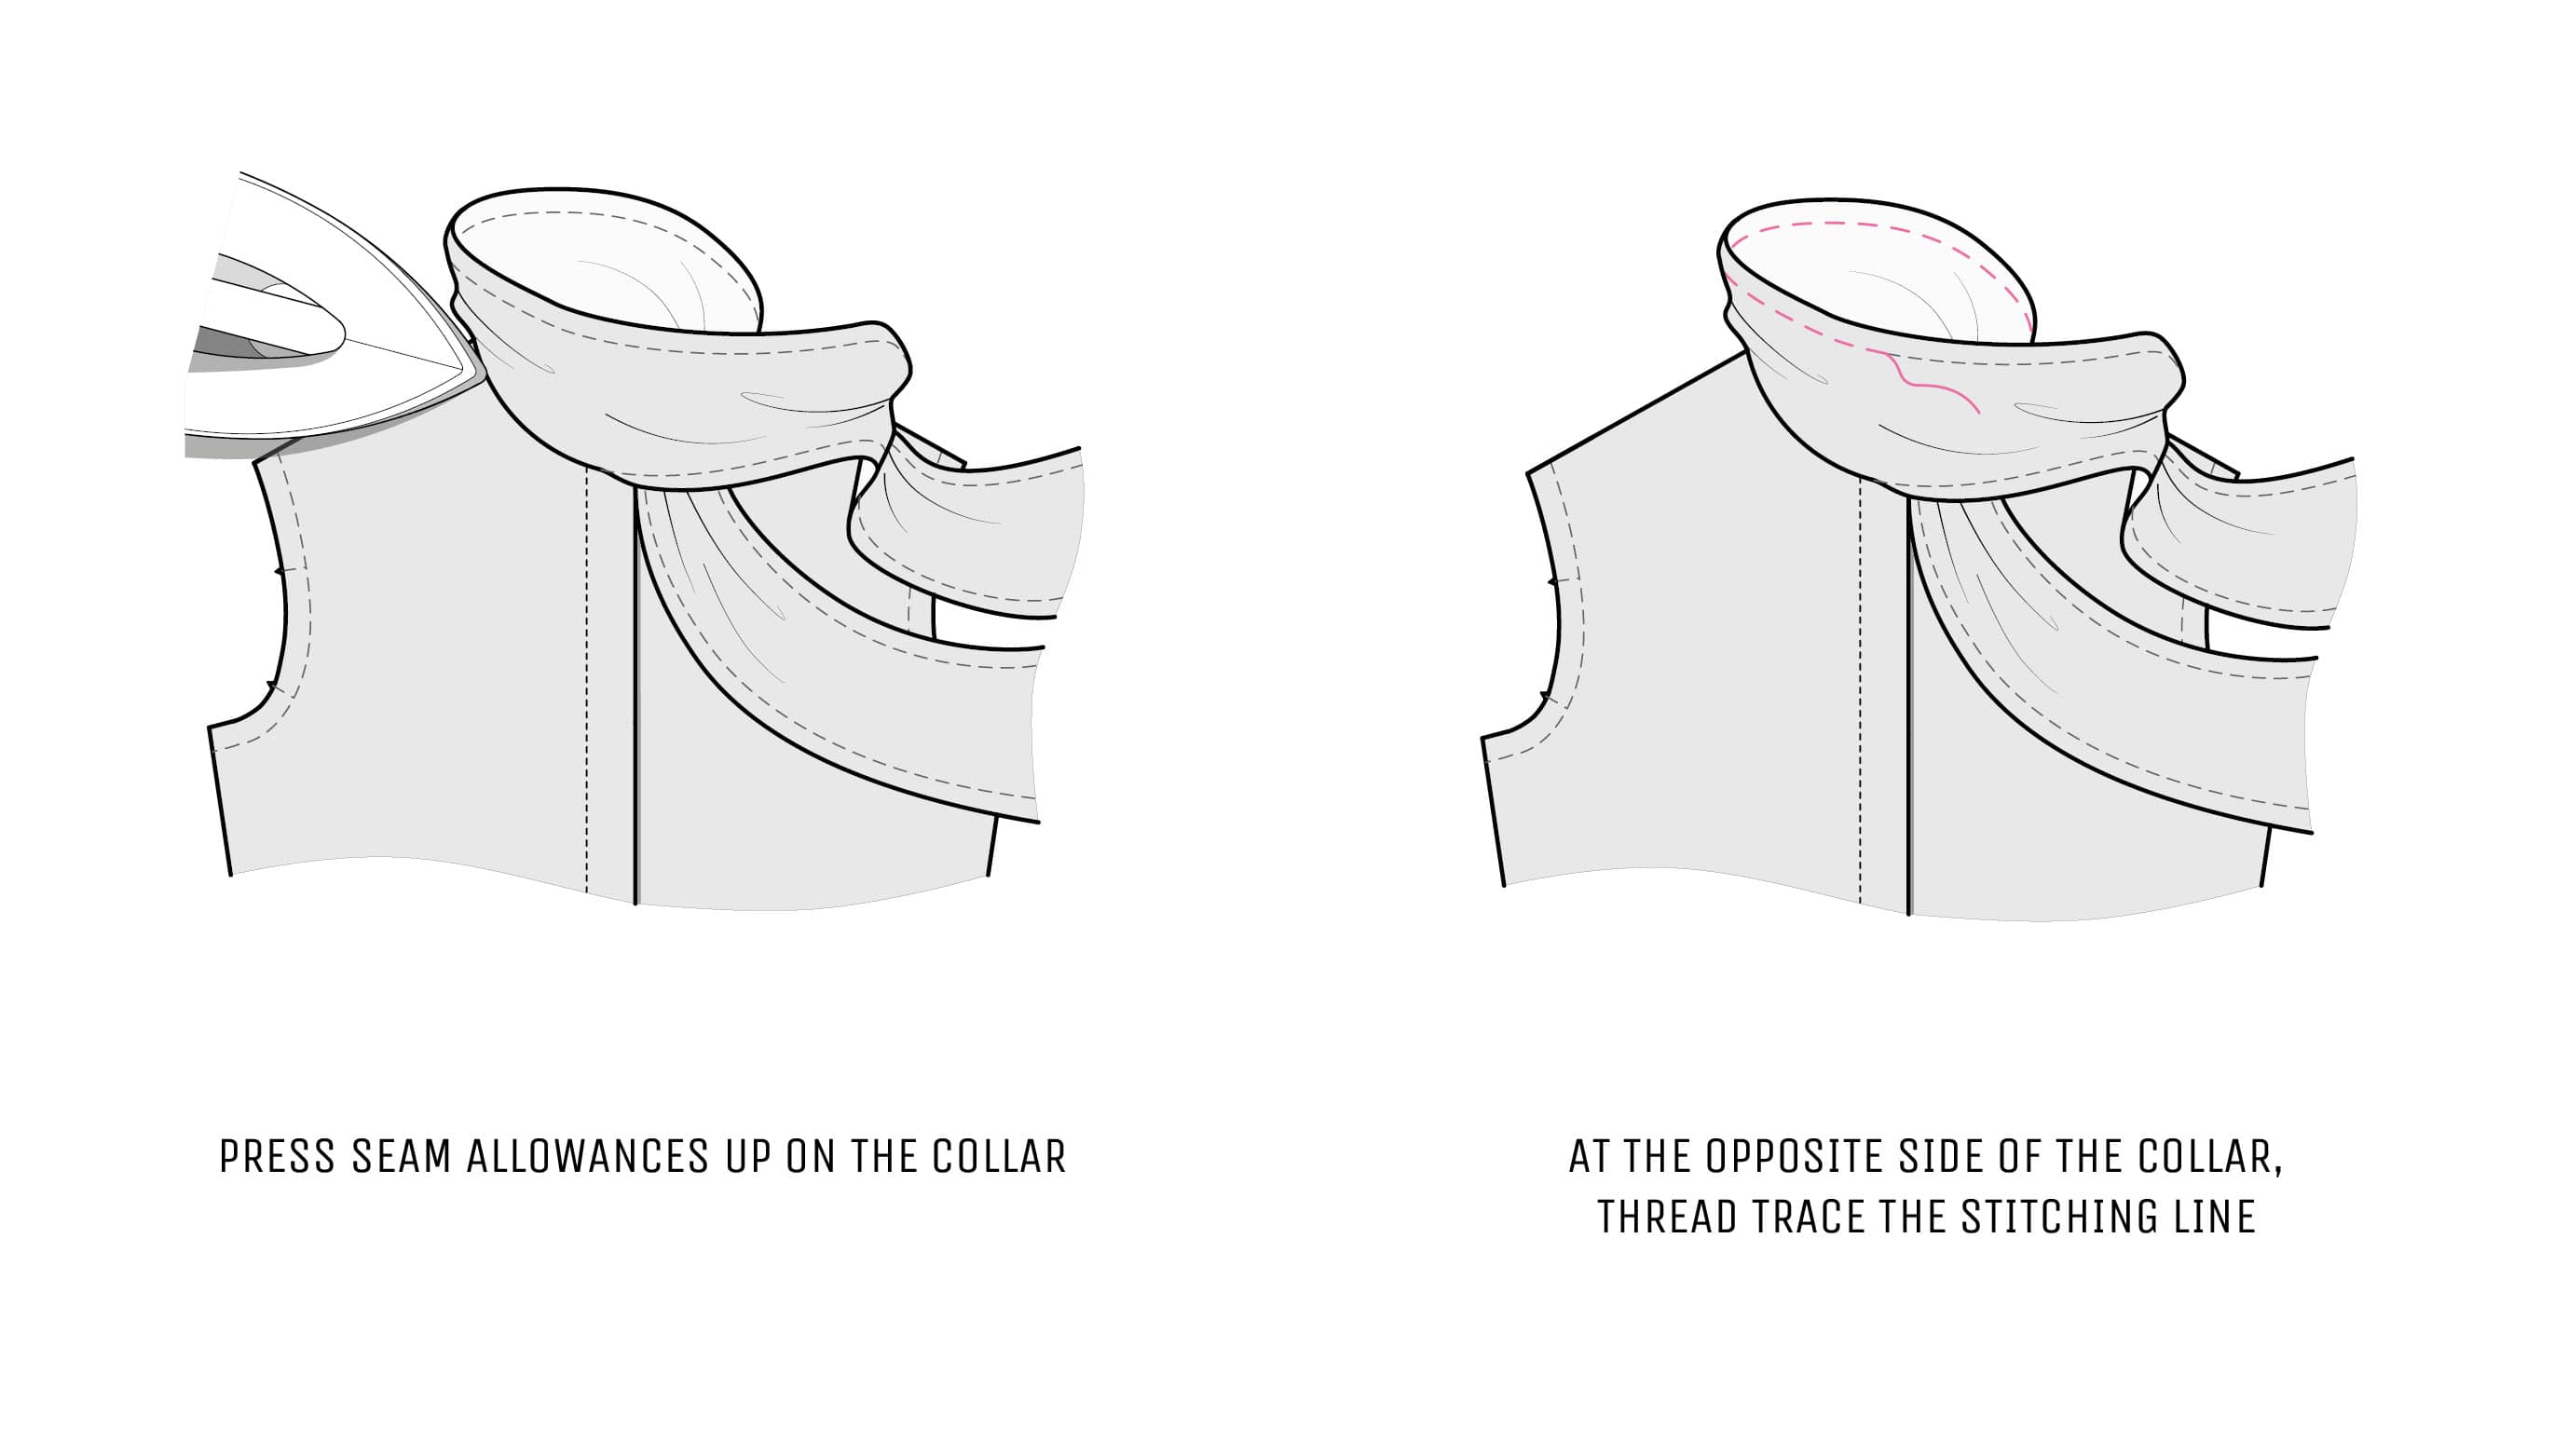
Trim-grade the blouse seam allowance to 0.6 cm (1⁄4ʺ)—if necessary, neatly clip both seam allowances to release tension. Don’t cut too close to the stitching line to avoid fraying and tearing. Then press seam allowances up to the collar.
At the opposite side of the collar—I will refer to it as the “facing”—thread trace the stitching line—the length of the basting line should be equal to the neckline seam. Later it’ll be easier to attach the collar facing to the neckline, using this basting as a guideline.
3. Sew the ties
Fold the collar right sides together. Make sure both sides are equal, and baste the collar ties on the short sides. Baste the long sides and stop right at the beginning of the stitching you made to join the collar and the blouse.
At the front, temporarily turn neckline seam allowances down. Starting at the short sides, stitch both collar ties as shown. As with the basting, it is crucial to stop stitching precisely at the beginning of the stitching you made to join the collar and the blouse. Be careful not to catch the blouse inside the seam.
Remove basting at the ties and check that everything is neat. Trim grade the seam allowance of the ties' facing to 0.6 cm (1⁄4ʺ). If you have short vertical sides, notch or fold the seam allowances at the corners, as shown. Folding the fabric would prevent fraying at the corners, but it might be tricky to turn the ties right side out. If you have short diagonal sides, carefully notch the corners.
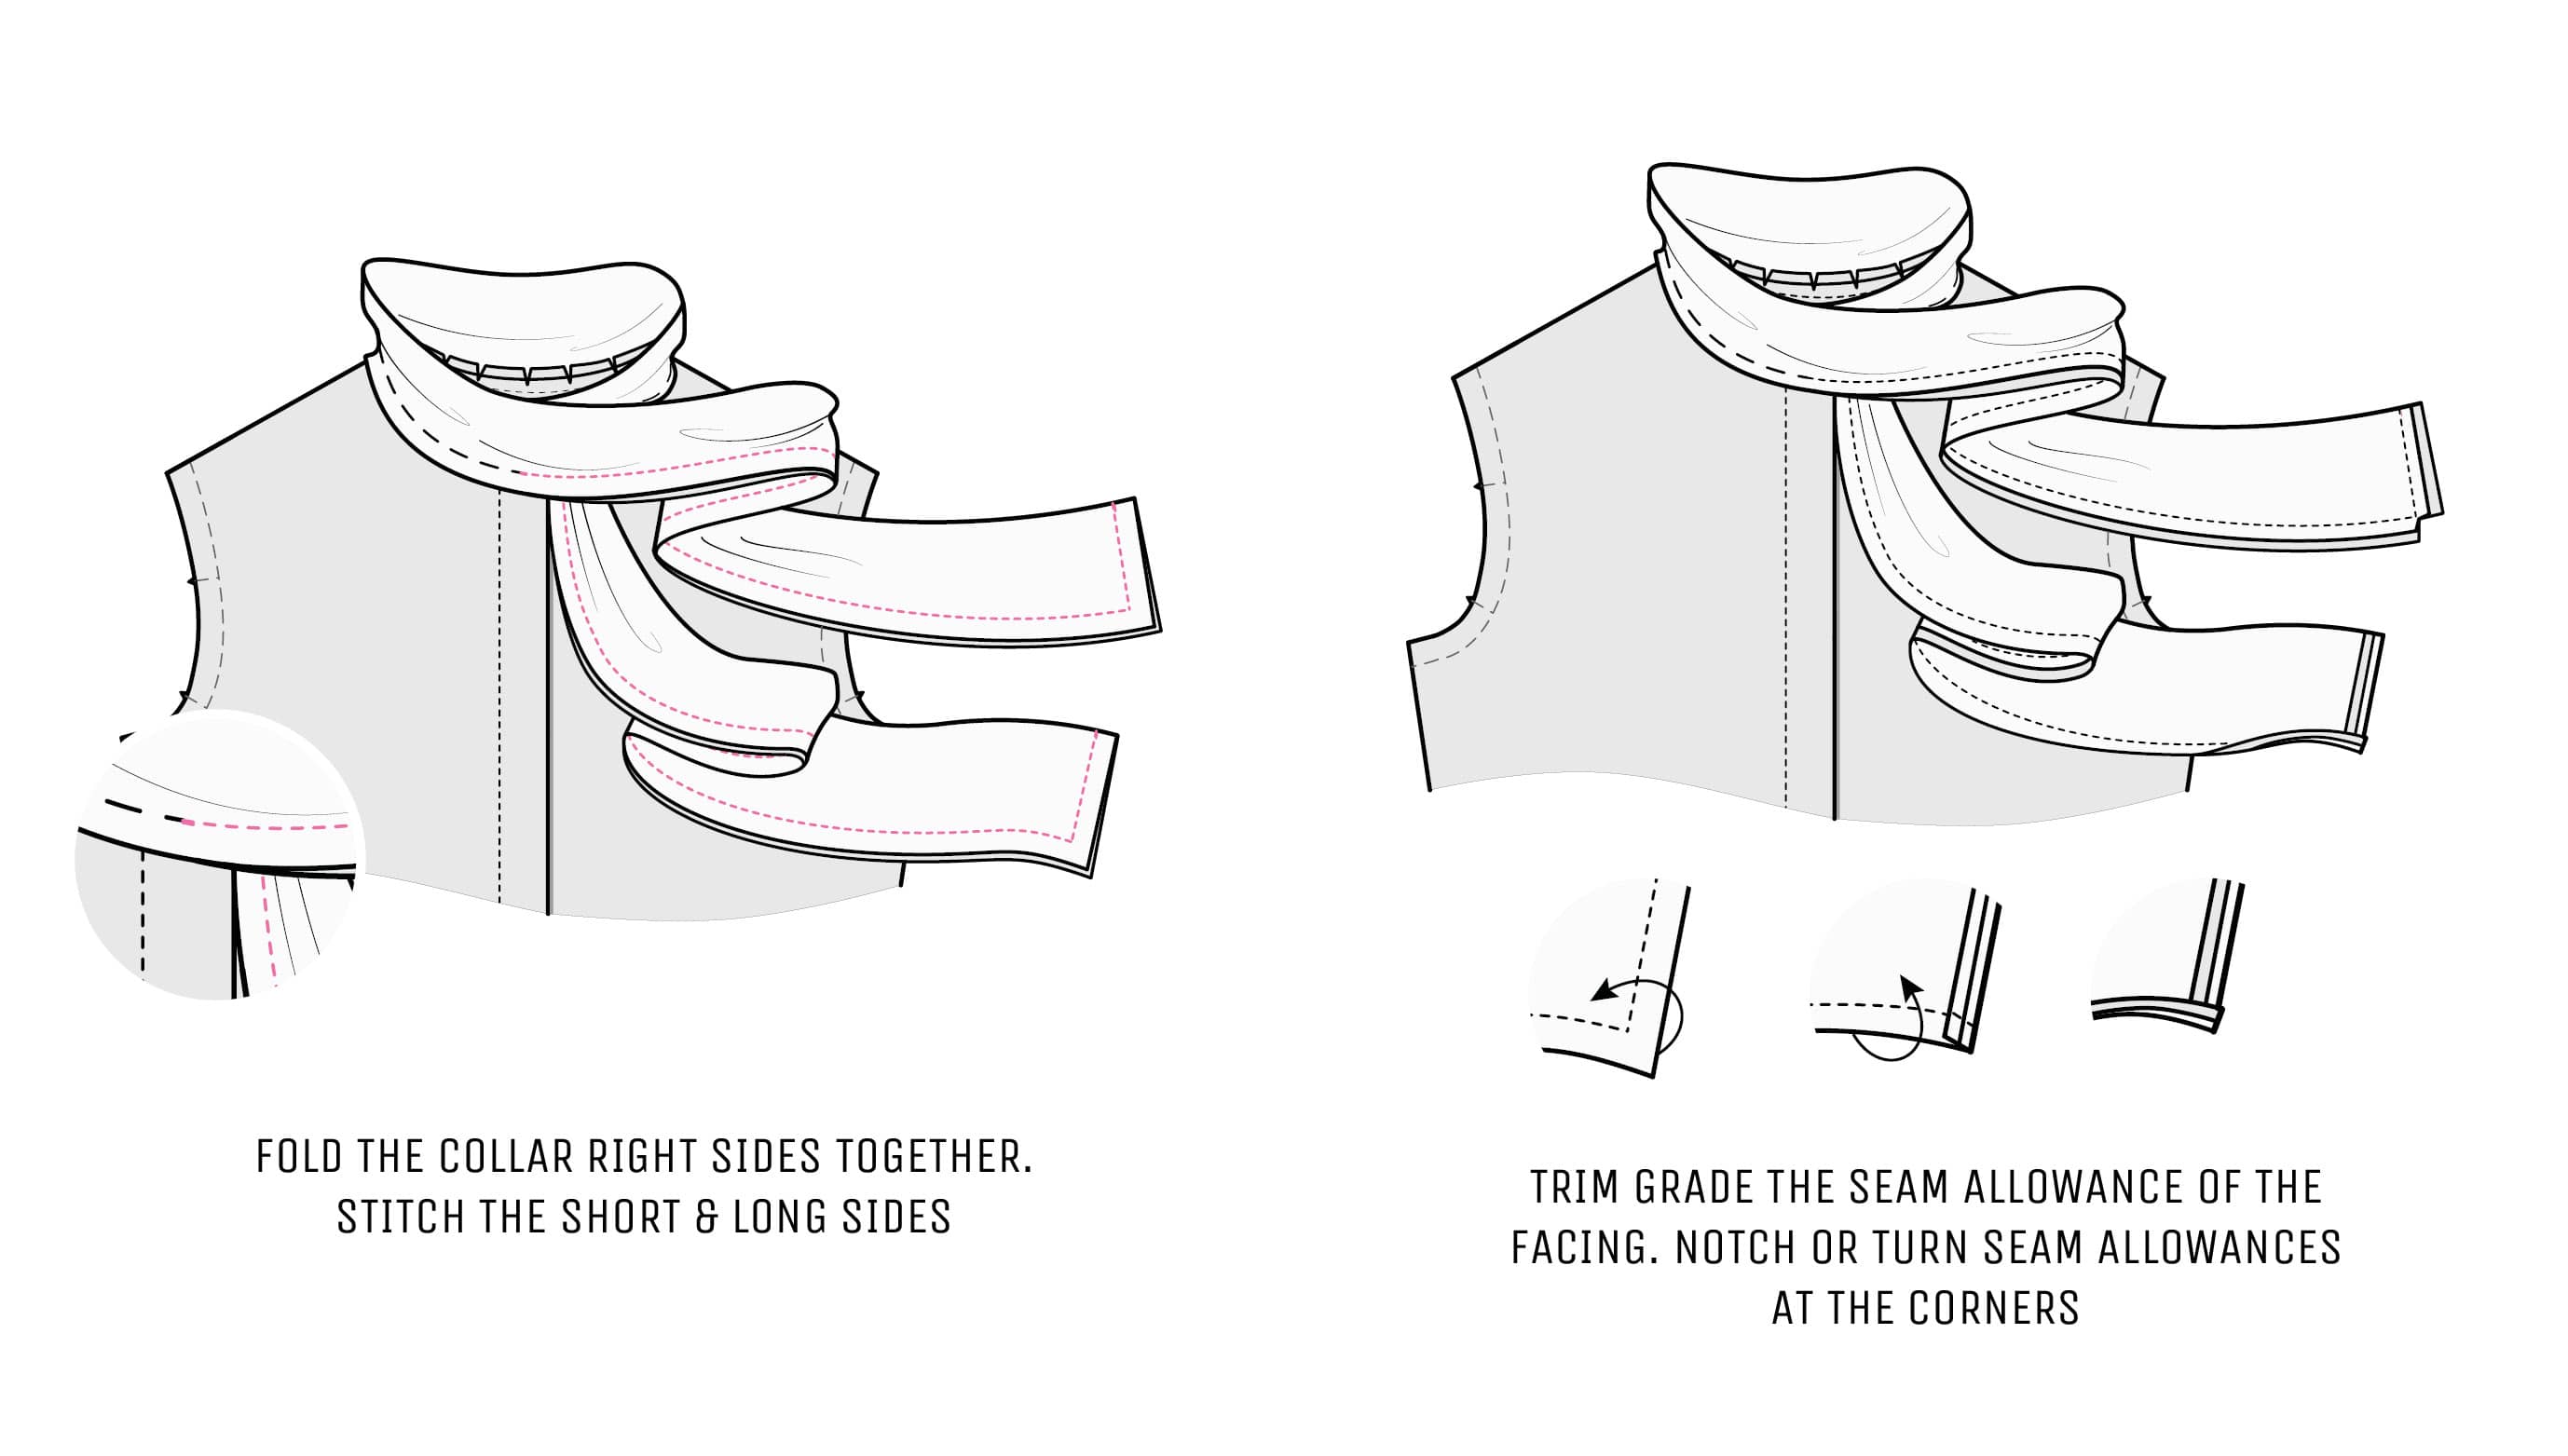
Using a seam roll, press the long side seam allowances to the inner side of the tie. Turn the ties right side out. Make sure the corners look nice and press them.
4. Finish the collar
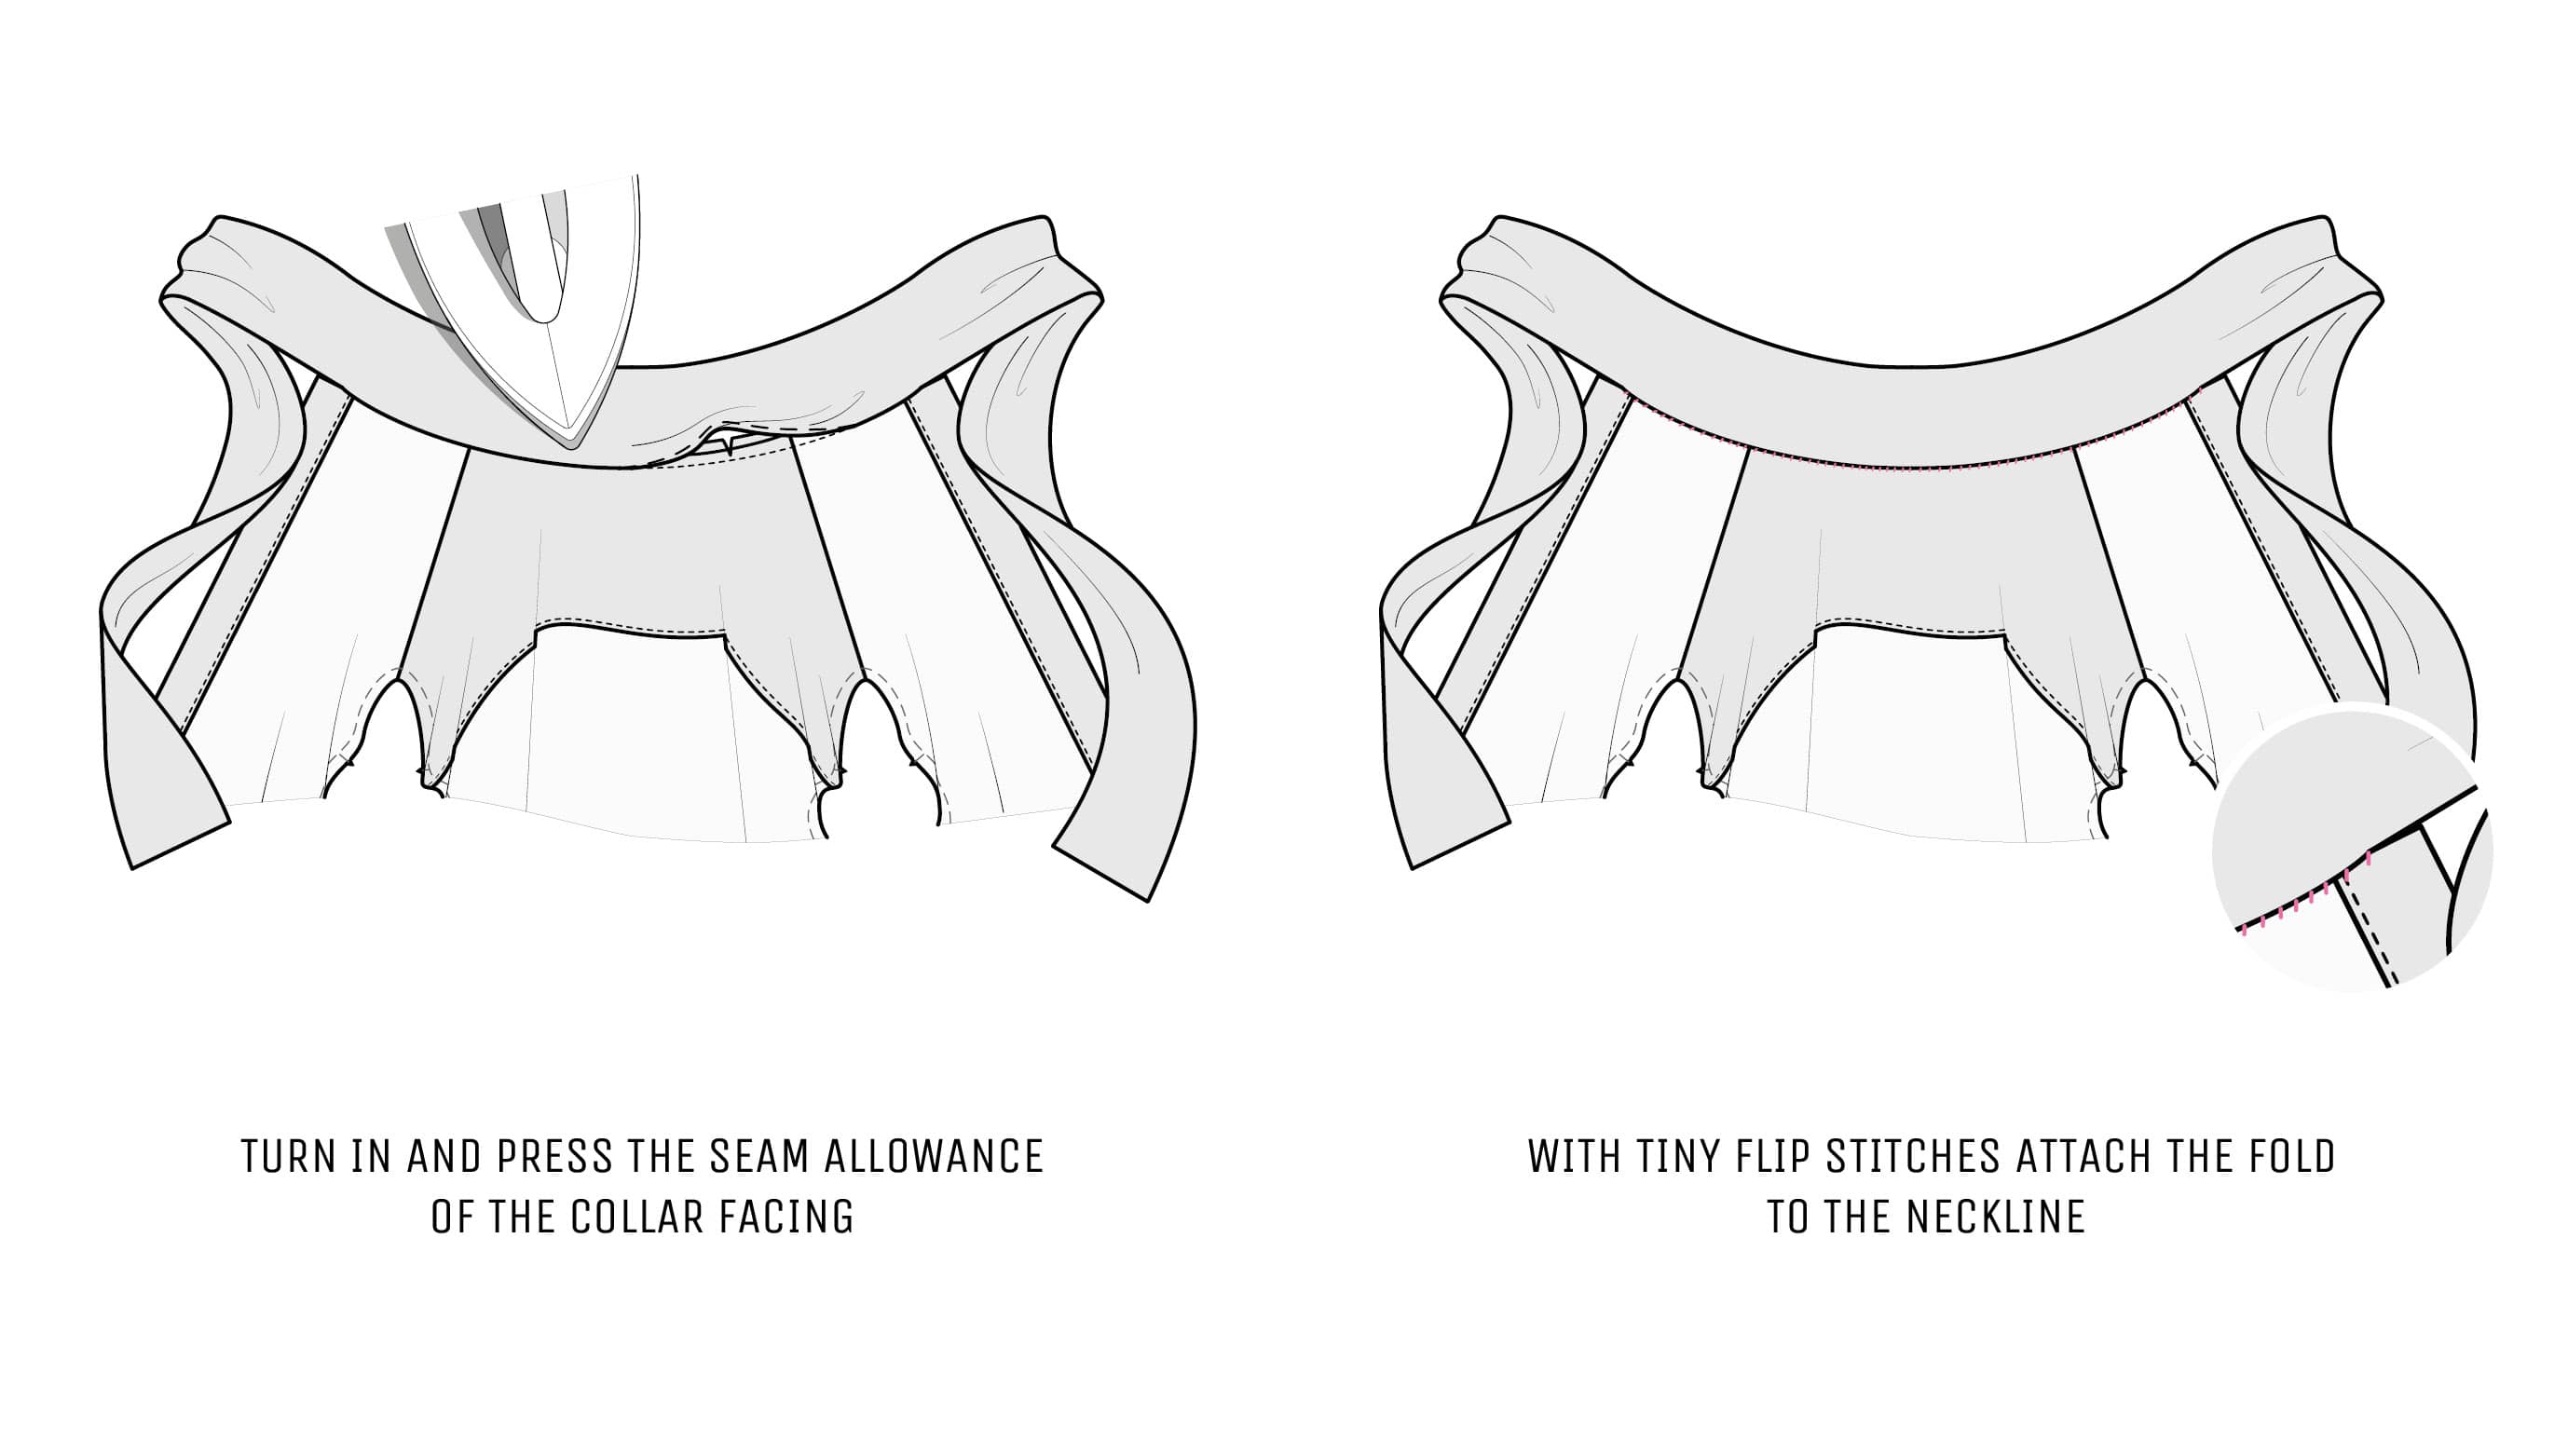
Using the basting you made before as a guideline, turn in and press the collar facing seam allowance. Baste the fold in place, so it goes right along the neckline seam. With neat tiny flip stitches, attach this fold to the neckline. If making hand stitches is hard to do, don’t worry, you can skip this.
Press the collar. Baste at the short and long bottom sides. Topstitch 0.2 cm (a scant 1⁄8ʺ) on these sides. Hide all treads and press.
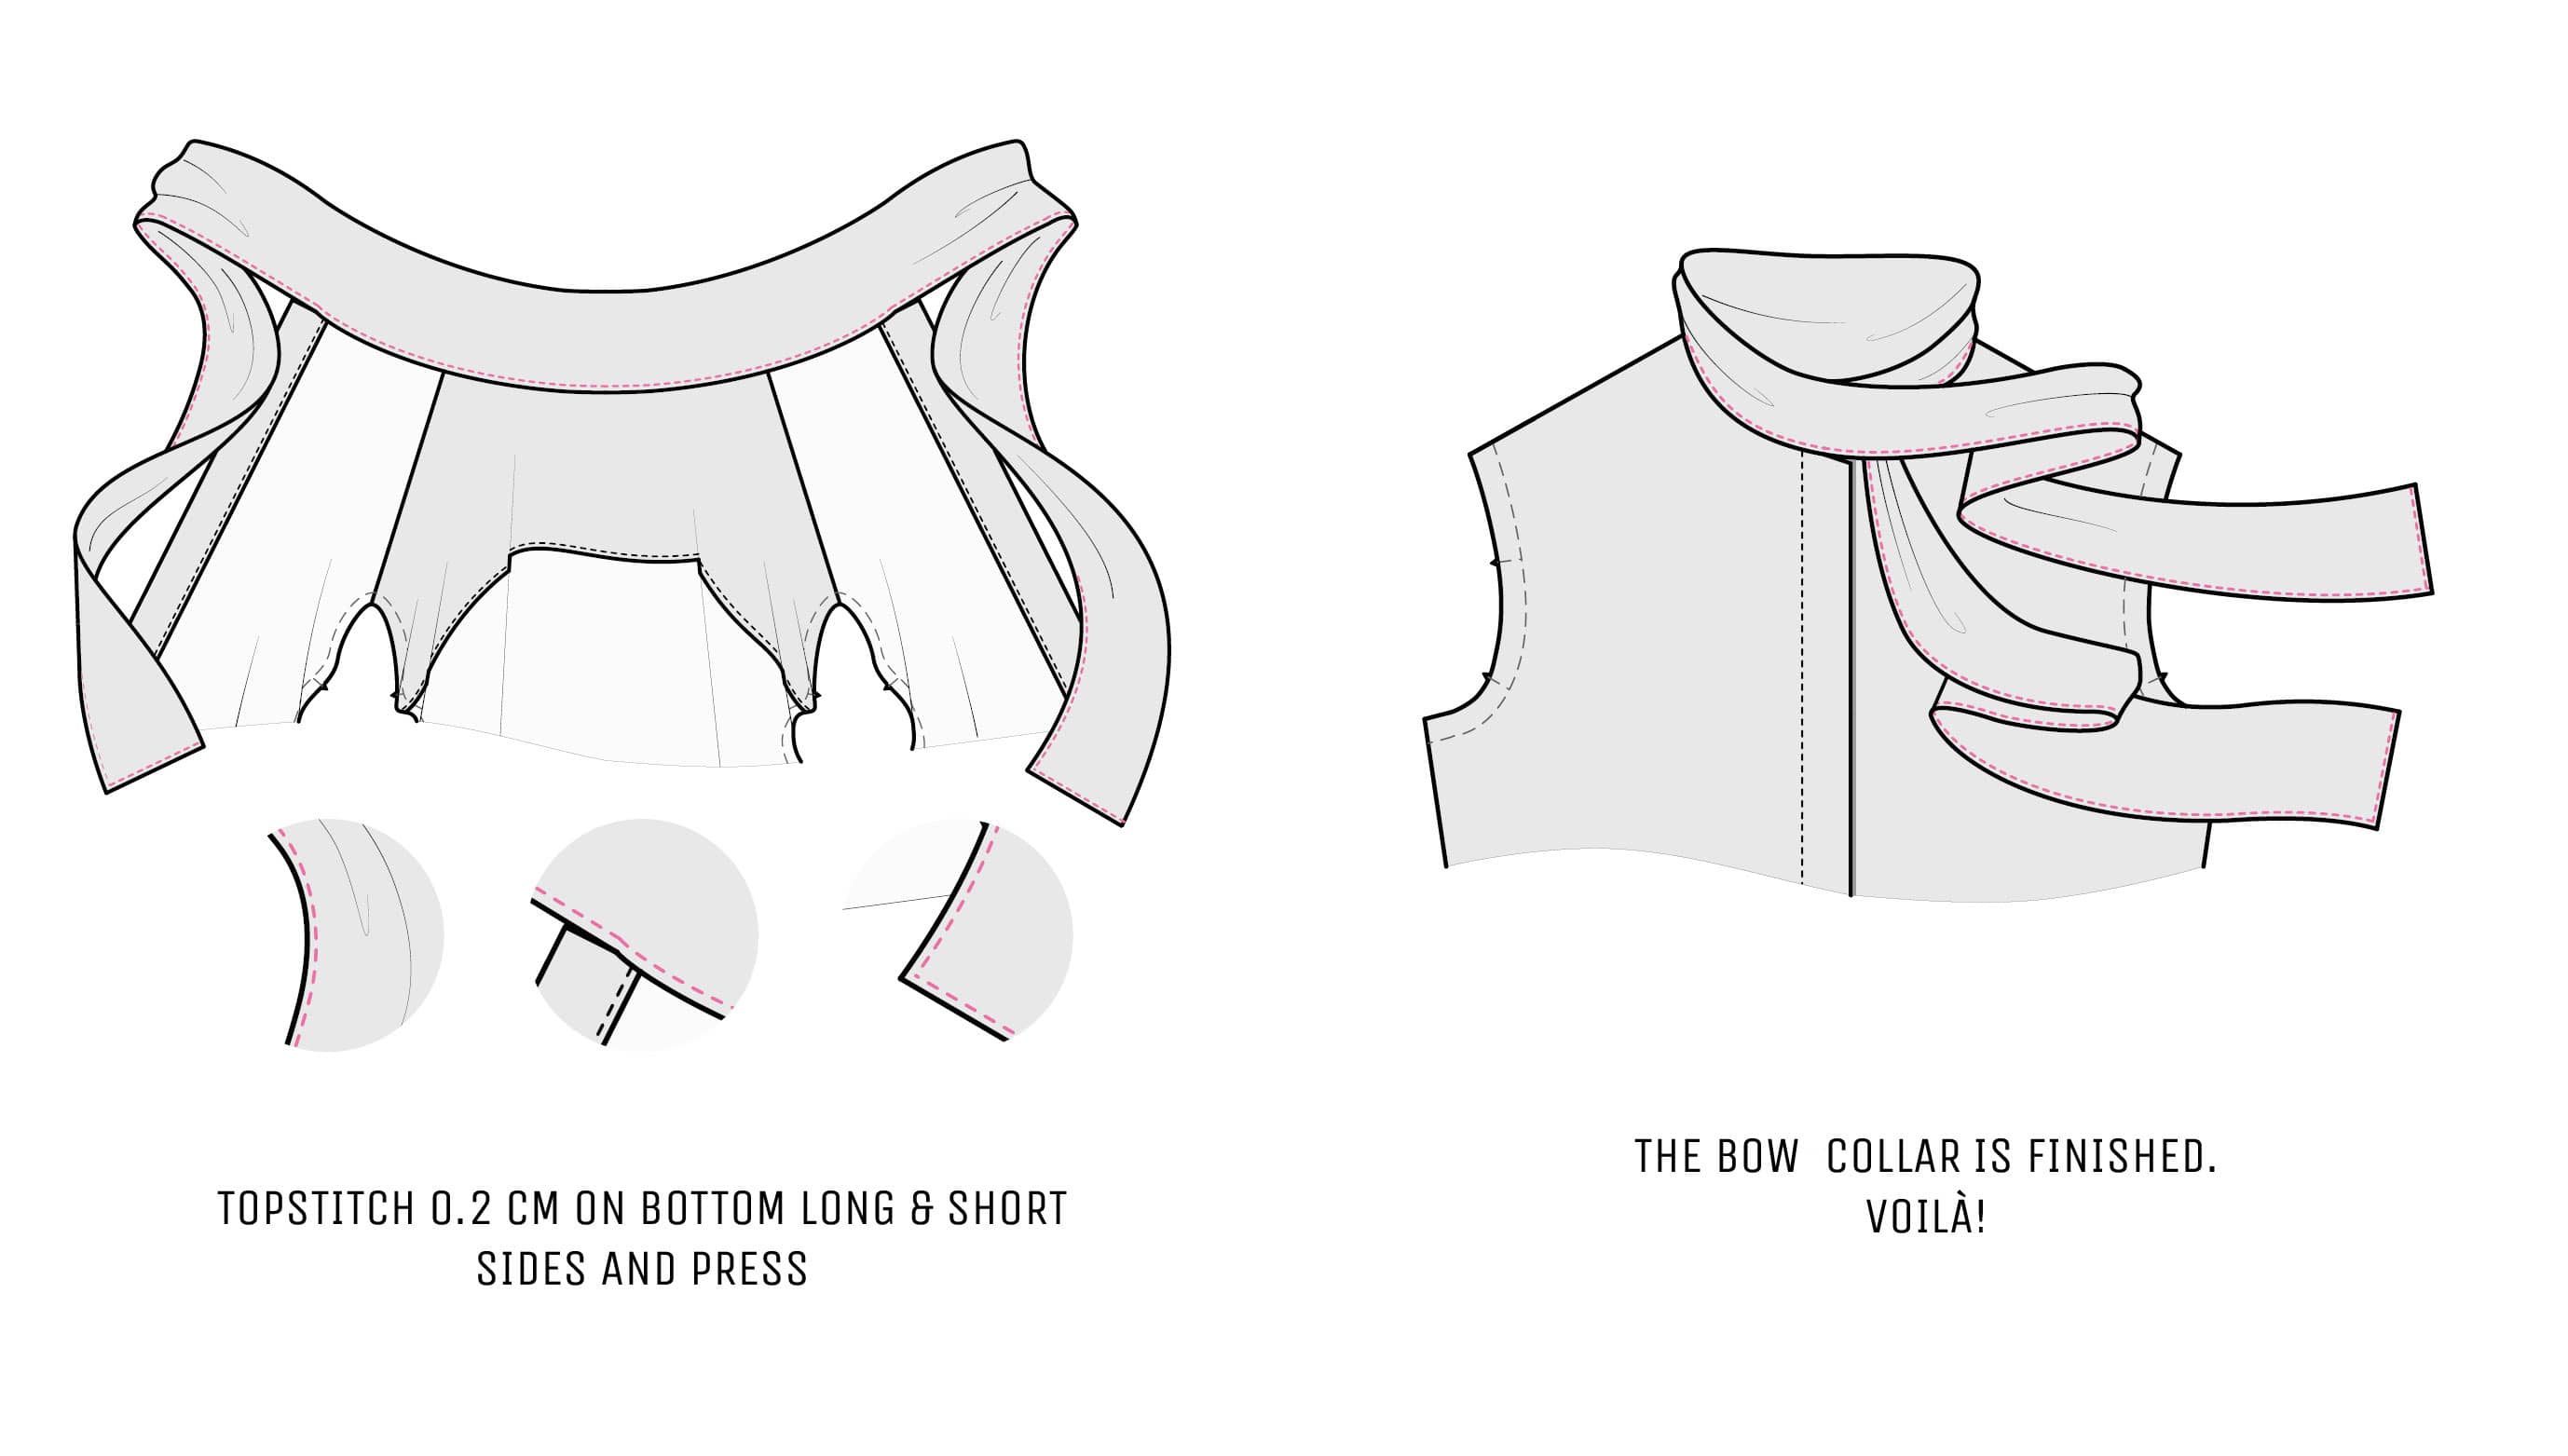
Now the bow collar is finished.
Enjoy your chic blouse.
xoxo
Yours,
Kaia
