
 My Etsy Store
How to Draft & Sew a Round Neckline Facing
Category: Tutorials 14 June 26
Ad: This tutorial is a complementary post for the Lili: Balloon-Sleeve Dress pattern, which is now available for sale on Etsy.
The Prologue
While not as lavish as bow collars, faced necklines have always been a quiet and polished foundation, accentuating both the owner’s features and the design’s elegance. Coming in various shapes and types, facings can contribute to minimalist designs and purely functional pieces or bring balance to playful and flamboyant garments.
And yet, despite how often they appear in garment construction, facings are rarely explained beyond the sewing steps themselves. And while this tutorial focuses on the practical side of this neckline finish, it still helps to first understand what facings are and why they are constructed as they are.
To make the sewing process easier, let’s first unpack a bit of theory and logic behind facings in general. And if you’d like, you can jump straight to the tutorial instead.
Facings
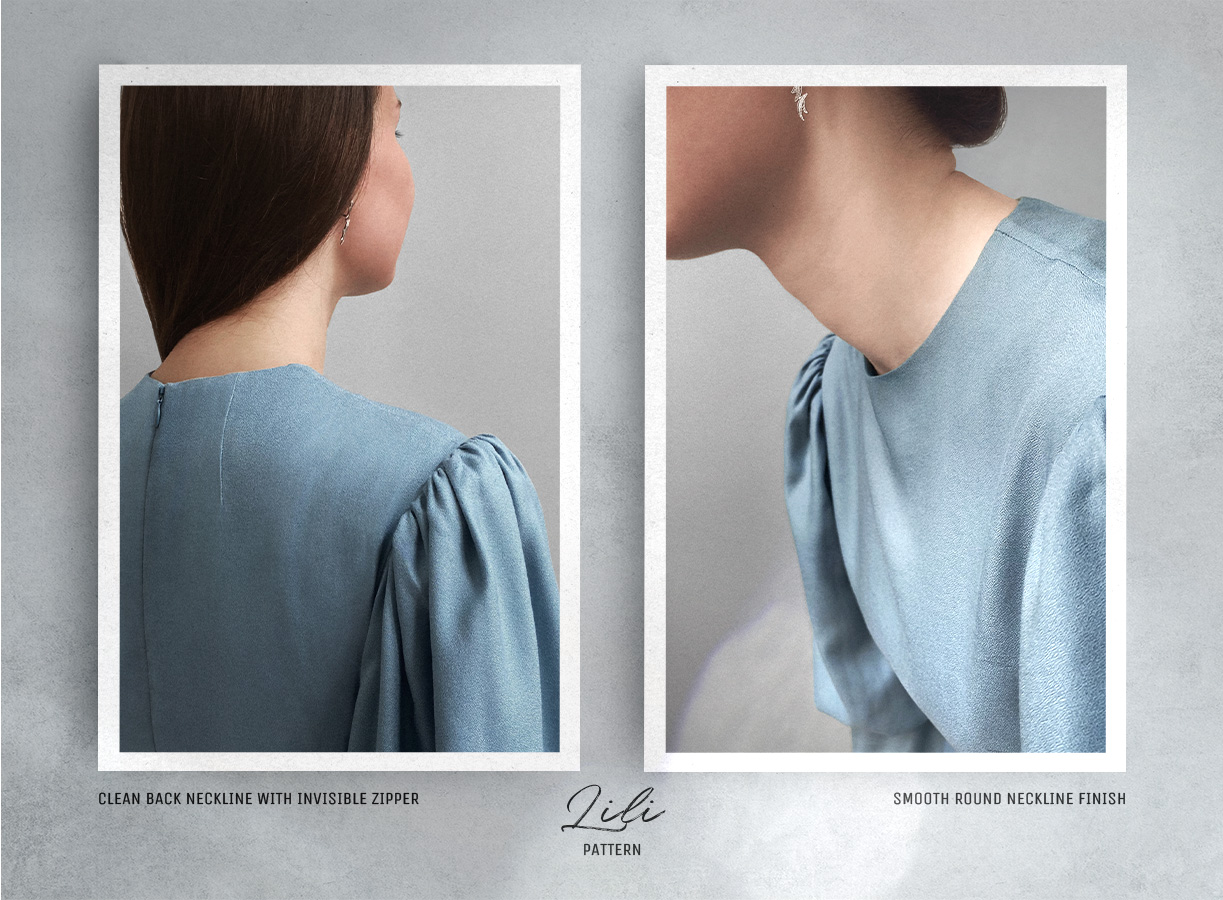
What is a Facing
Facings are pieces of fabric used to finish a garment’s raw edges and prevent fraying. Most often, facings are used at necklines, armholes, waistlines, slits, and, of course, garment openings—think lapels on a tailored jacket, for example. In a sense, facings serve a purpose similar to that of the fold-in hems. The main distinction between them is that fold-in hems work on straight and barely curved edges. The facings, however, work beautifully with edges of various shapes: straight, angled, curved, and even scalloped; that’s why they are often used to finish edges when the regular fold-in technique does not work.
Types of Facings
There are three types of facings: extended, separate (often called fitted) and bias. The extended facings, as the name suggests, are the extensions of the garment piece and are used along straight edges, much like a fold-in hem.
The fitted and bias facings are cut independently of the garment from the fashion fabric itself or a lighter, more suitable alternative, such as lining. A fitted facing is cut by the pattern and duplicates the shape, the size and often, but not always, the grainline of the edge it faces. Bias facings are cut in strips at a 45° angle, also known as true bias, and create a clean, narrow finish.
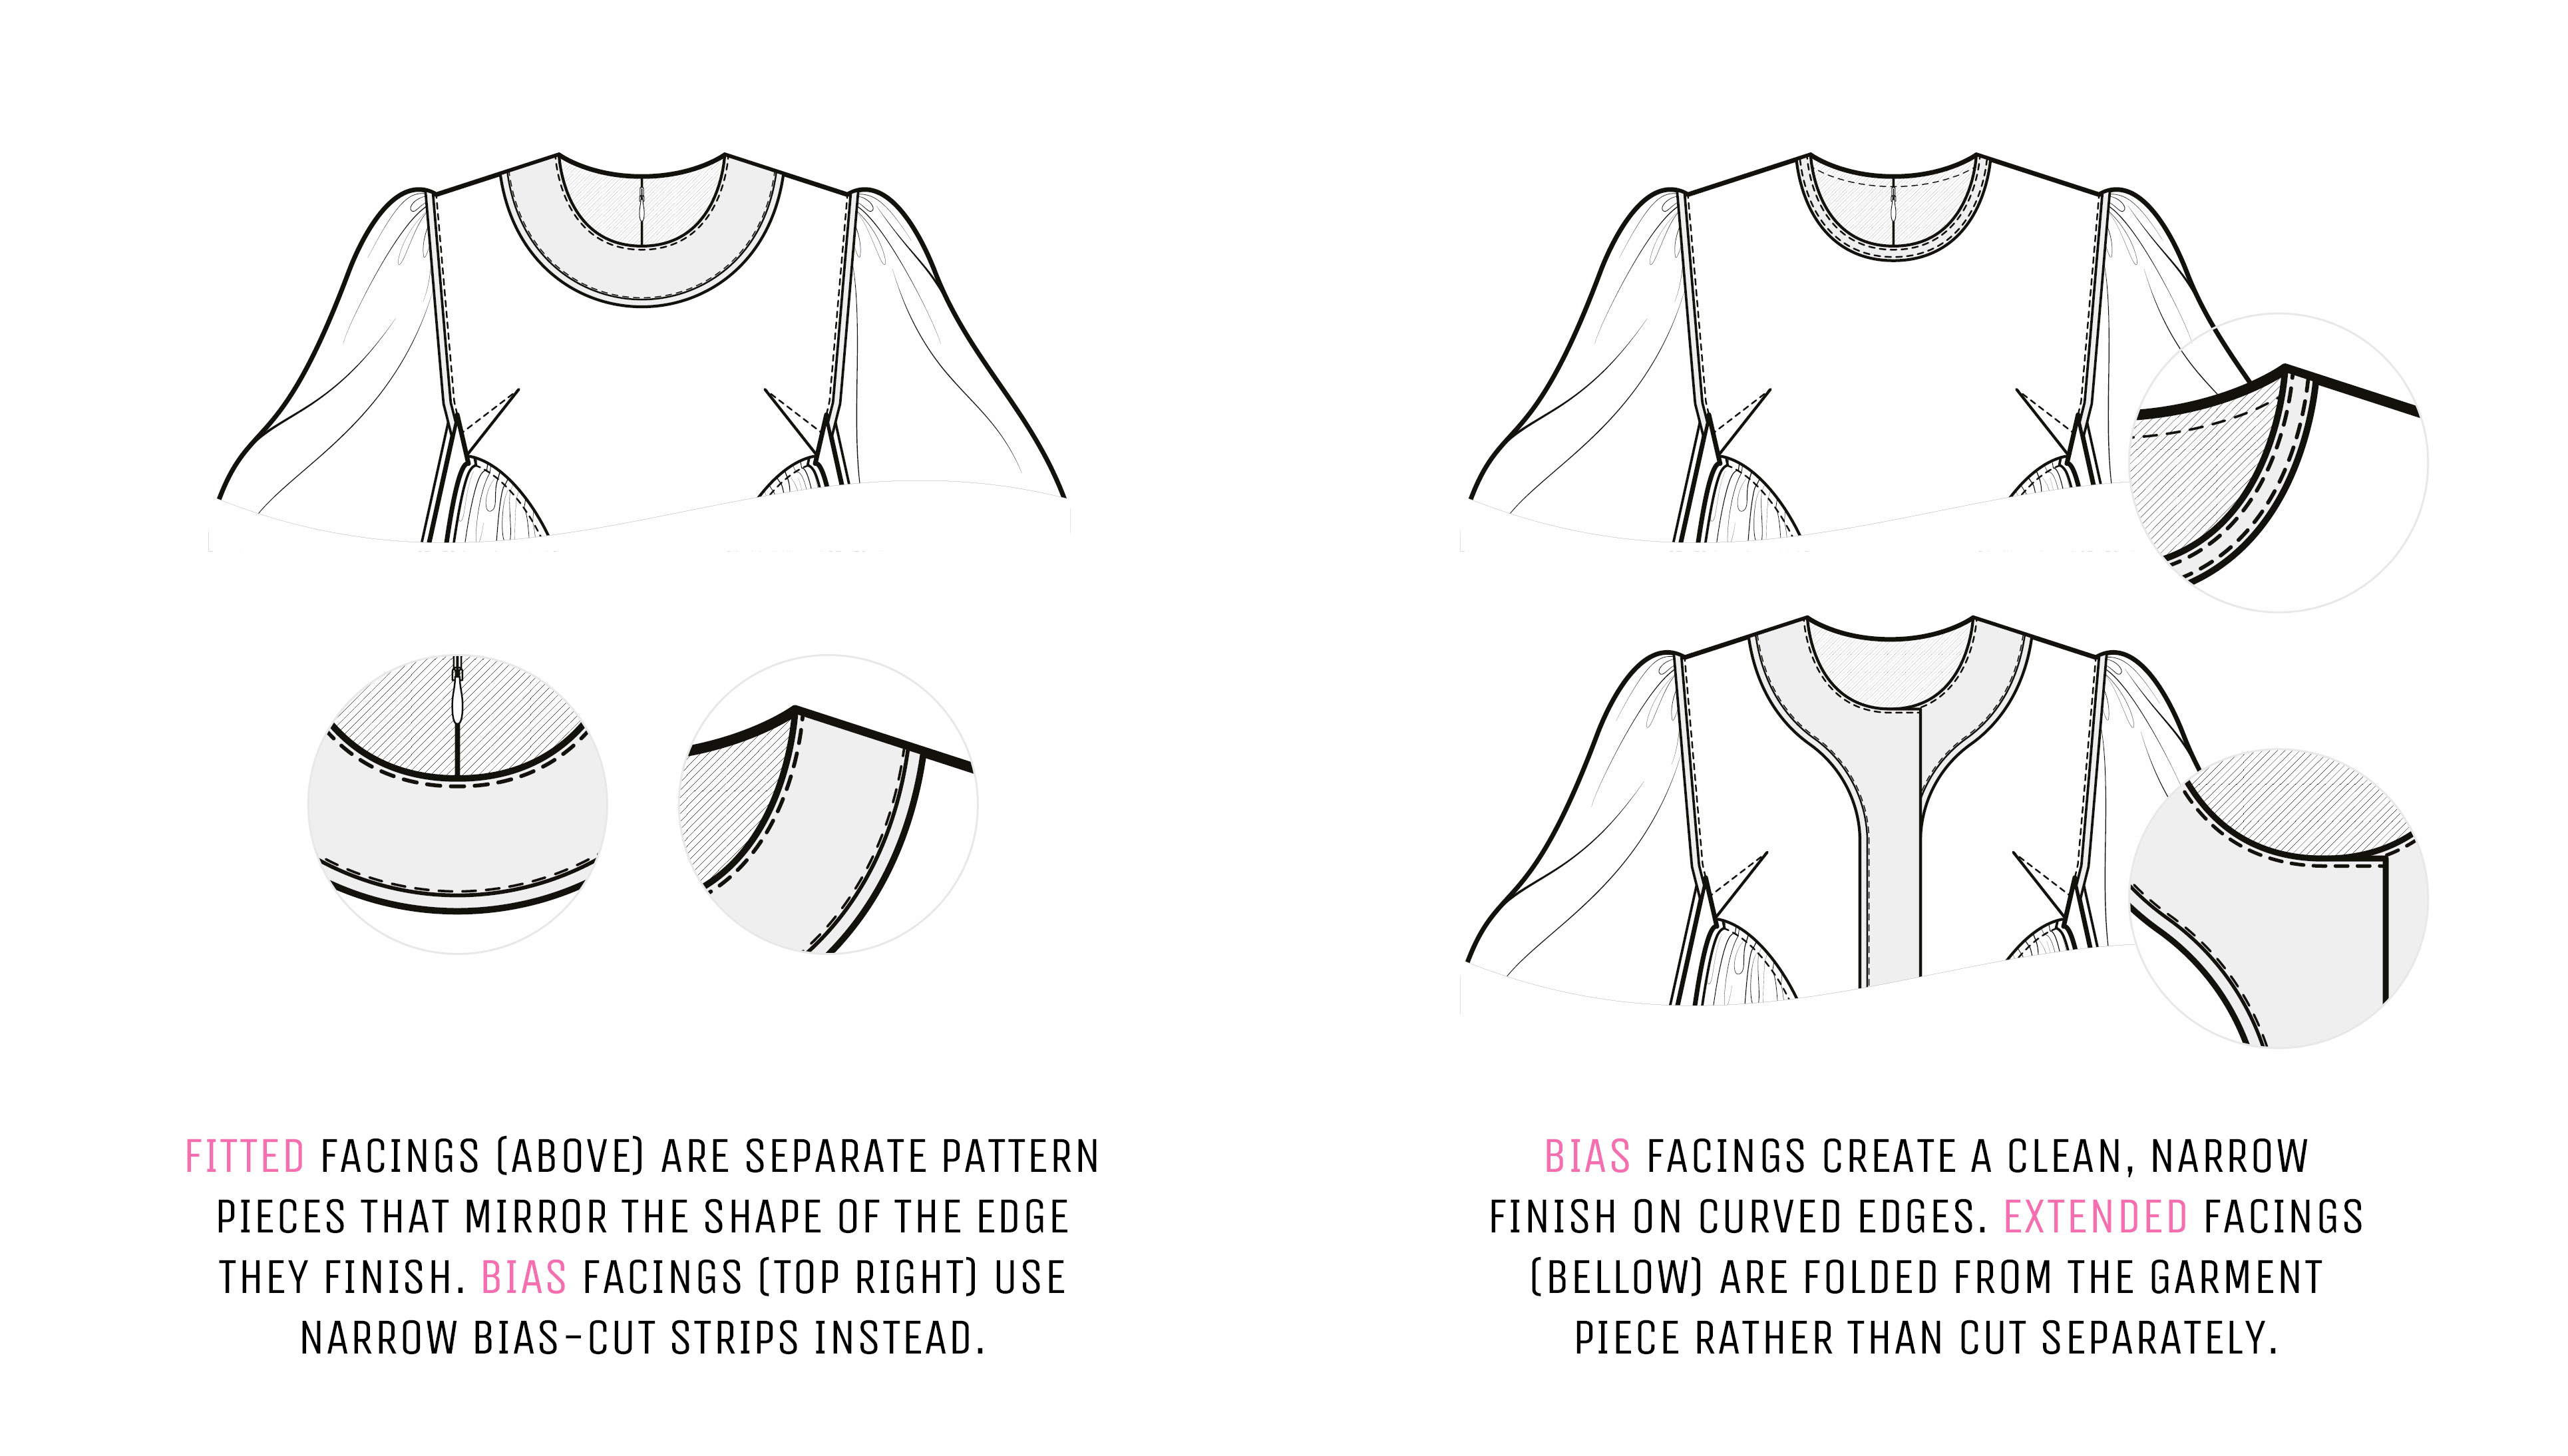
Most often, independently cut facings are solely functional elements attached right sides together to the garment edge and turned to the wrong side, to remain invisible from the outside once the garment is finished. However, they may sometimes be used as a decorative element on the garment’s right side. In this case, they might be cut from contrasting or complementary fabric and include decorative topstitching.
Shapes of Facings
Facings can be cut in several shapes. The most common one is the circular facing that has an even width from the edge. Sometimes, its outer edge can be lowered at the centre front and back to help protect the garment from perspiration and body oils. Another common shape is rectangular. It extends into the armholes, adding stability to the garment but often also increasing the thickness of the armhole seam.
In sleeveless garments with open necklines, an all-in-one facing can be used instead of three separate circular facings for a smoother finish. This single complex facing finishes both the neckline and the armholes at once.
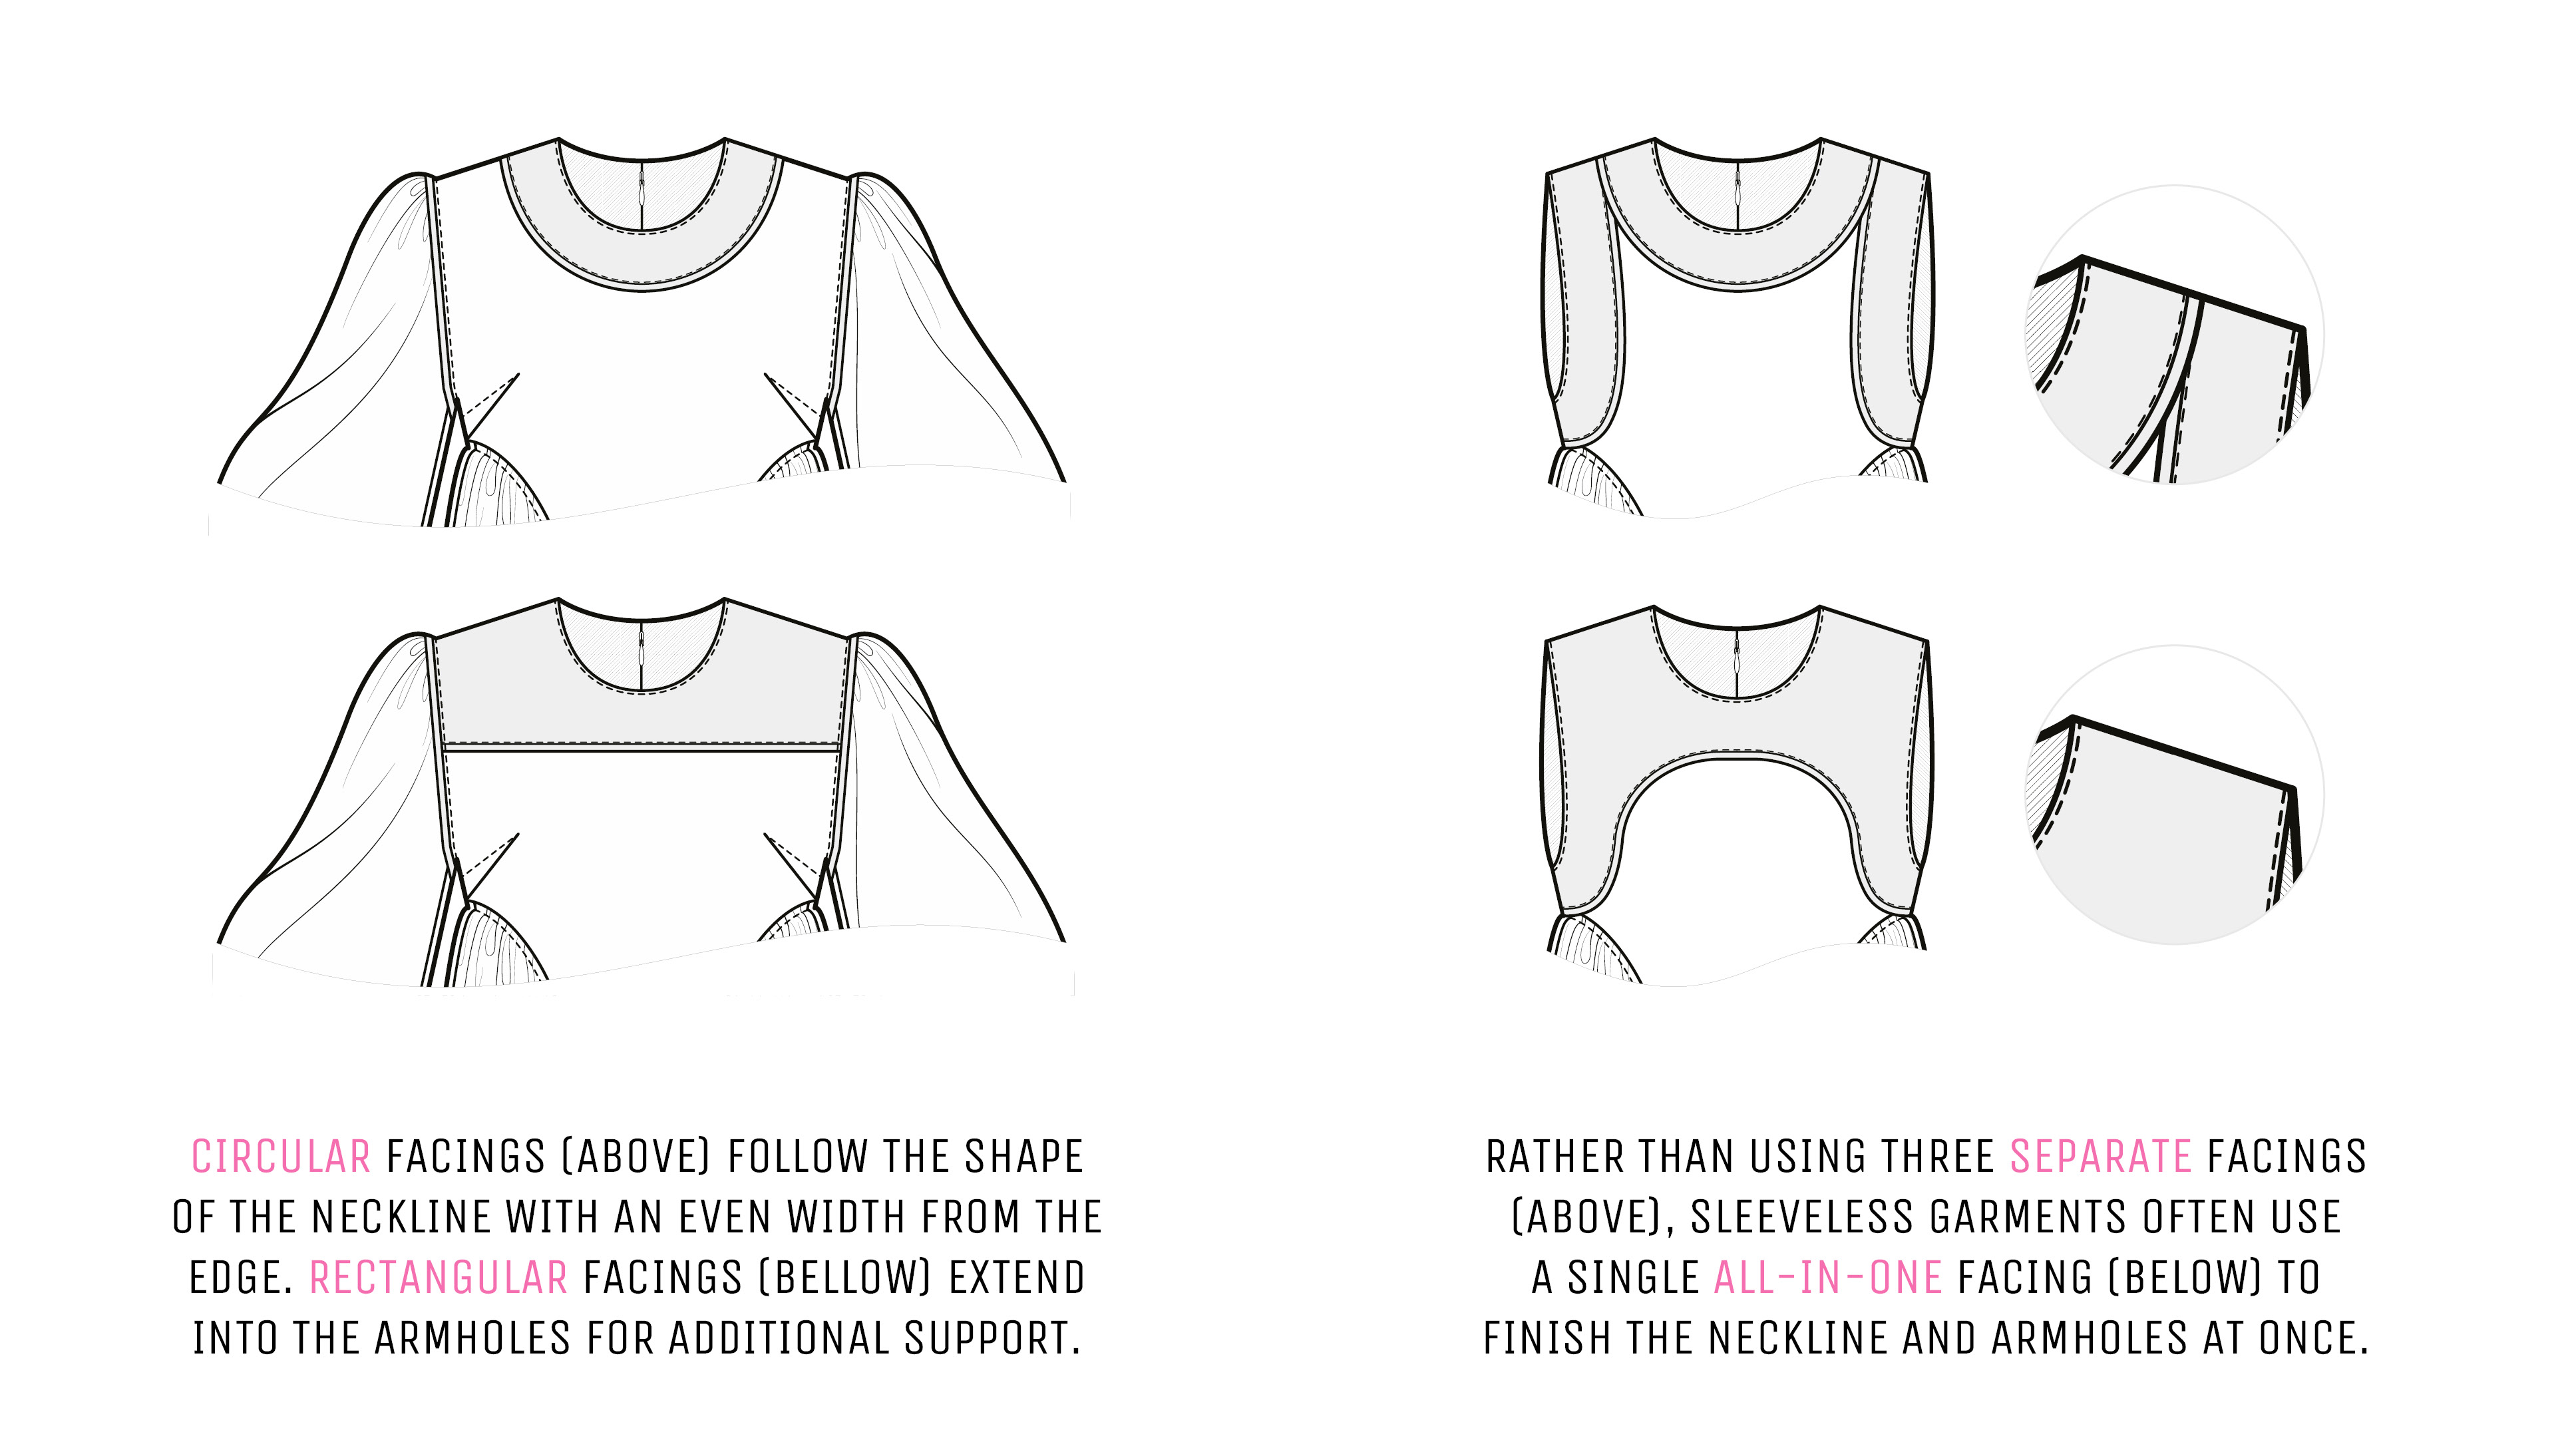
While this tutorial focuses on the standard circular facing for a round neckline, its methods and principles can easily be applied to the armhole and curved-hem facings.
Now, let’s uncover the process from the pattern pieces to the last stitch.
Fabric & Supplies
For your neckline facing, you’ll need:
- Fashion Fabric*: non-stretch light- to medium-weight woven dress fabrics. For designs similar to Lili, consider viscose or silk crêpe and twill, silk habotai, dupioni, charmeuse, or dramatic taffeta.
*Most often, the facing is cut from the same fabric as the garment itself, but if the fabric feels too bulky or its pattern is see-through, you might want to opt for a lighter-weight alternative in a matching colour.
- Interfacing: lightweight fusible options that match your facing fabric in weight and drape.
- An optional hook and eye for the back neckline.
- A conventional sewing machine and the rest of your regular sewing tools.
Once you’ve gathered your tools, it’s time to draft and cut the facing pieces.
Drawing the Neckline Facing Pattern
The instructions below use the pattern pieces included in the Lili pattern. If you’re using a custom design or a different pattern, check whether it includes separate pieces for the neckline facing.
If your pattern doesn’t have these pieces, follow these instructions and illustrations:
The Lili design includes an invisible zipper at the centre back. That’s why this tutorial will show two separate facing pieces used to neatly finish the back neckline and the top of the zipper opening. If your design does not include an opening, draw the back neckline facing as a cut-on-fold piece.
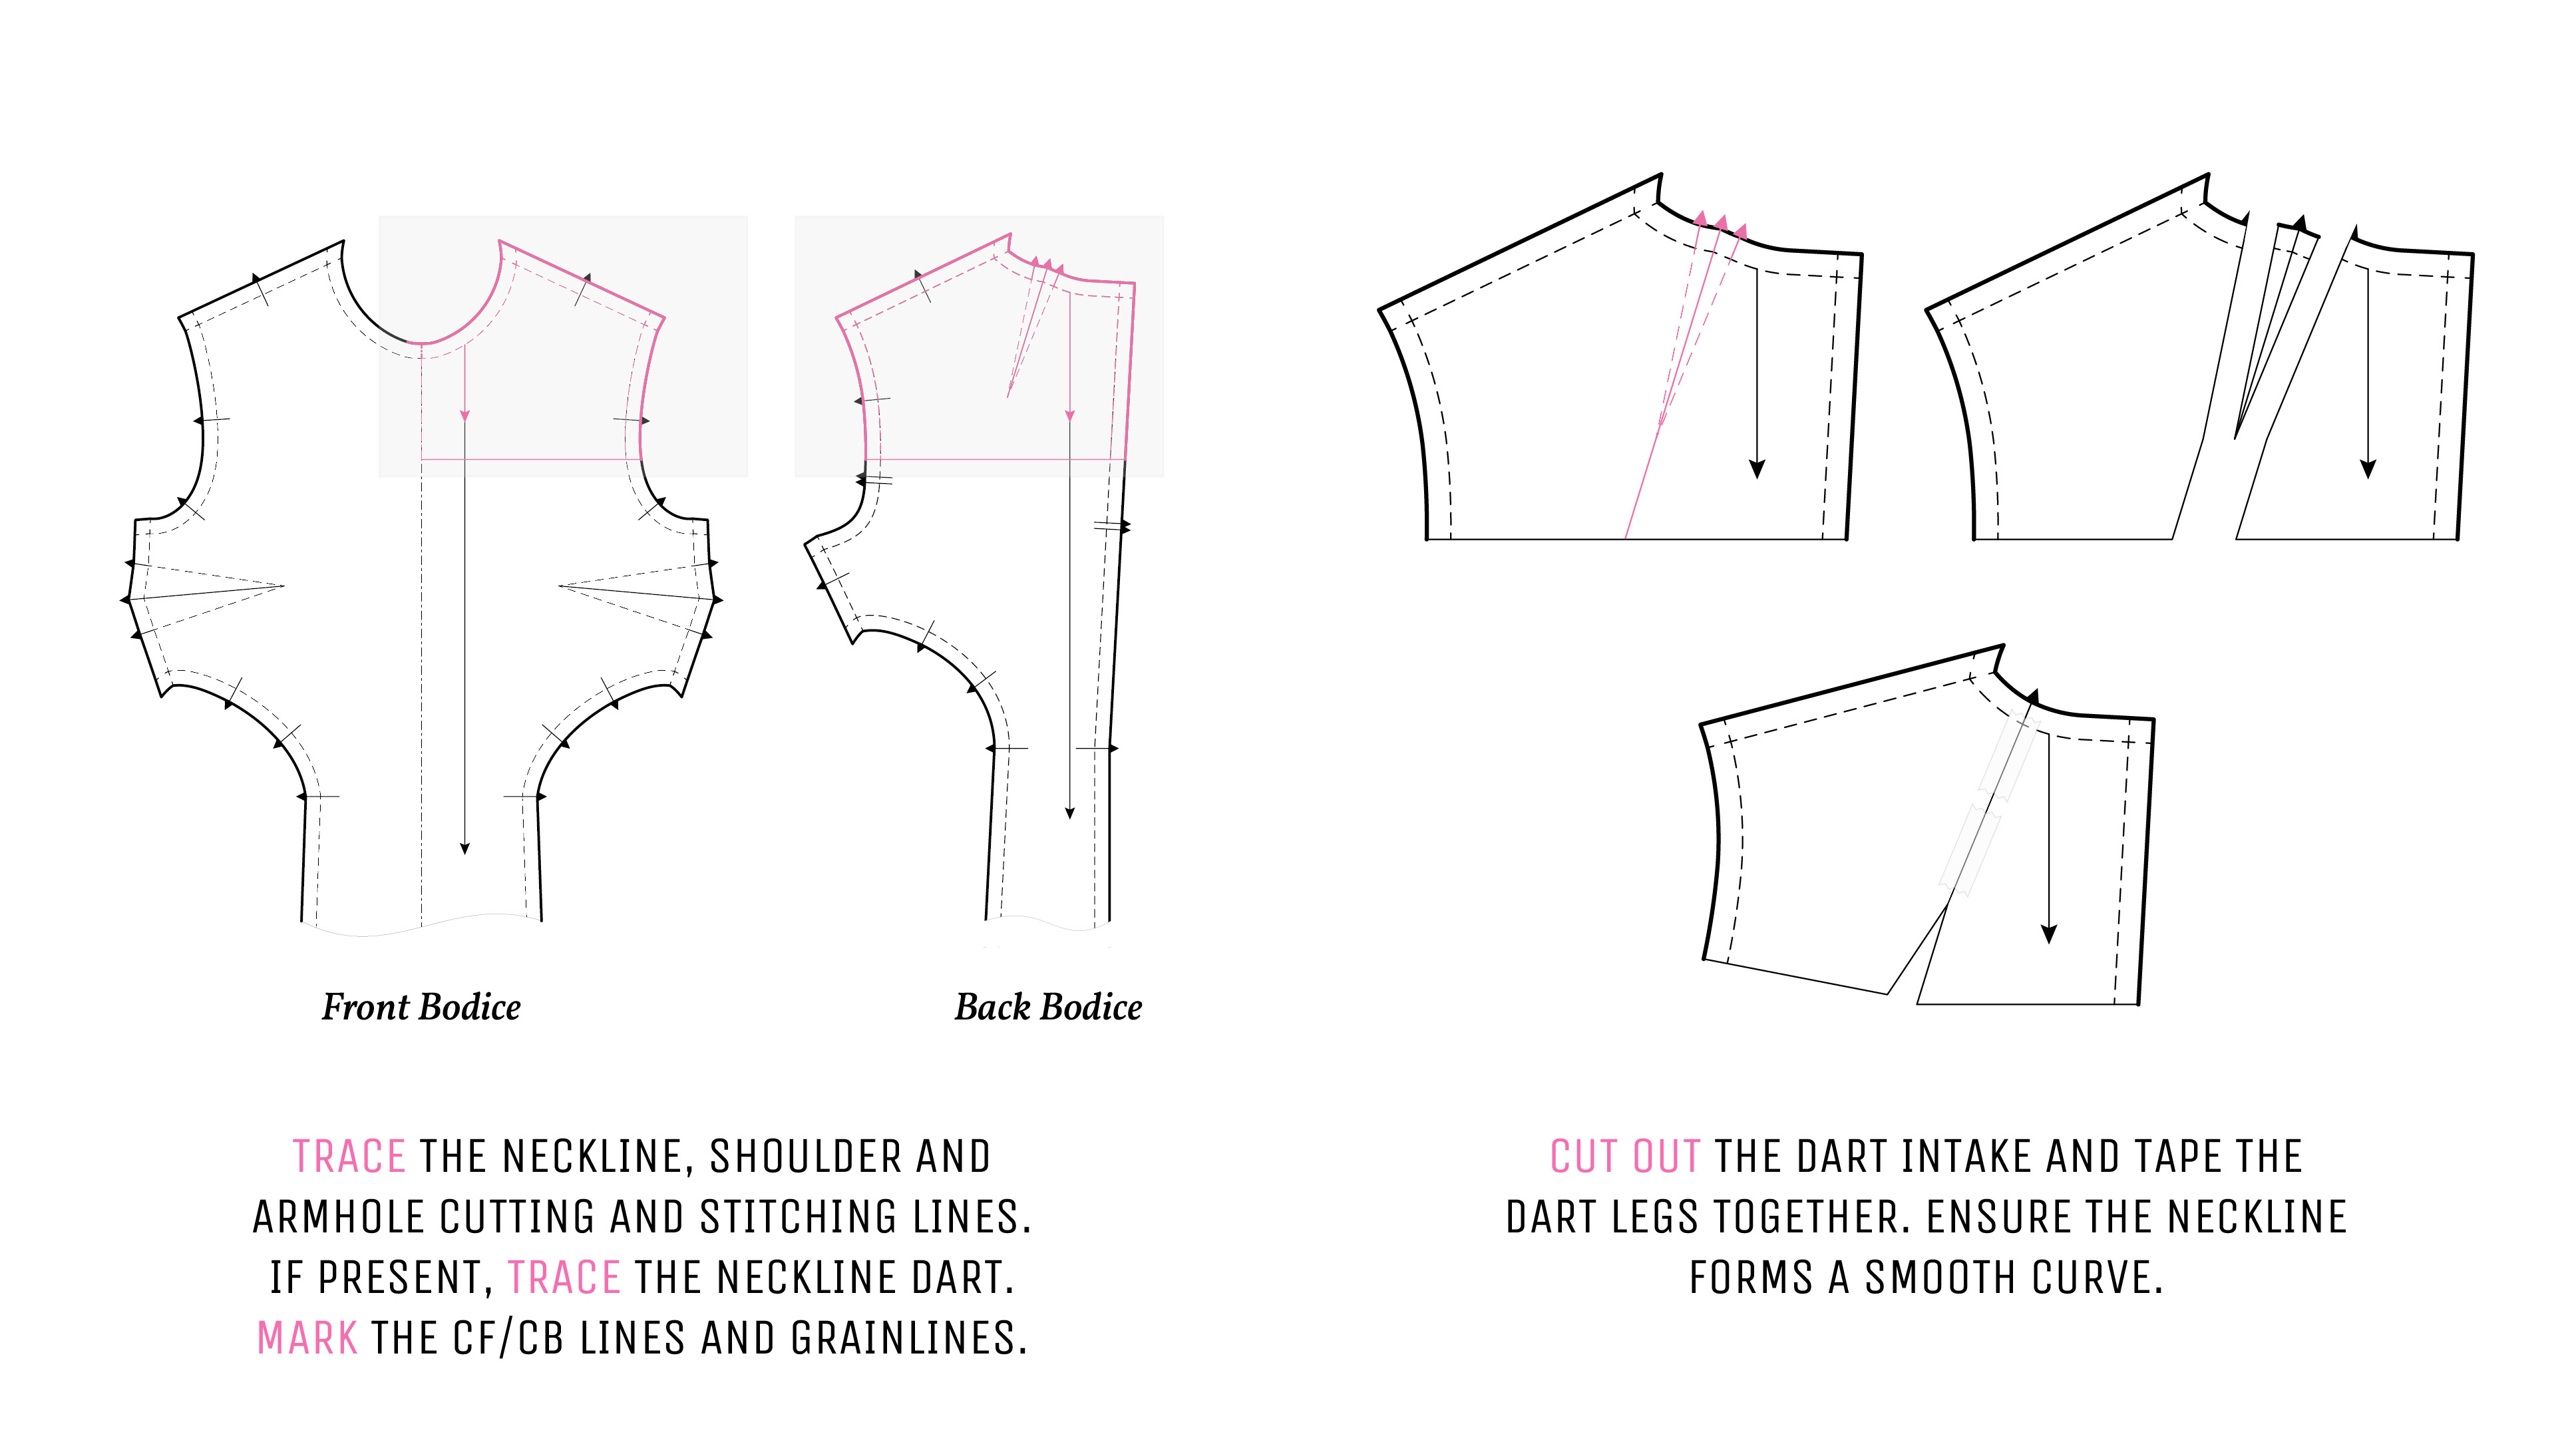
- Place a sheet of tracing paper over the front and back pattern pieces. Trace the neckline and shoulder stitching and cutting lines and, for convenience, the armholes as well. If present, trace the neckline dart. Mark the CF/CB lines and grainlines. Omit the shoulder and armhole notches to reduce visual clutter.
In the following illustrations the traced pattern pieces remain white to avoid visual clutter caused by the grey fill of the tracing paper.
- If the back neckline includes a dart, cut out the dart intake on the tracing paper and tape the dart legs together. Ensure the neckline forms a smooth, continuous curve.
- Measure 5–6.5 cm (2–2 5⁄8″) from the neckline stitching line and draw the facing’s outer edge, as shown.
- Lower the shoulder’s stitching line at the facing’s outer edge by 0.1 cm (a scant 1⁄16″) to prevent puckering. Draw the new seam allowance. (The Lili pattern uses a 1.2 cm (½") seam allowance.) Cut away the tracing paper along the new shoulder edge.
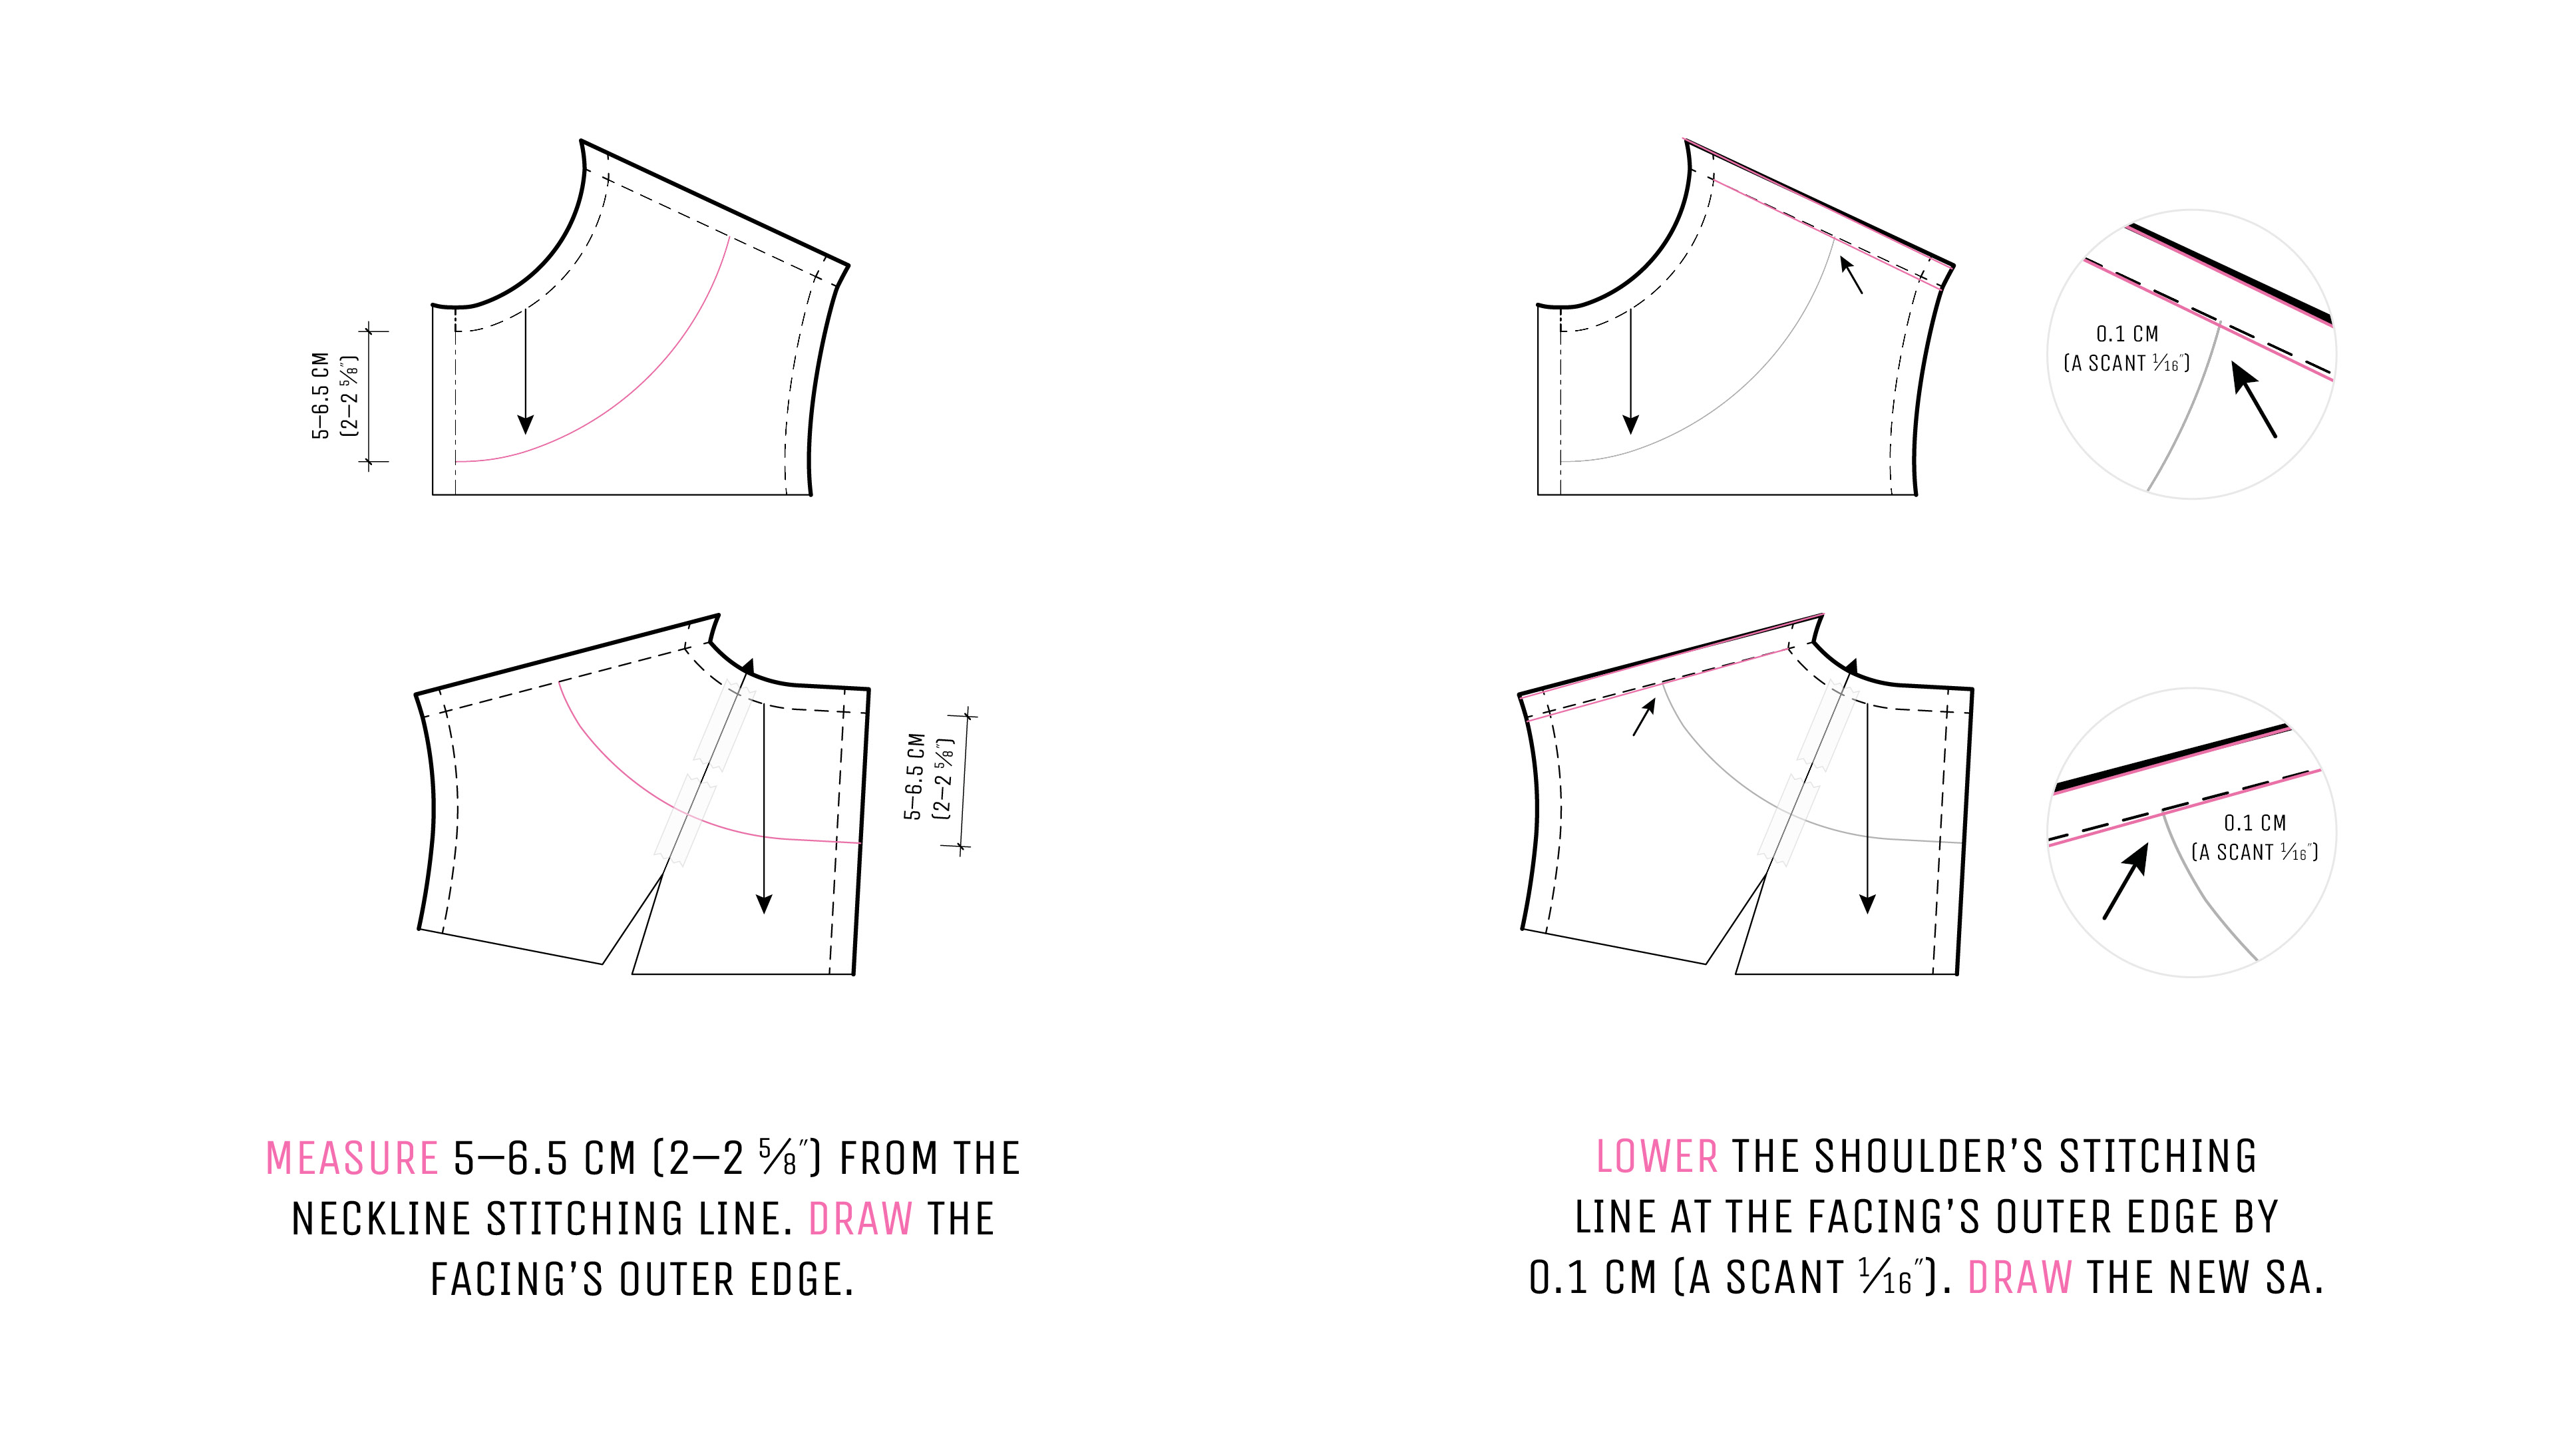
The facing shown in this tutorial is a functional detail that remains entirely on the wrong side of the garment. For this reason, its pattern pieces are trimmed slightly at the shoulder. If your facing is intended to be decorative, raise the shoulder edges instead.
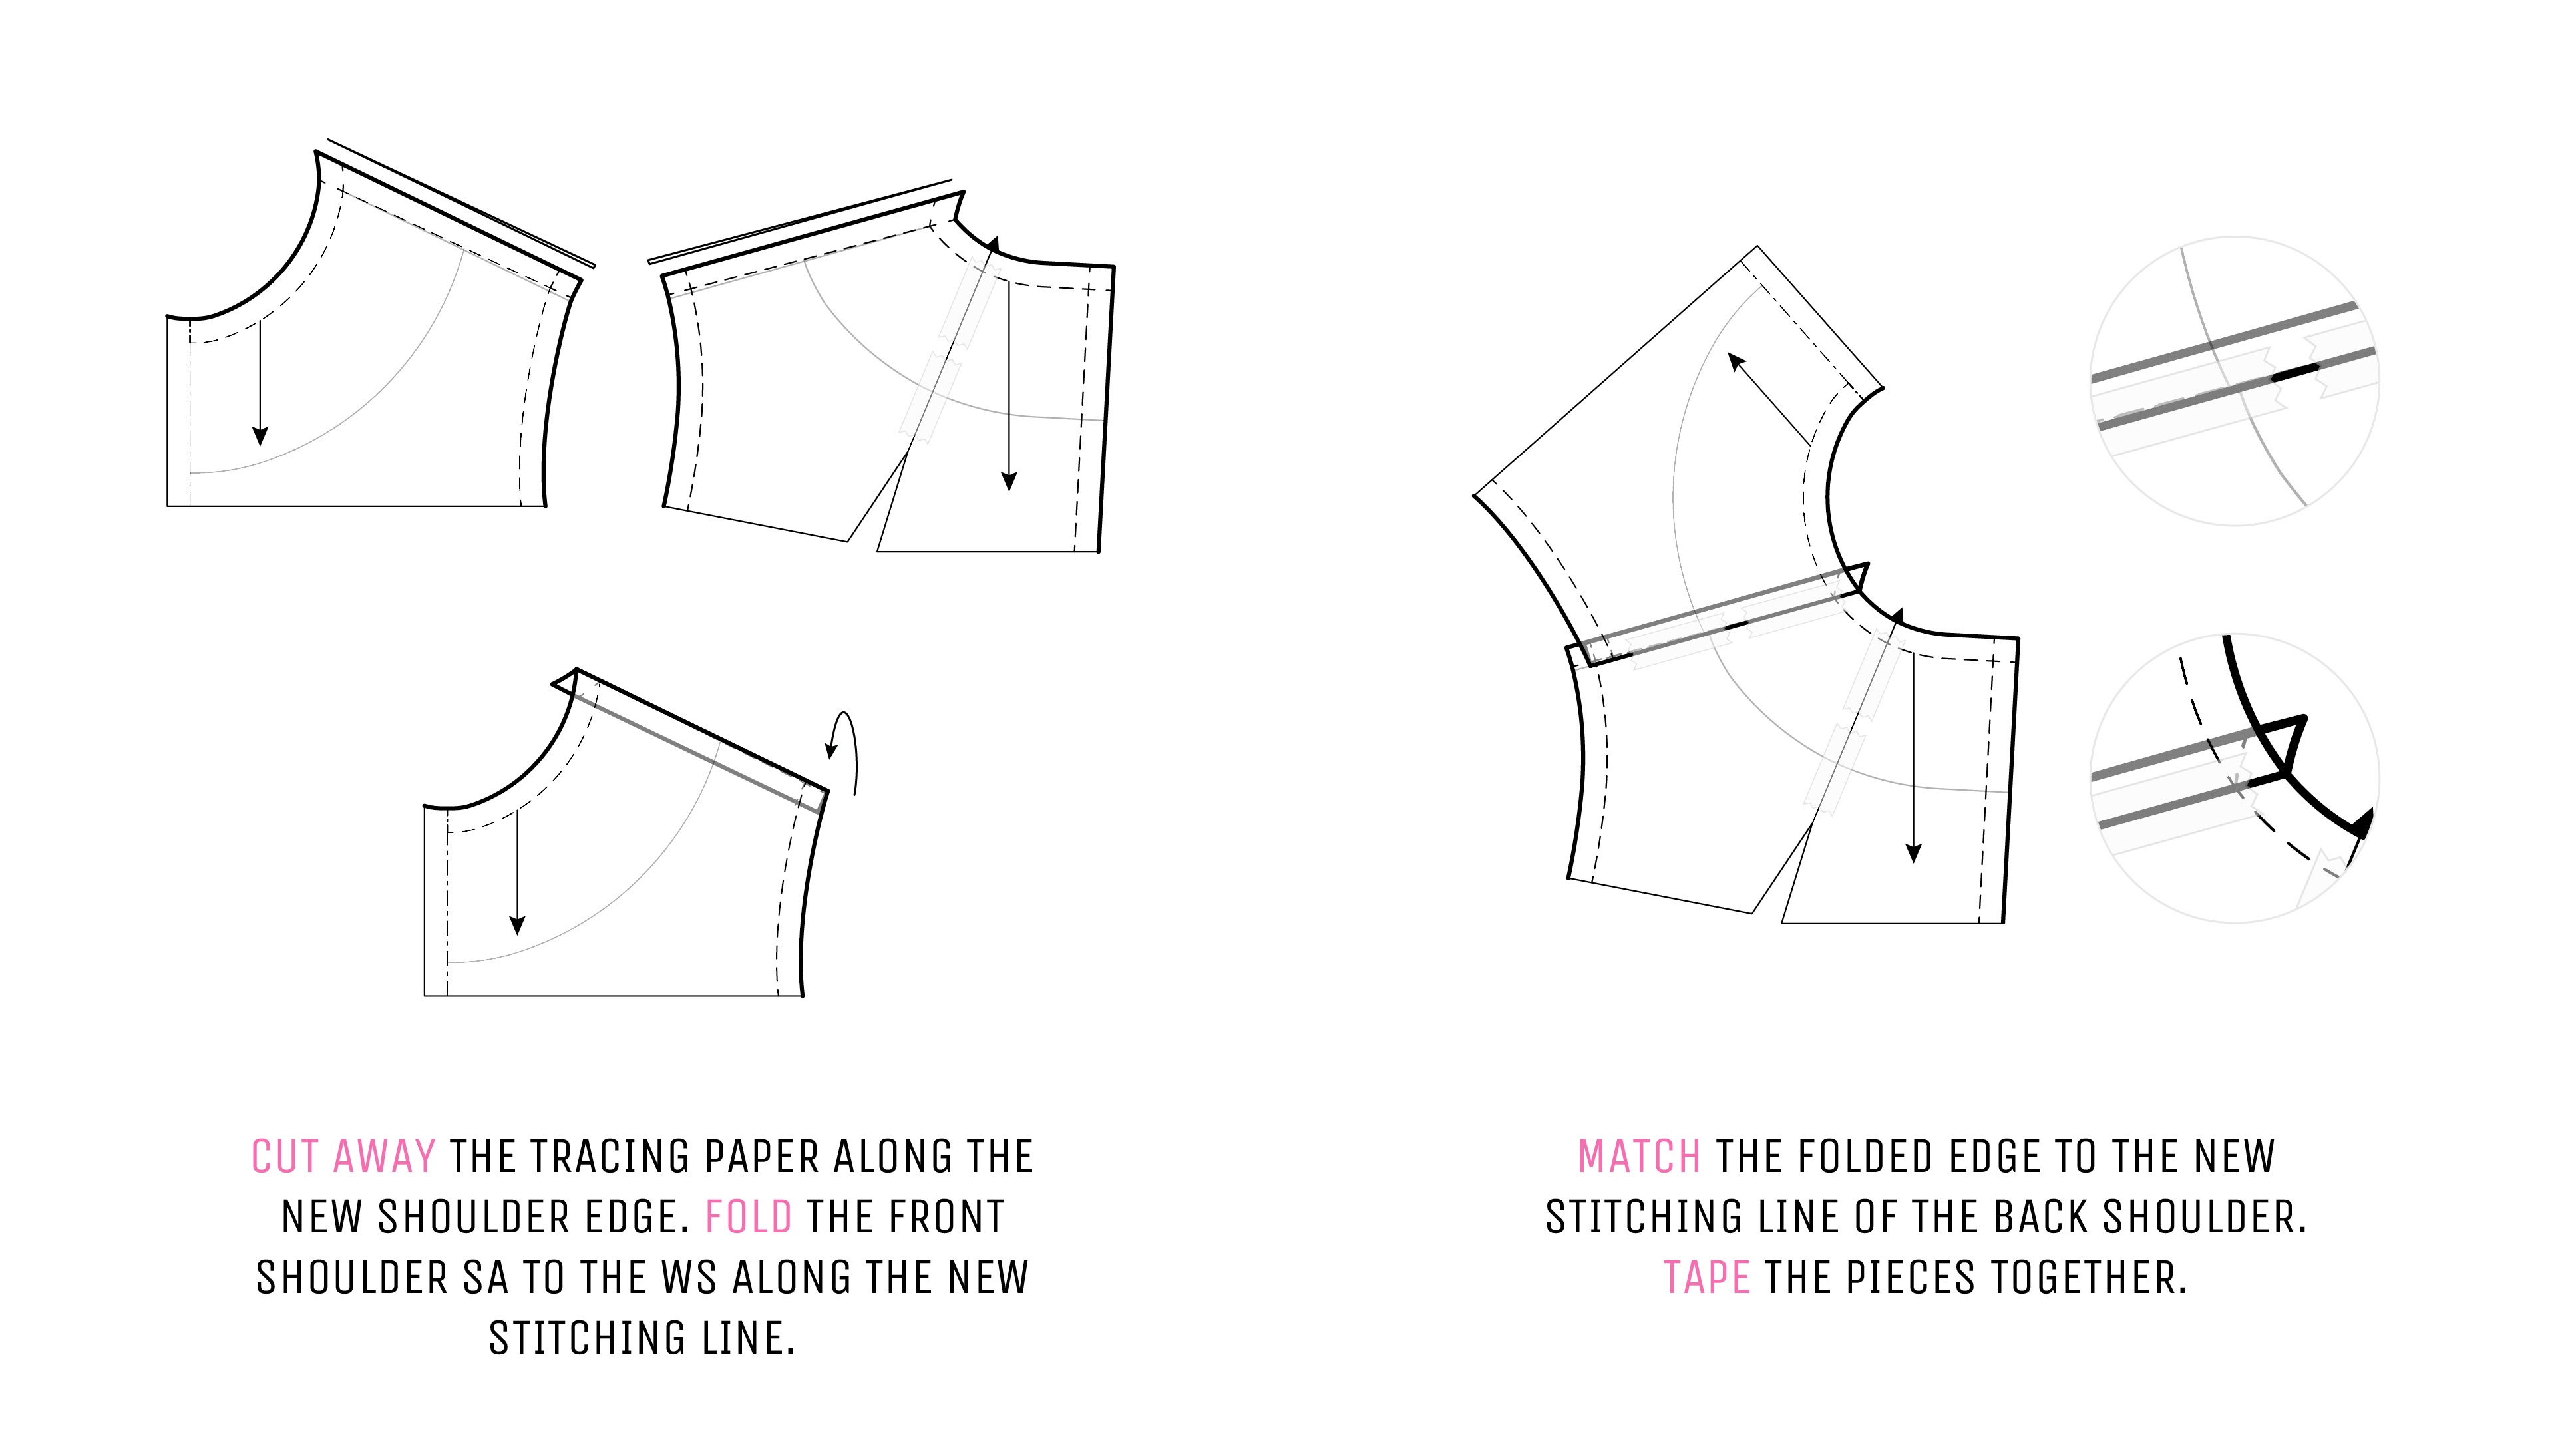
- To ensure the final shoulder seam allowances align with the intended pressing direction (to the front in Lili’s case), fold the front shoulder seam allowance to the wrong side along the new stitching line. Starting at the neckline, match the folded edge to the new stitching line of the back shoulder and tape the pieces together.
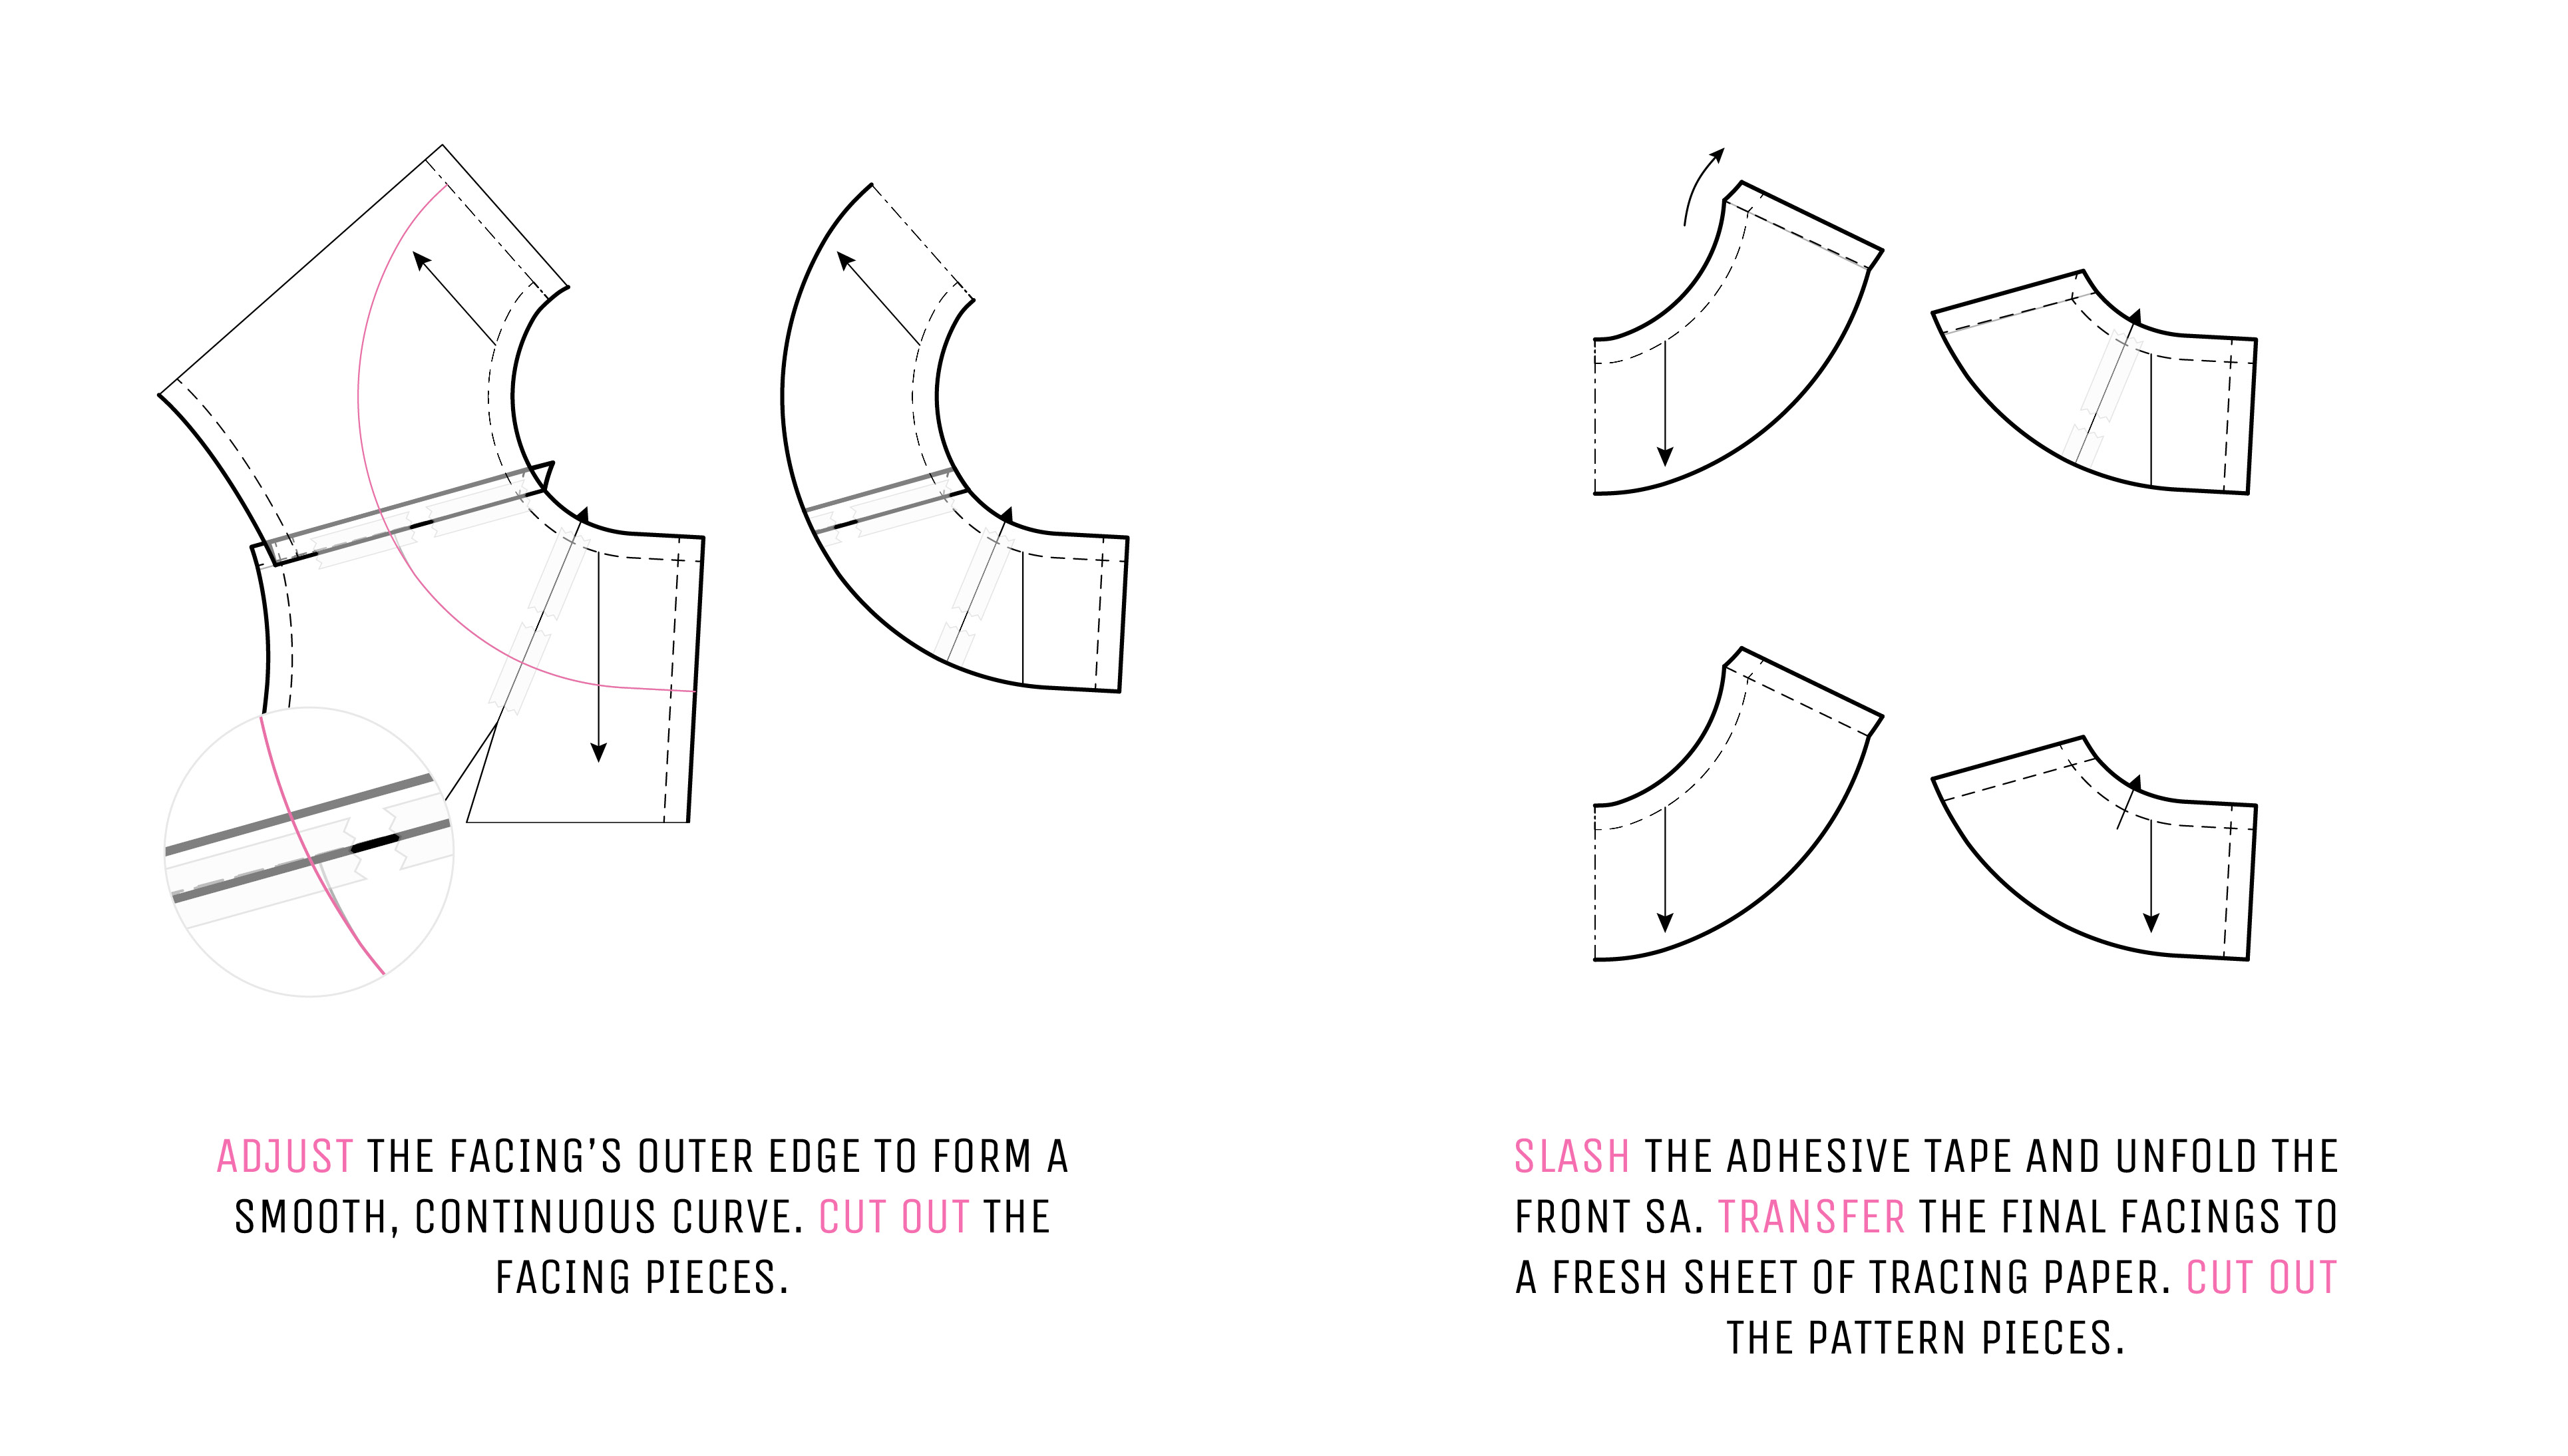
- Adjust the facing’s outer edge to form a smooth, continuous curve.
- Cut out the facing pieces. Carefully remove or slash the adhesive tape, then unfold the front seam allowance.
- Transfer the final facings’ stitching and cutting lines, markings and grainlines to a fresh sheet of tracing paper. Cut out the pattern pieces.
Cutting & Applying Interfacing
With your paper pattern pieces prepared, here’s what you’ll need to cut to follow this tutorial:
- Front Neckline Facing (1) — cut 1 on fold of fashion fabric and 1 on fold of interfacing
- Back Neckline Facing (2) — cut 2 mirrored of fashion fabric and 2 mirrored of interfacing
Please note that this tutorial does not provide yardages for the interfacing and the fashion fabric, as they are usually cut with the rest of the garment pieces during the cutting.
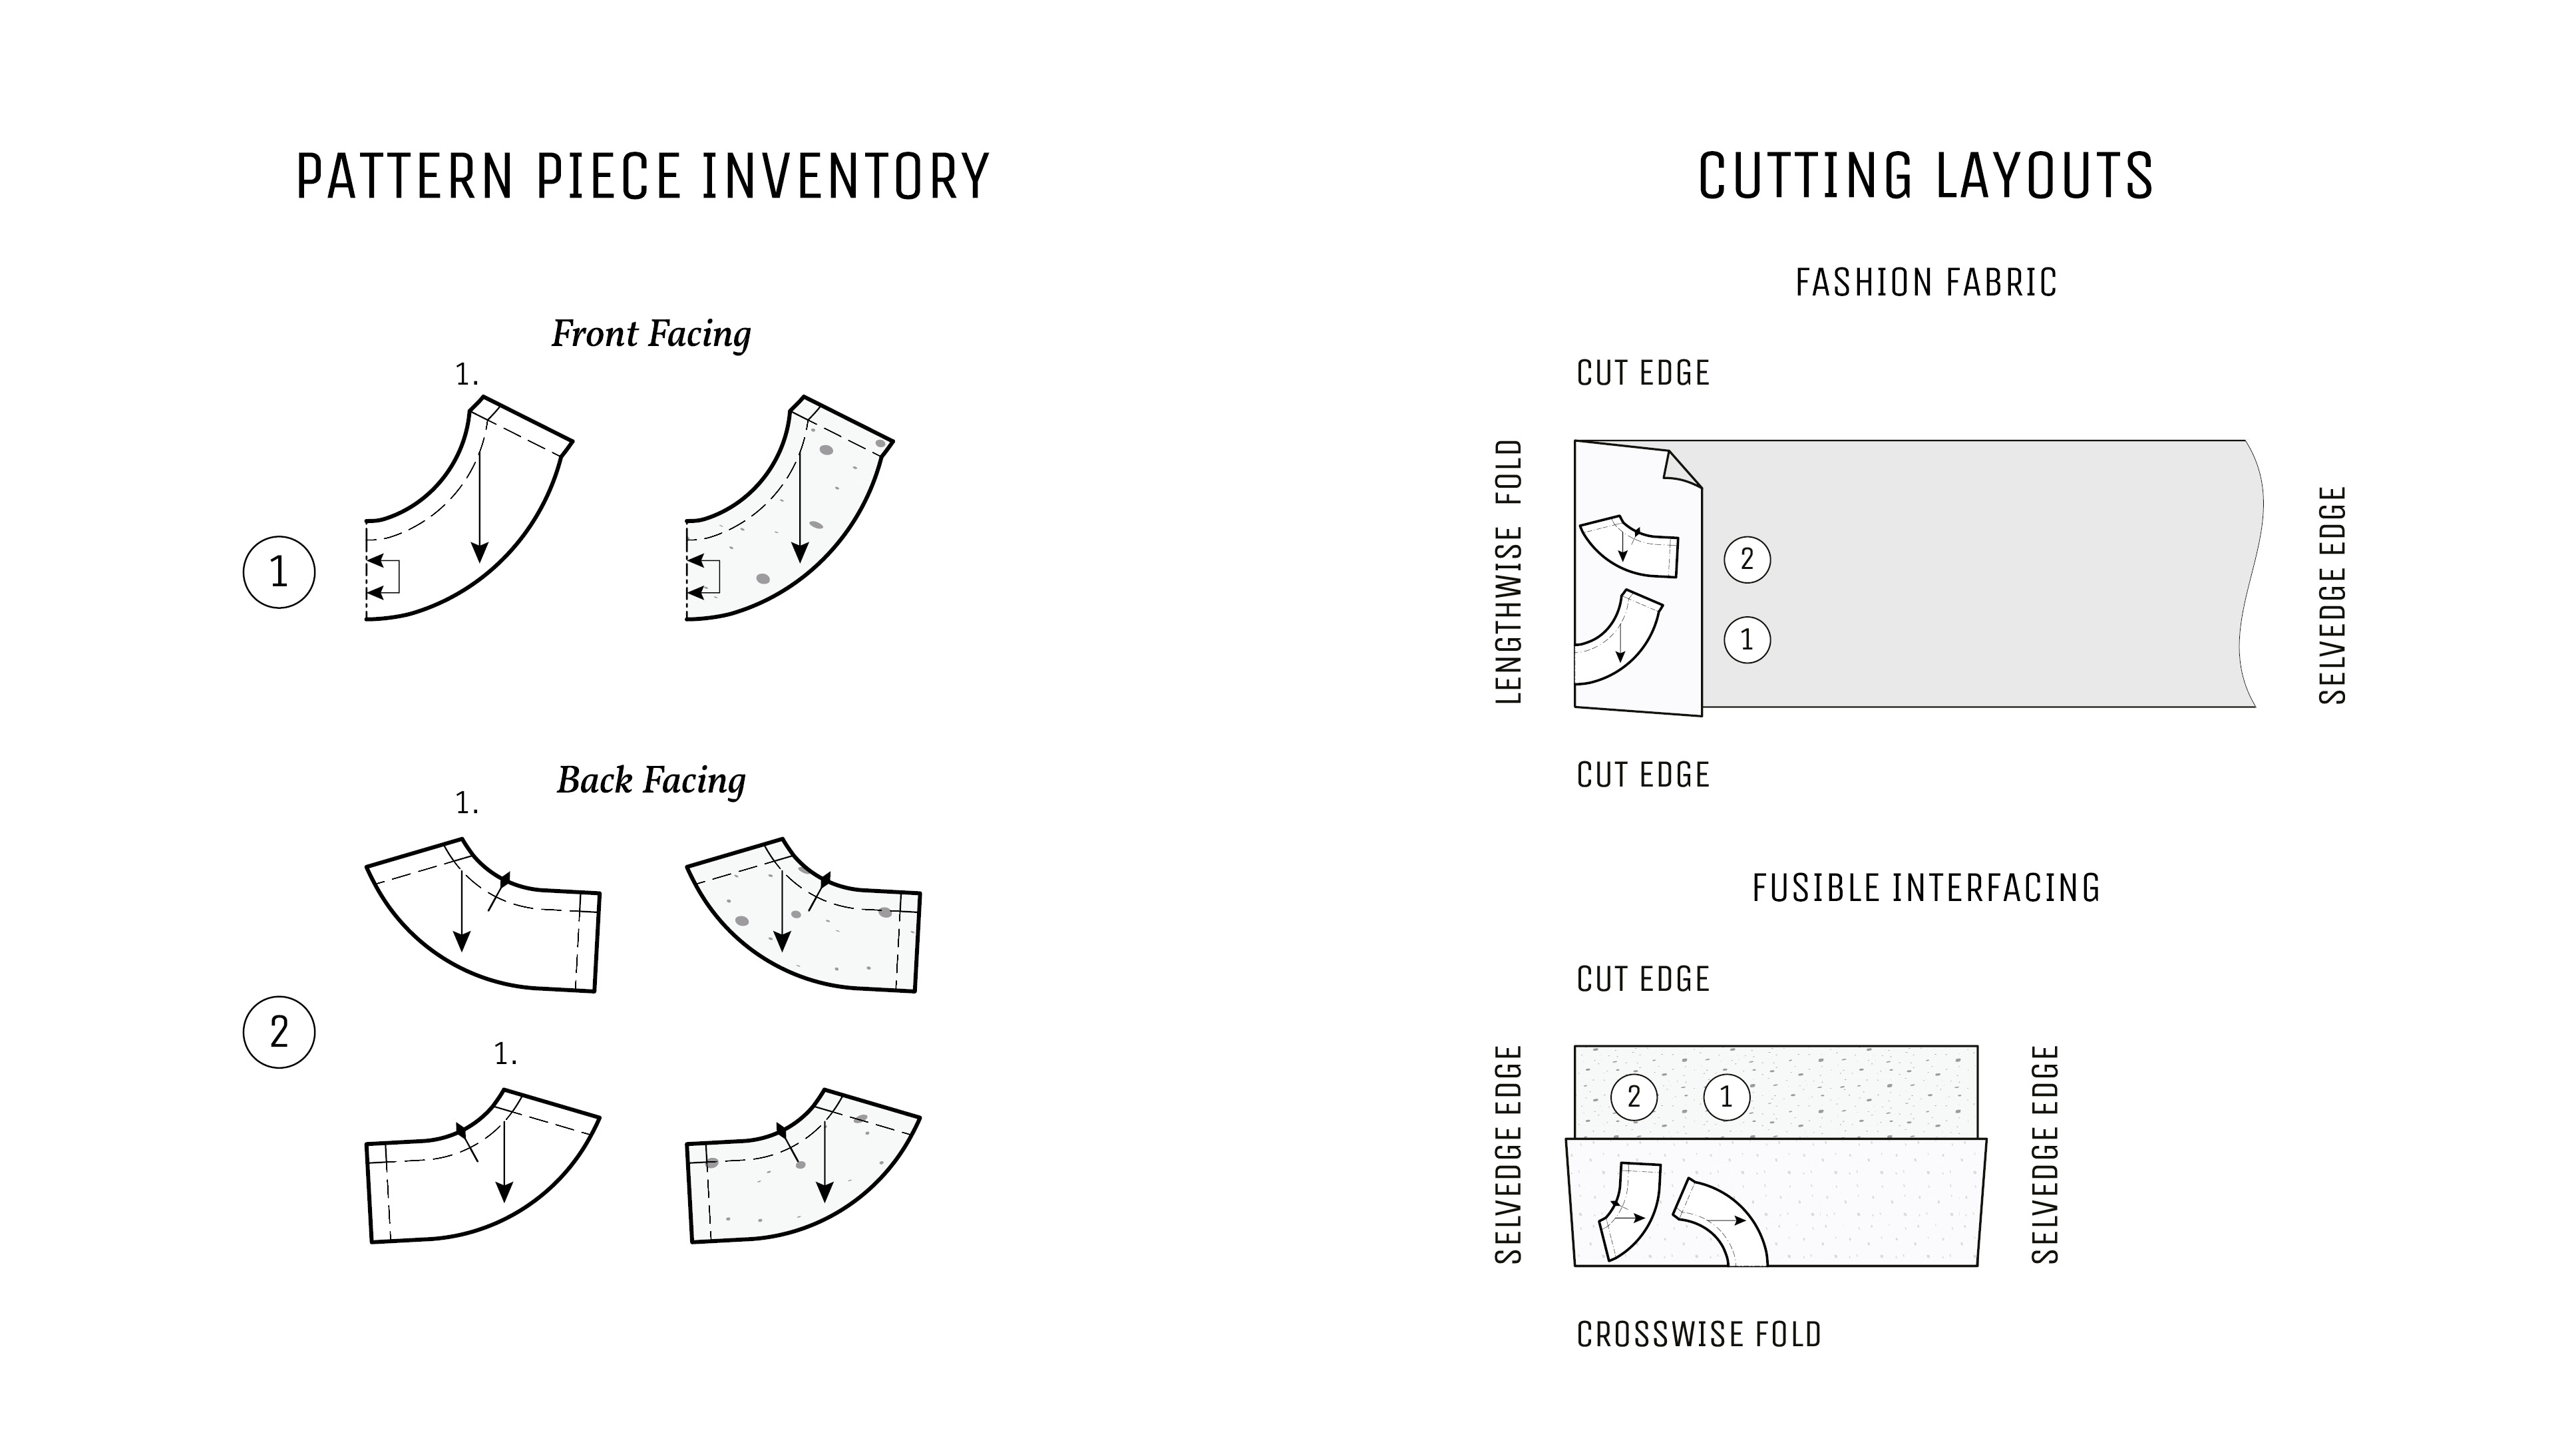
Once you’ve cut all the interfacing and fabric pieces, take a moment to apply the interfacing to the corresponding pieces: the front neckline facing (1), back neckline facing (2) ×2. This will make the sewing process much easier later on.
Sewing
A quick note: This tutorial follows the step-by-step instructions from the Lili dress pattern booklet. I’ve adjusted the piece numbers and reference marks slightly, and added a few notes to make it easier to follow on its own. If you have the full booklet, I recommend using that instead—it’s all there. But if you’re here to sew your custom neckline facing, just dive in.
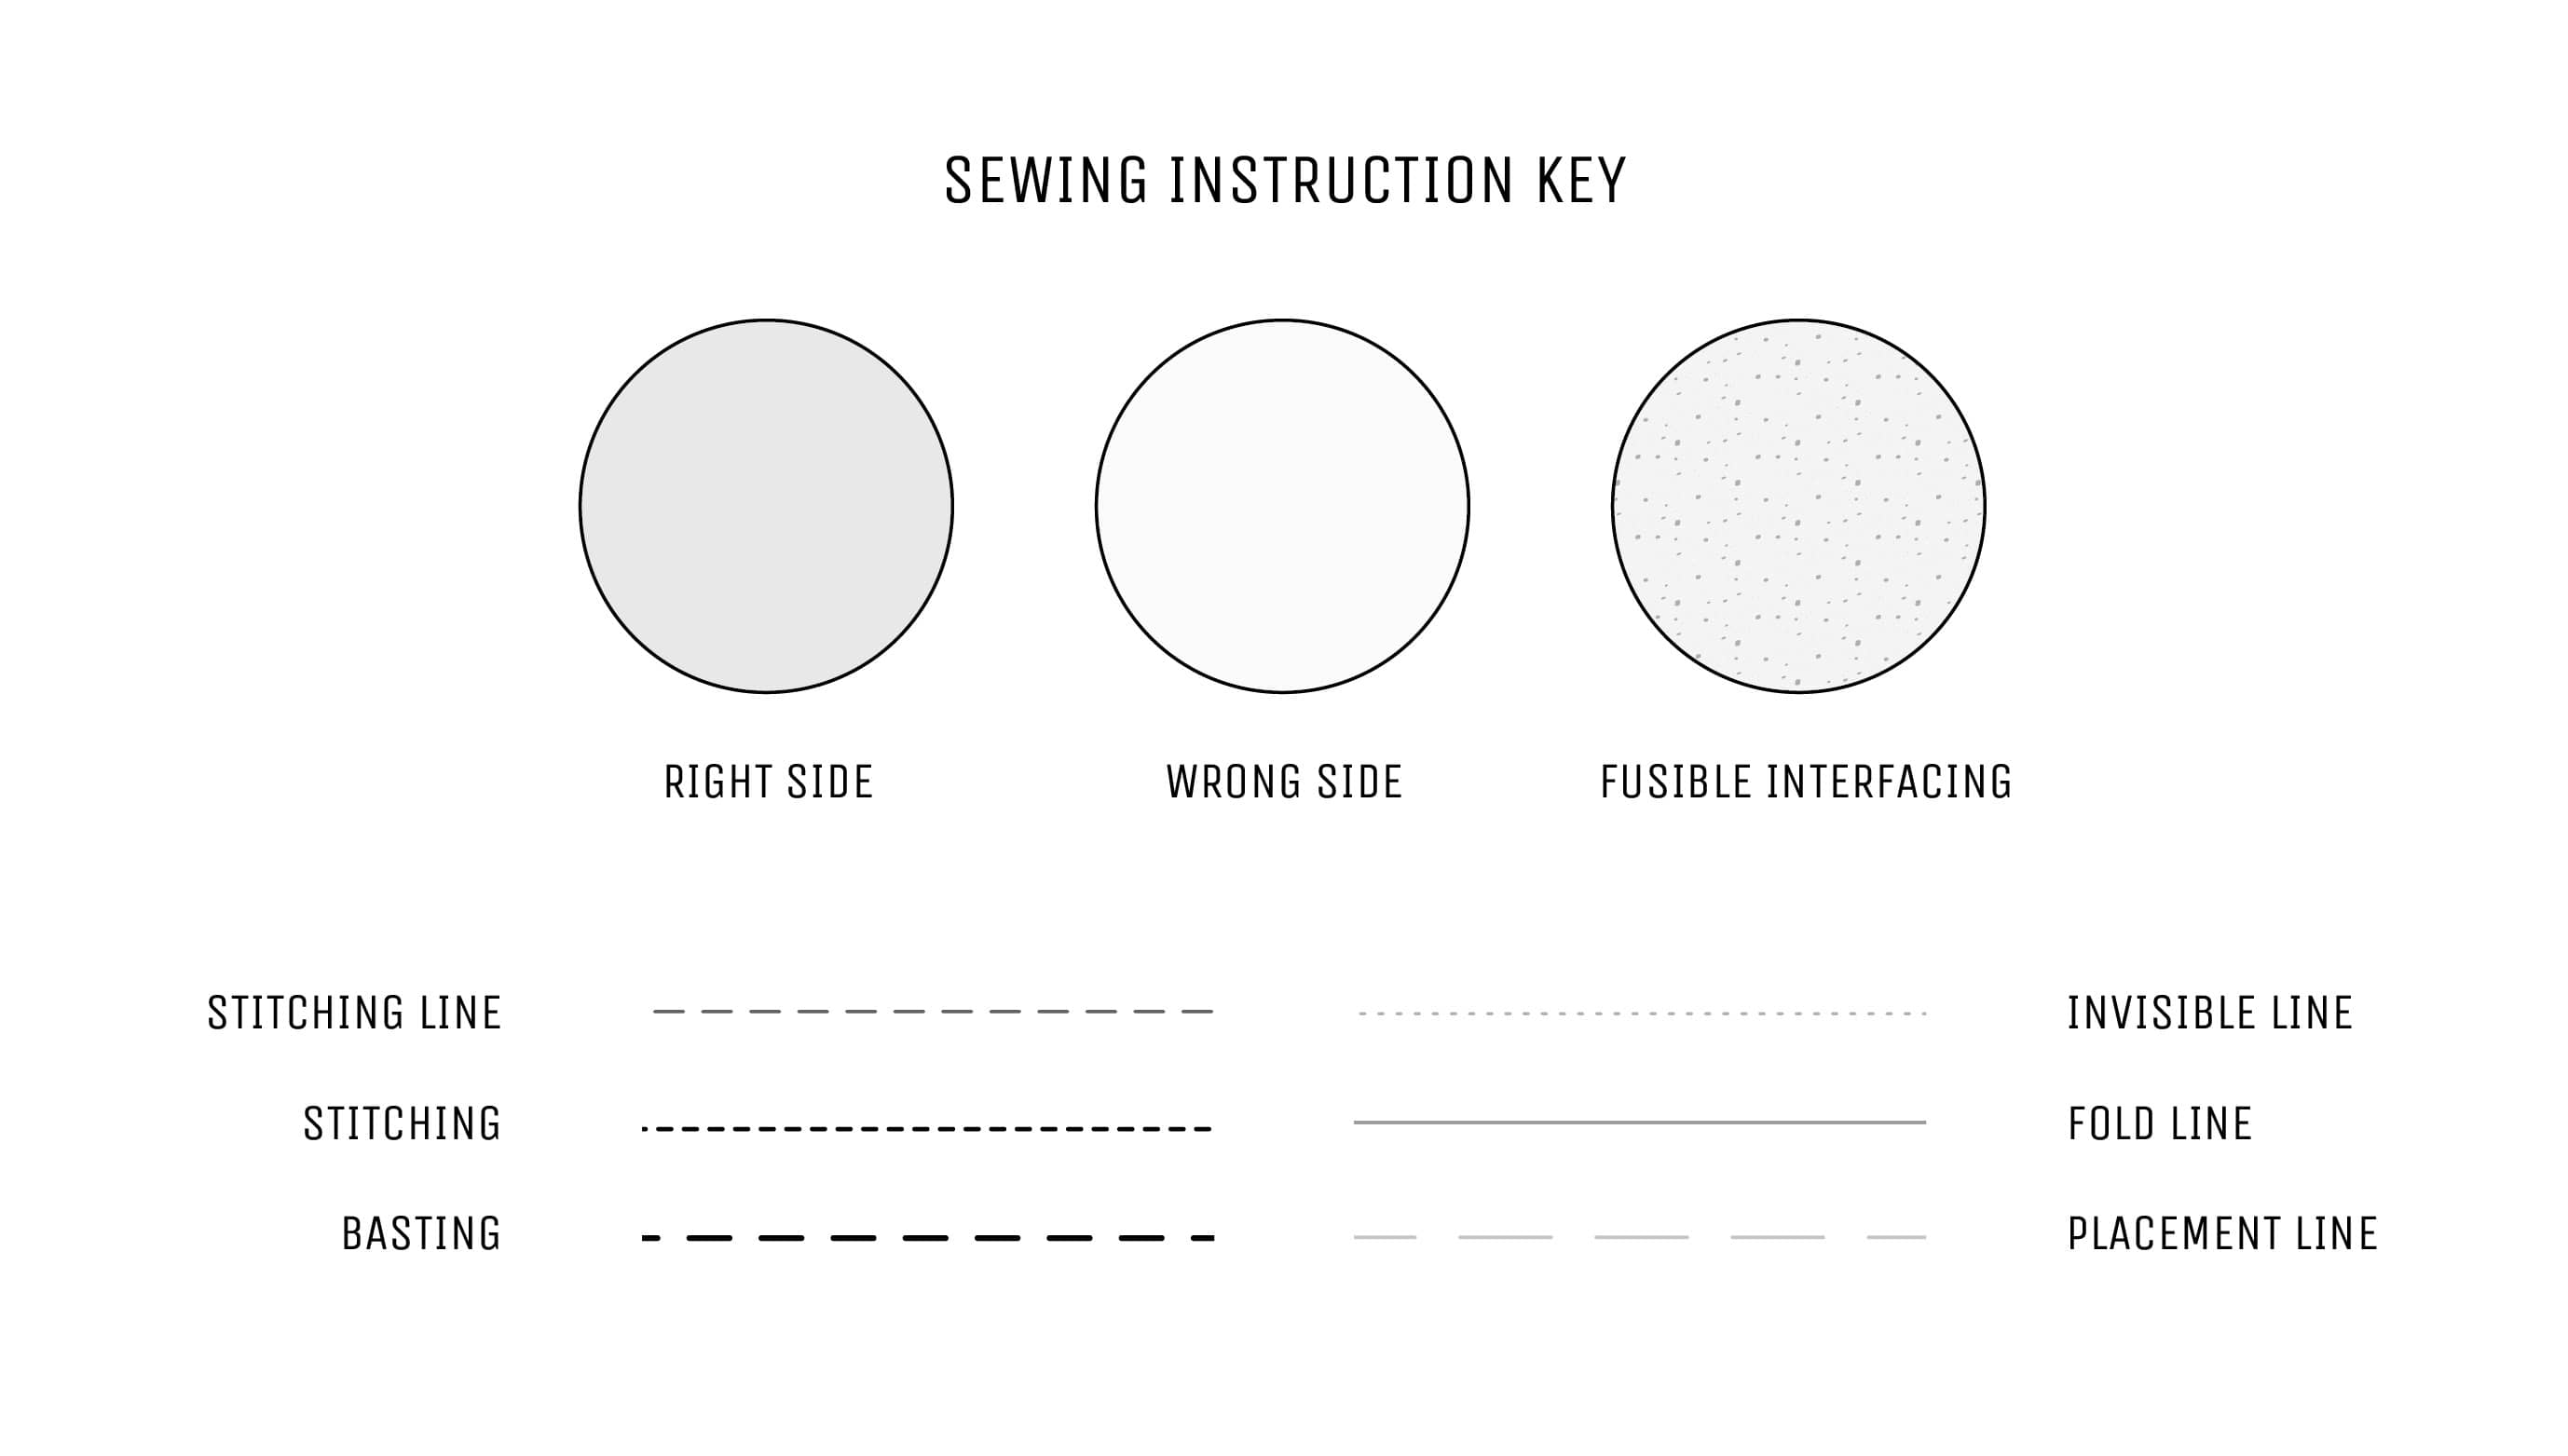
Seam Allowances: All steps in this tutorial use the Lili dress seam allowance of 1.2 cm (½”) for the facing, shoulder seams and neckline. If your pattern uses a different value, simply apply your usual seam allowance instead.
At this point in the construction process, the shoulder seams of your dress or blouse should already be stitched.
1. Prepare the Neckline Facing
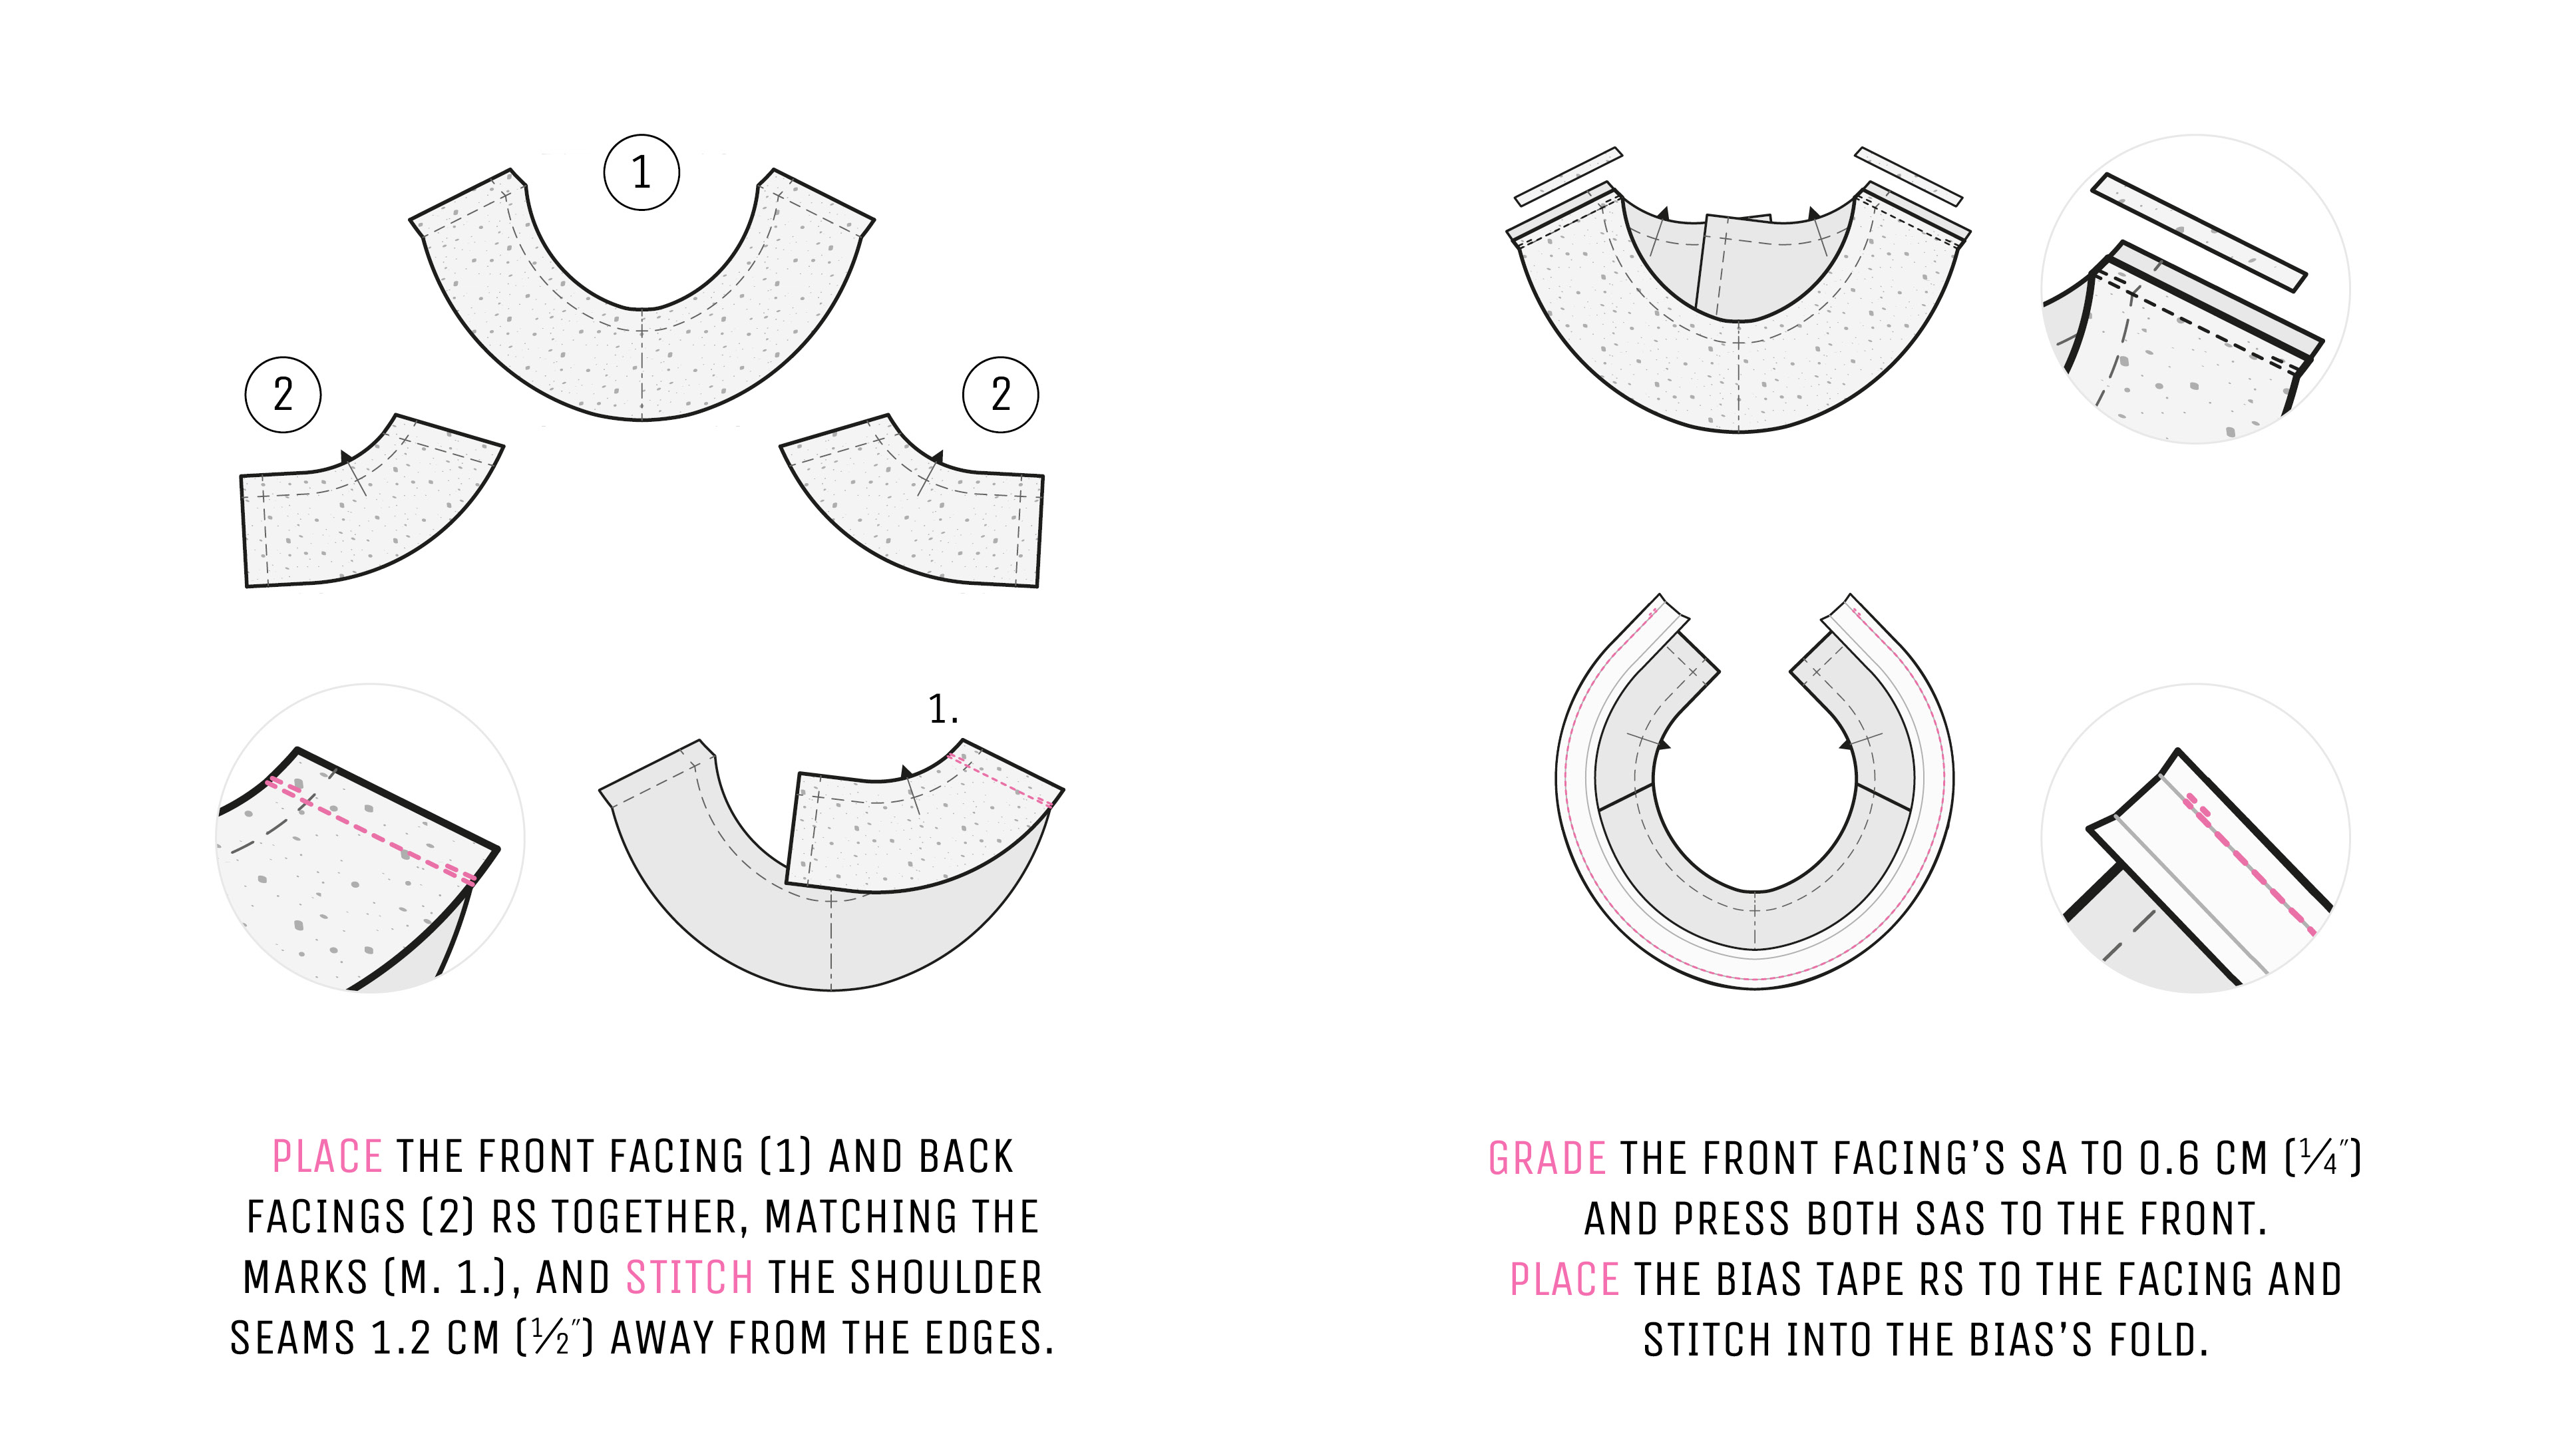
Place the fully interfaced pieces of the front facing (1) and back facing (2) right sides together, matching the marks (m. 1.), and pin the shoulder edges together. Stitch 1.2 cm (½″) away from the edges. Make neat backstitches and move from the neckline (m. 1.) to the facing’s outer edge. Grade the front facing’s seam allowance to 0.6 cm (1⁄4″).
Press both seam allowances to the front. Then, finish the facing’s outer edge with an overlock stitch, or follow the instructions below if you chose bias binding*.
*Ensure that the tape you use has both long sides pre-folded to the wrong side. Please note that the following steps refer to single-fold bias tape as an example.
To make a bias tape finish, place the unfolded tape’s edge right side against the facing’s right side—make sure the bias is slightly longer than the piece’s edge. Pin or baste the tape to the facing. Stitch the pieces together, following the bias’s fold as a guideline.
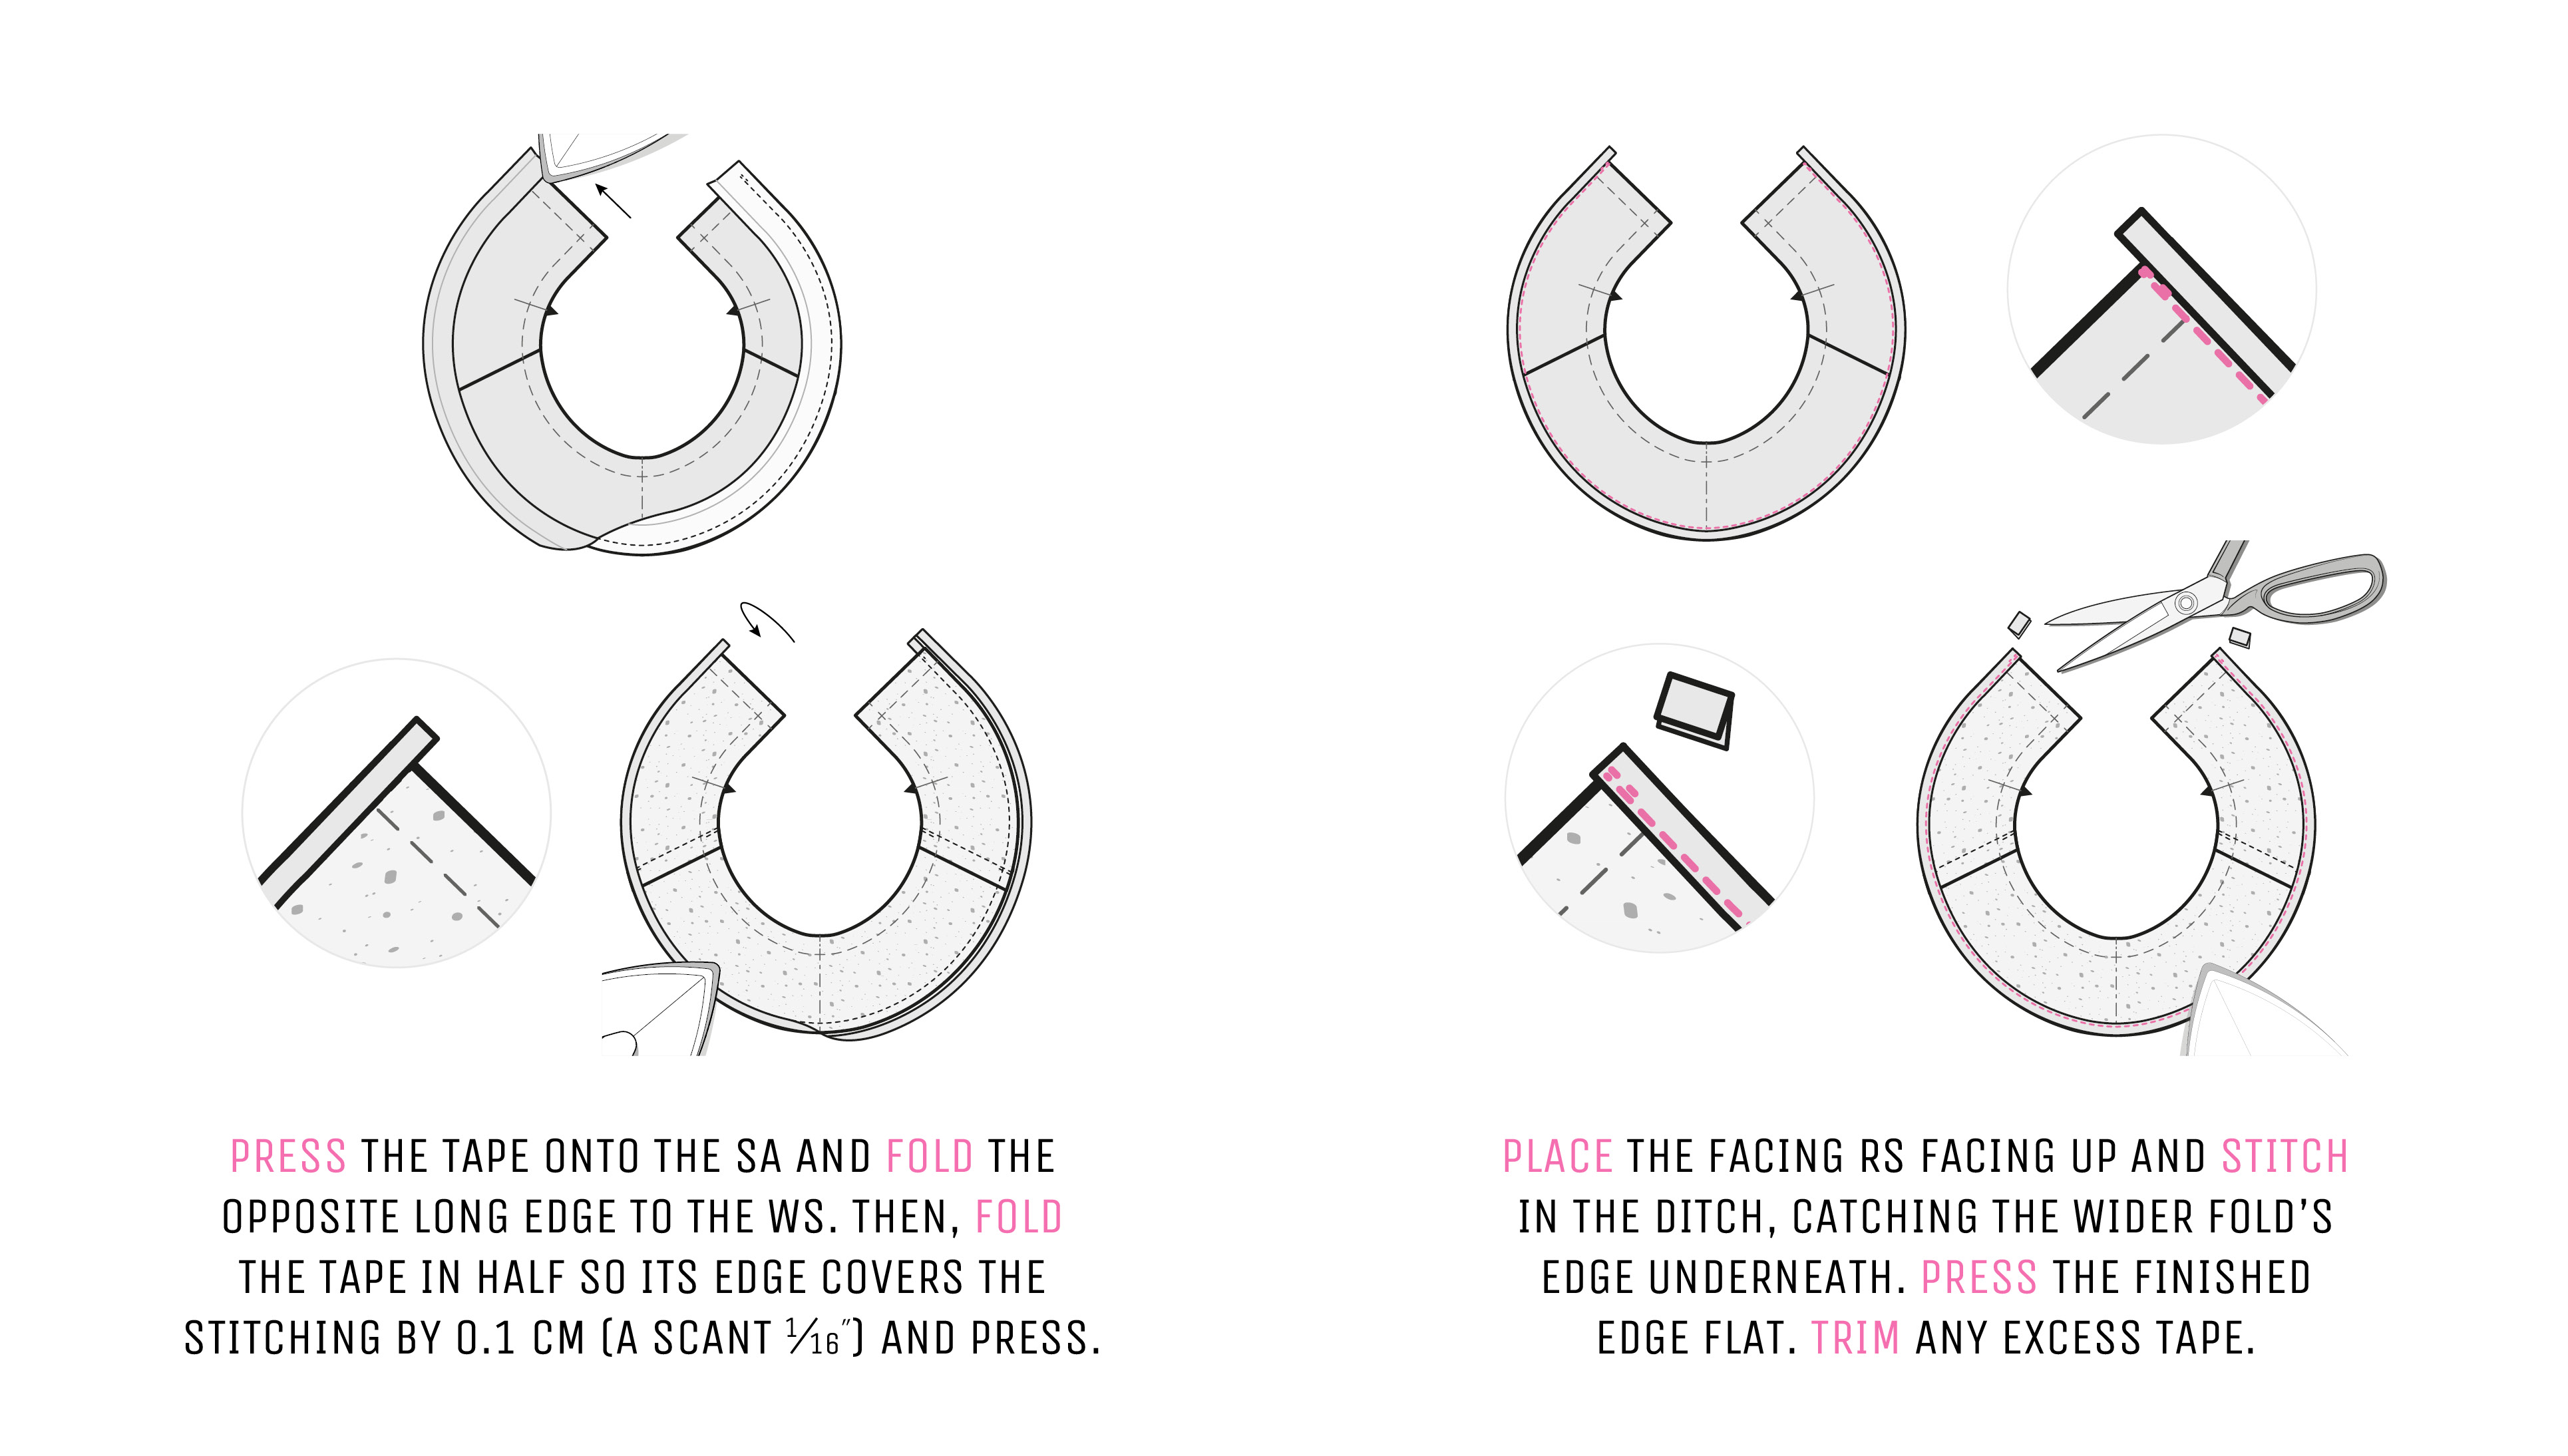
Carefully press the tape onto the seam allowance. If you’re using pre-folded tape, be careful not to press the foldline of the other edge, as it will be challenging to restore it. Then, fold the opposite long edge to the wrong side. Lightly press the foldline, if needed.
Fold the tape in half so its edge covers the stitching by 0.1 cm (a scant 1⁄16″) and press. Baste in place if necessary. Place the facing right side facing up and stitch in the ditch, catching the wider fold’s edge underneath. “The ditch” is the groove where the tape and the fabric are stitched together. Press the finished edge flat.
Trim any excess tape. To reduce bulk, hand overcast the edges neatly instead of folding them under. For synthetic fibres, seal the edges with a lighter to prevent fraying.
2. Finish the Neckline with the Facing
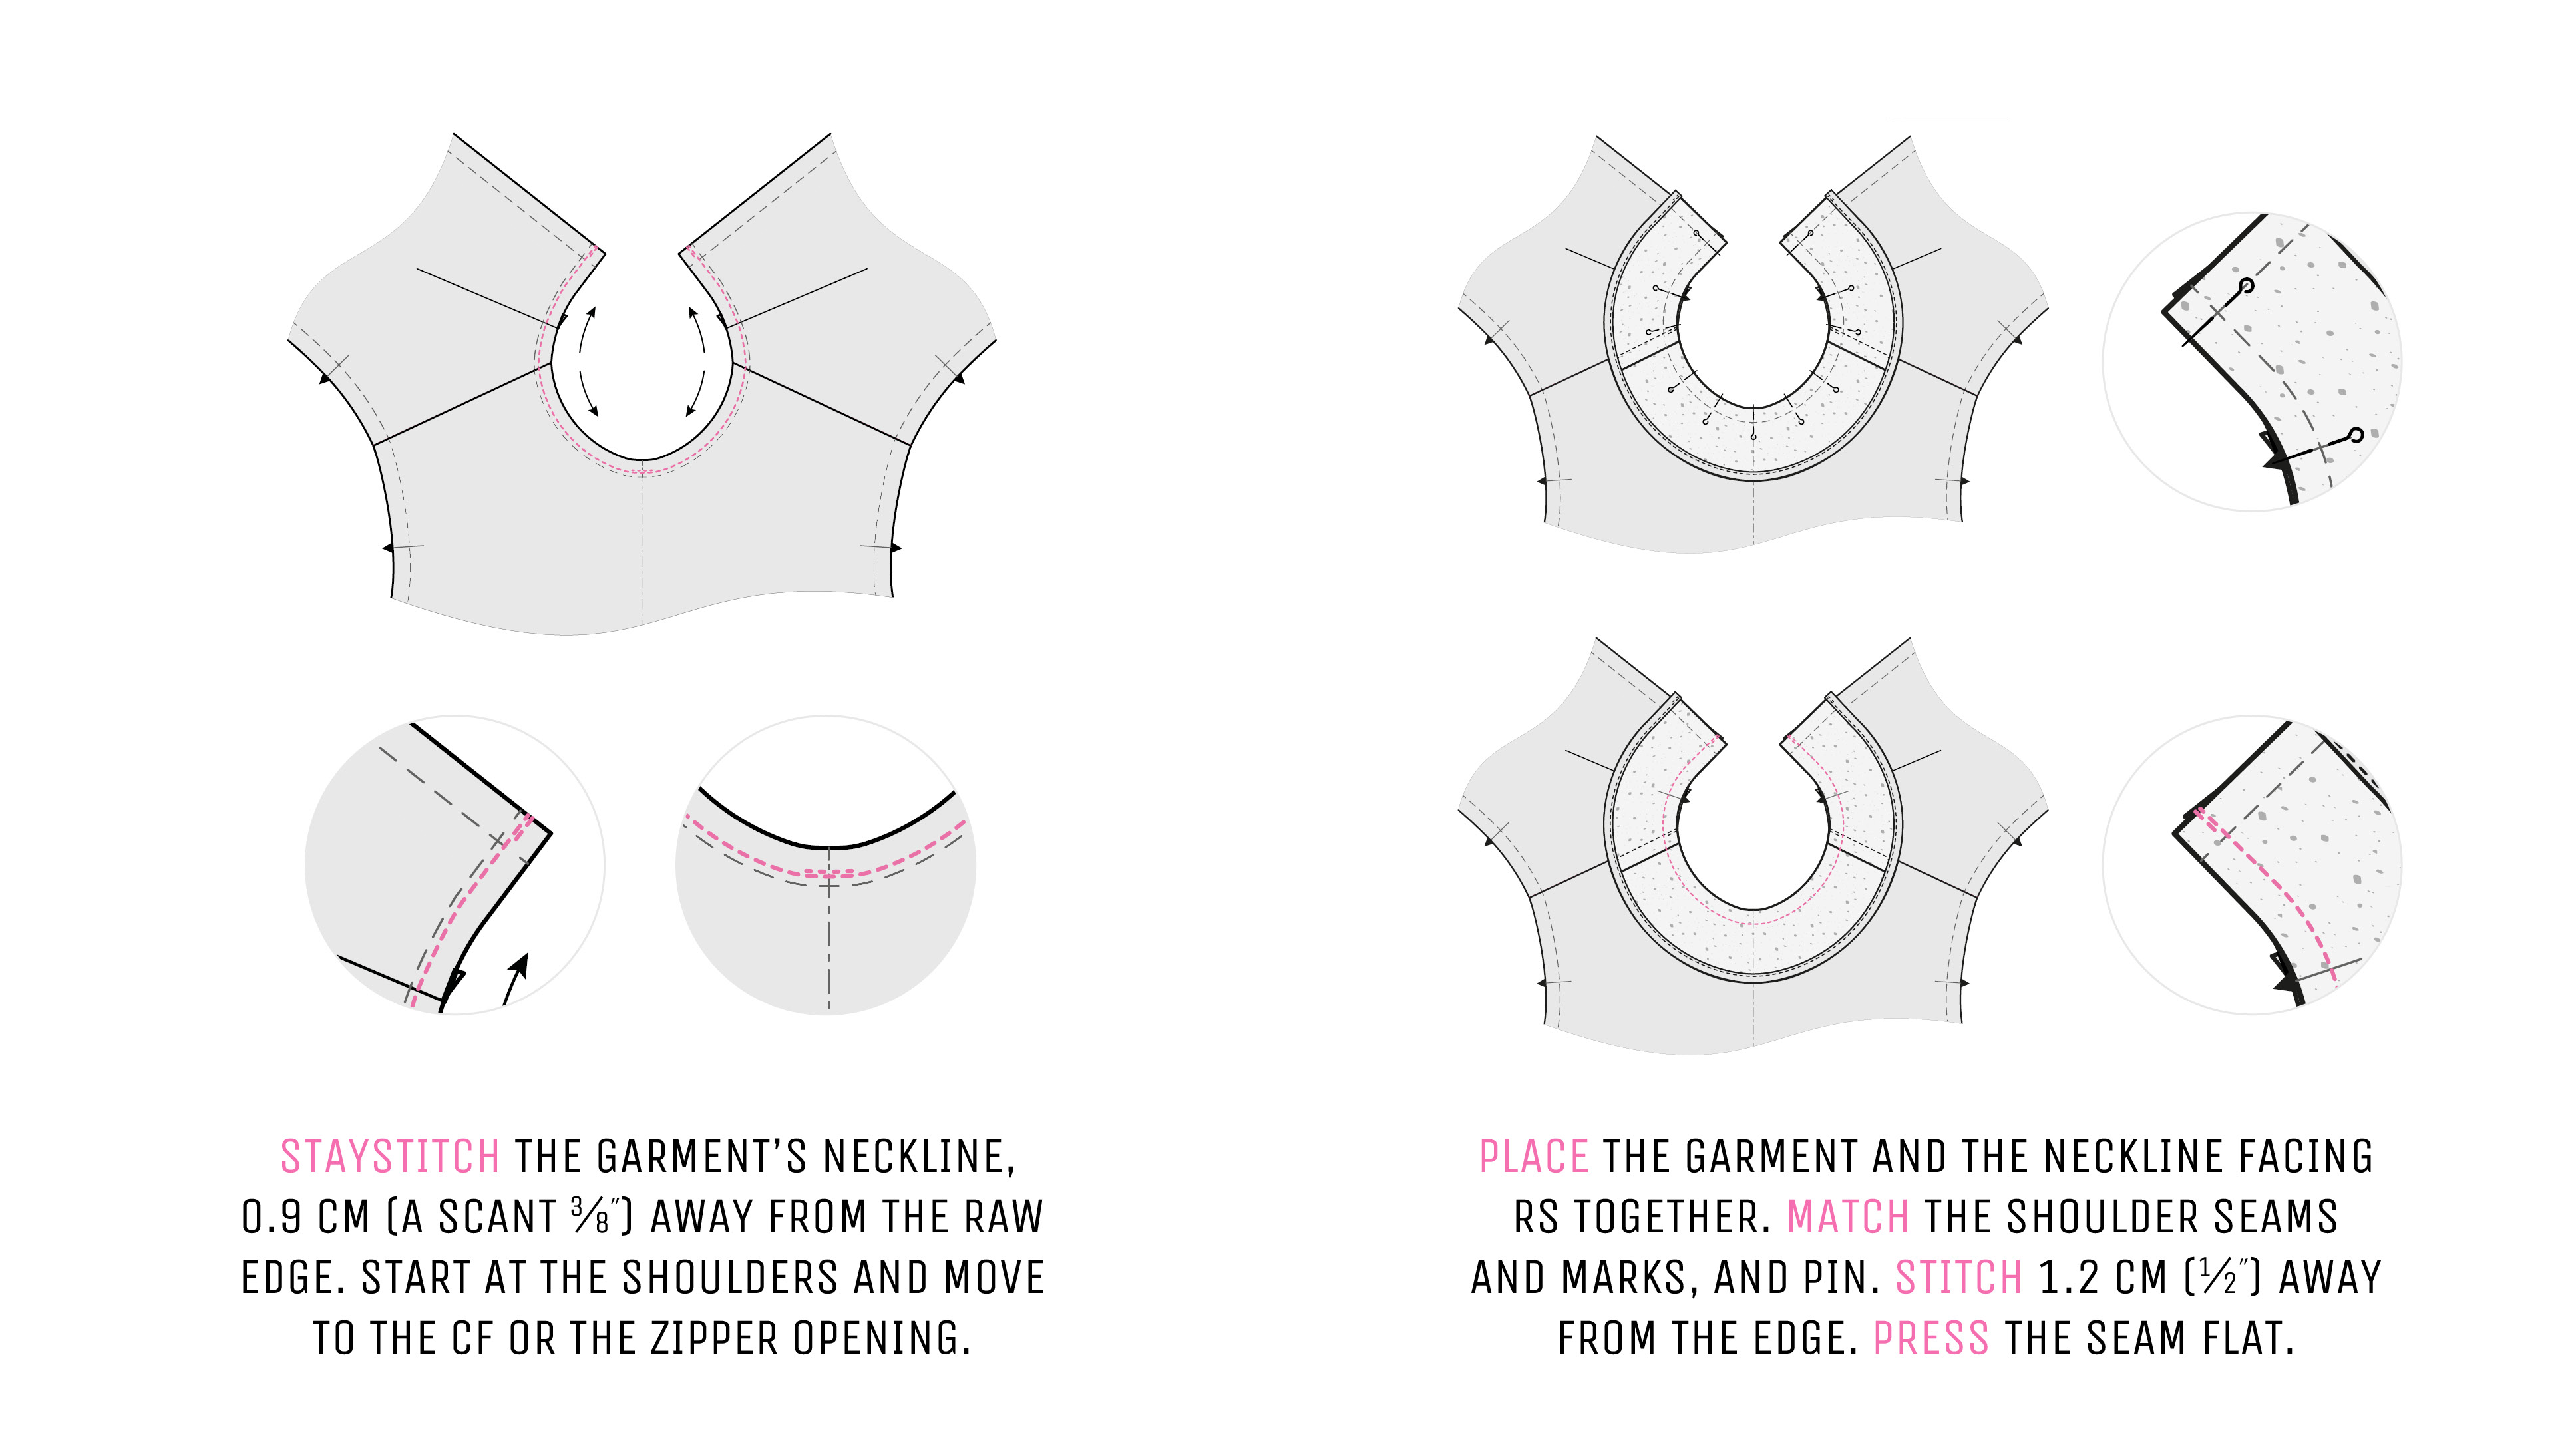
At the garment’s neckline, stitch a line of regular machine stitching 0.9 cm (a scant 3⁄8″) away from the raw edge. Start at the shoulders, move to the centre of the piece and stop at the CF or the zipper opening.
This stitching, also known as “staystitching”, will prevent the neckline from stretching. With one stitching line, you will stabilise only a quarter of the neckline—this will help to avoid deformation.
Place the garment and the neckline facing right sides together. Match the shoulder seams, CF and CB lines, and pin the pieces together. Starting at the zipper opening, carefully stitch the neckline 1.2 cm (½″) away from the edge. Press the seam flat.
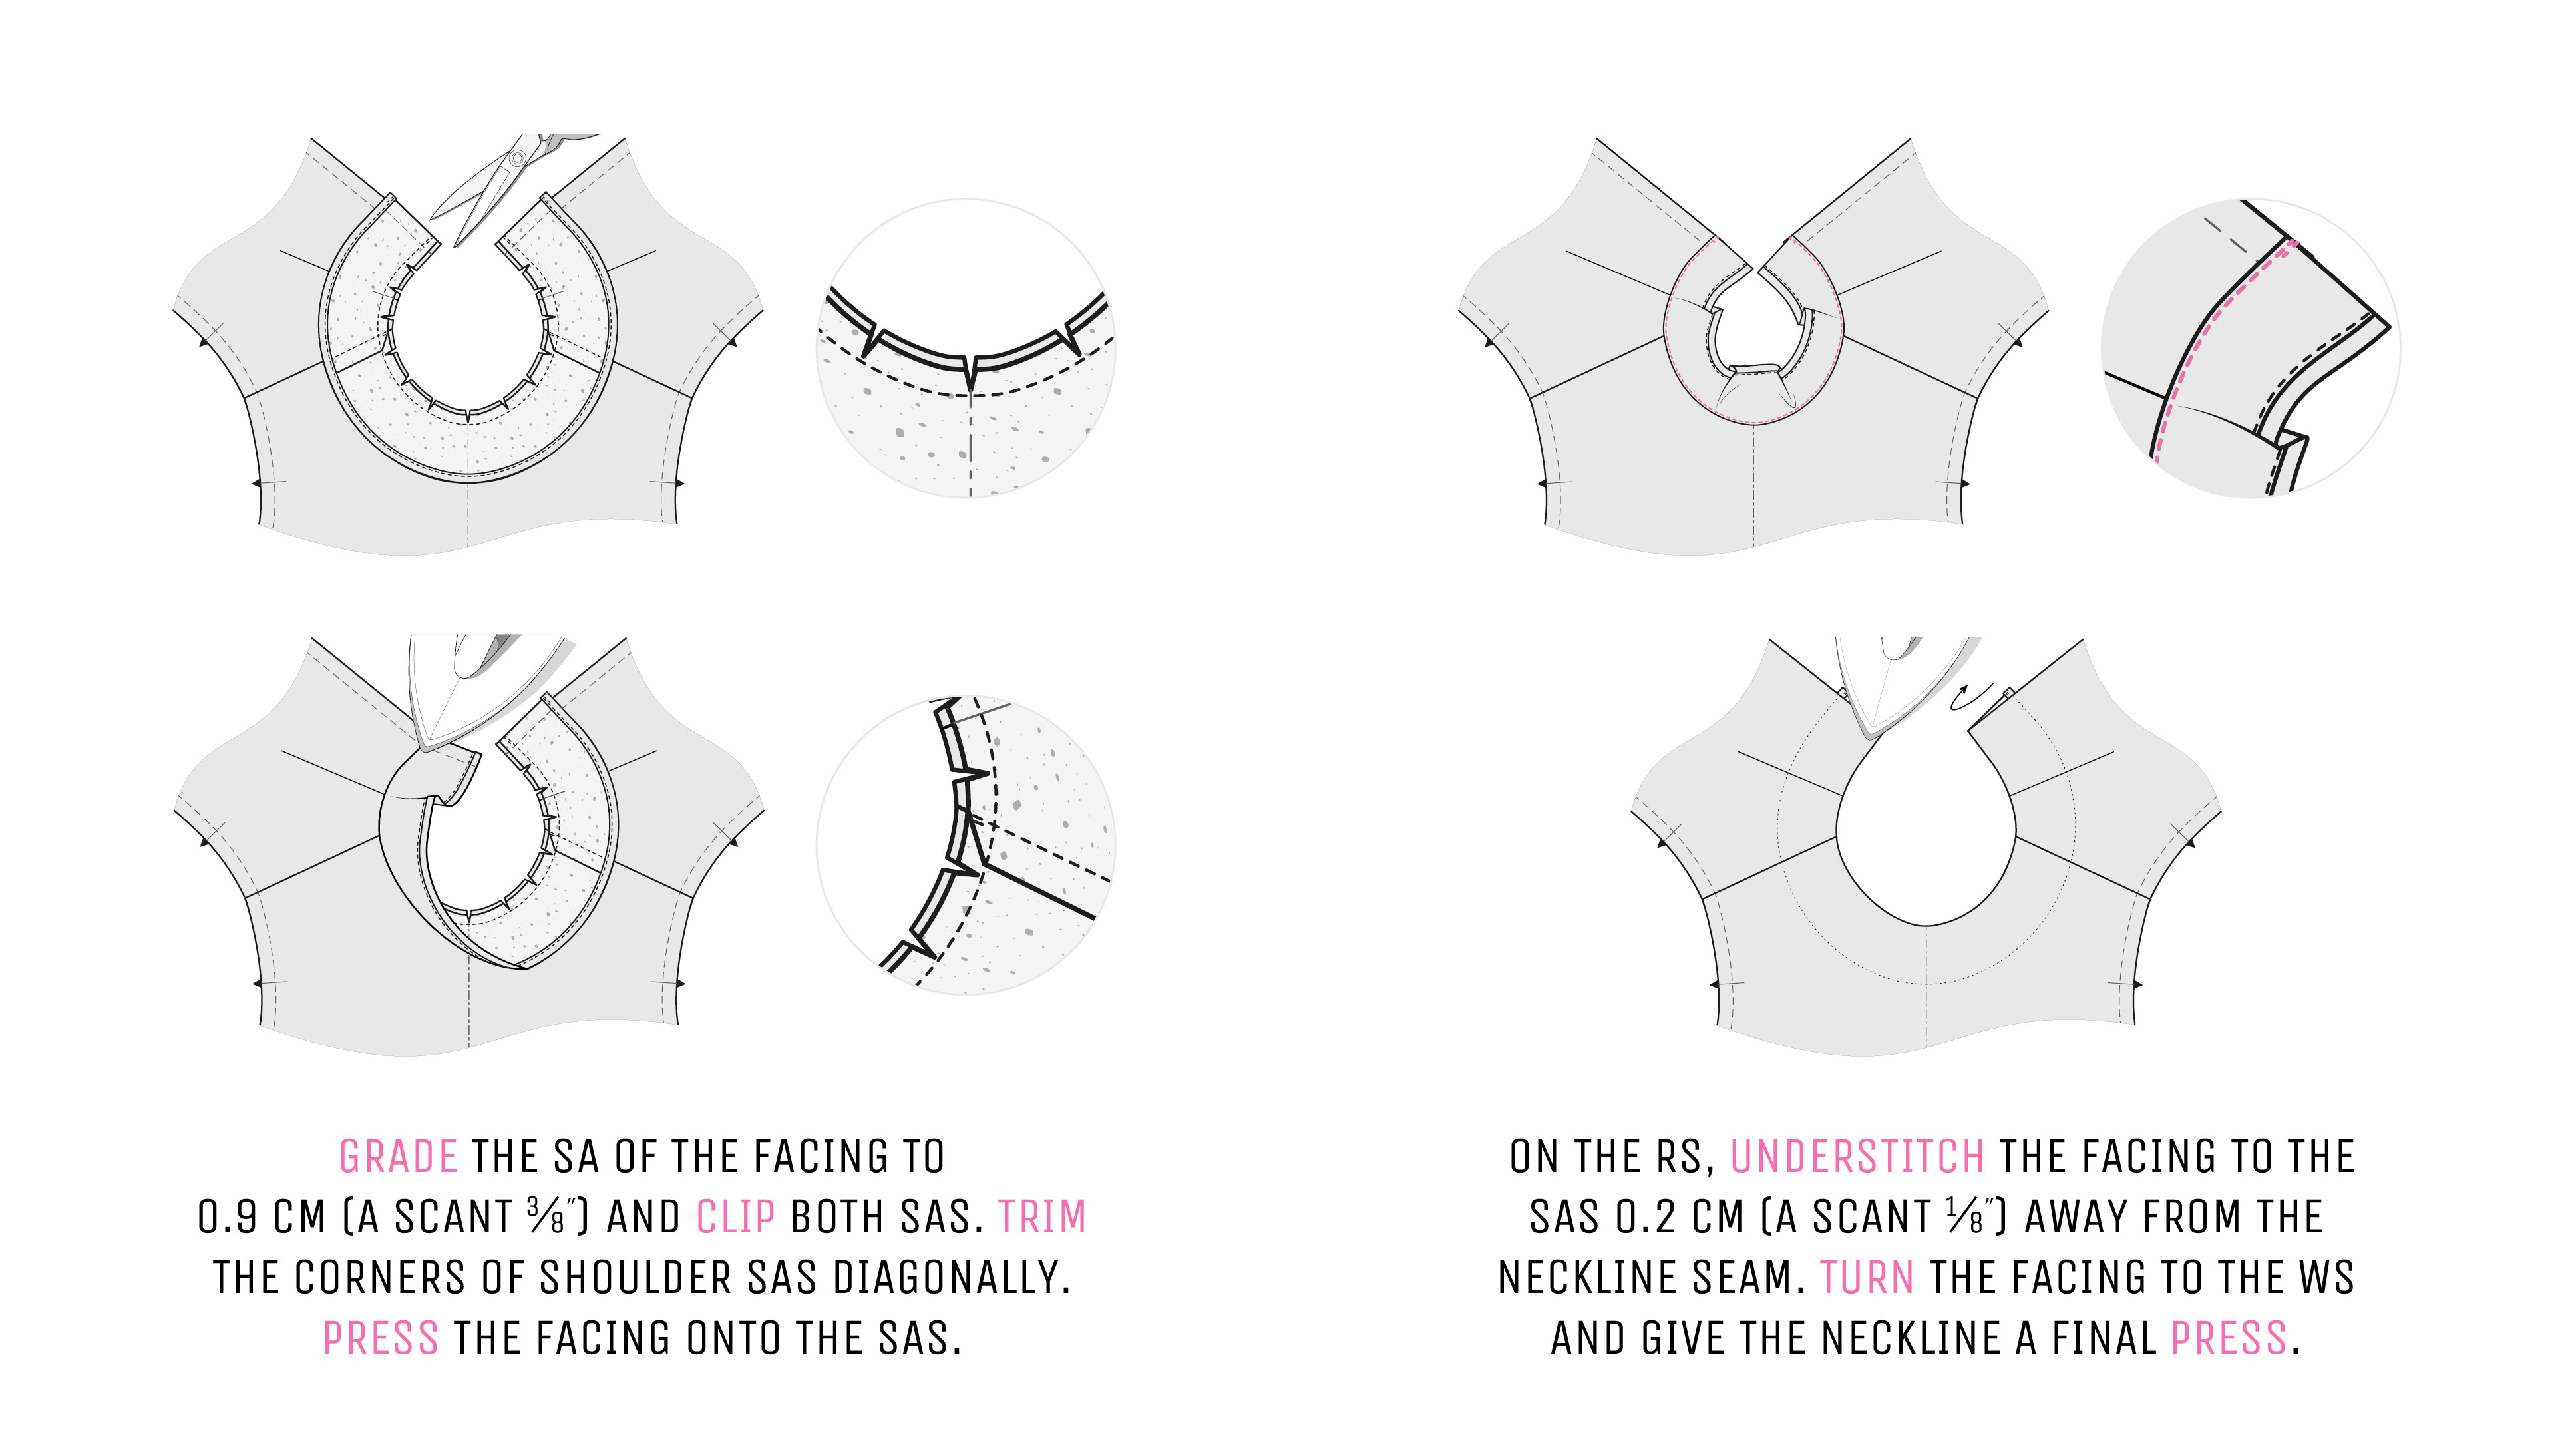
Grade the seam allowance of the facing to 0.9 cm (a scant 3⁄8″) and clip both seam allowances to release tension along the curved areas. Snip up to but not through the stitching line. Be especially careful if working with a fabric that frays easily. Trim the corners of shoulder seam allowances and, if included, darts diagonally to eliminate bulk.
Press the facing onto the seam allowances. Ensure the neckline forms a smooth curve. Avoid pulling or stretching the seam. On the right side, understitch the facing to the seam allowances 0.2 cm (a scant 1⁄8″) away from the neckline seam. Turn the facing to the inside of the garment and give the neckline a final press.
3. Finish the Zipper Opening
By this point, install the invisible zipper with your preferred method and finish the edges of the centre back seam.
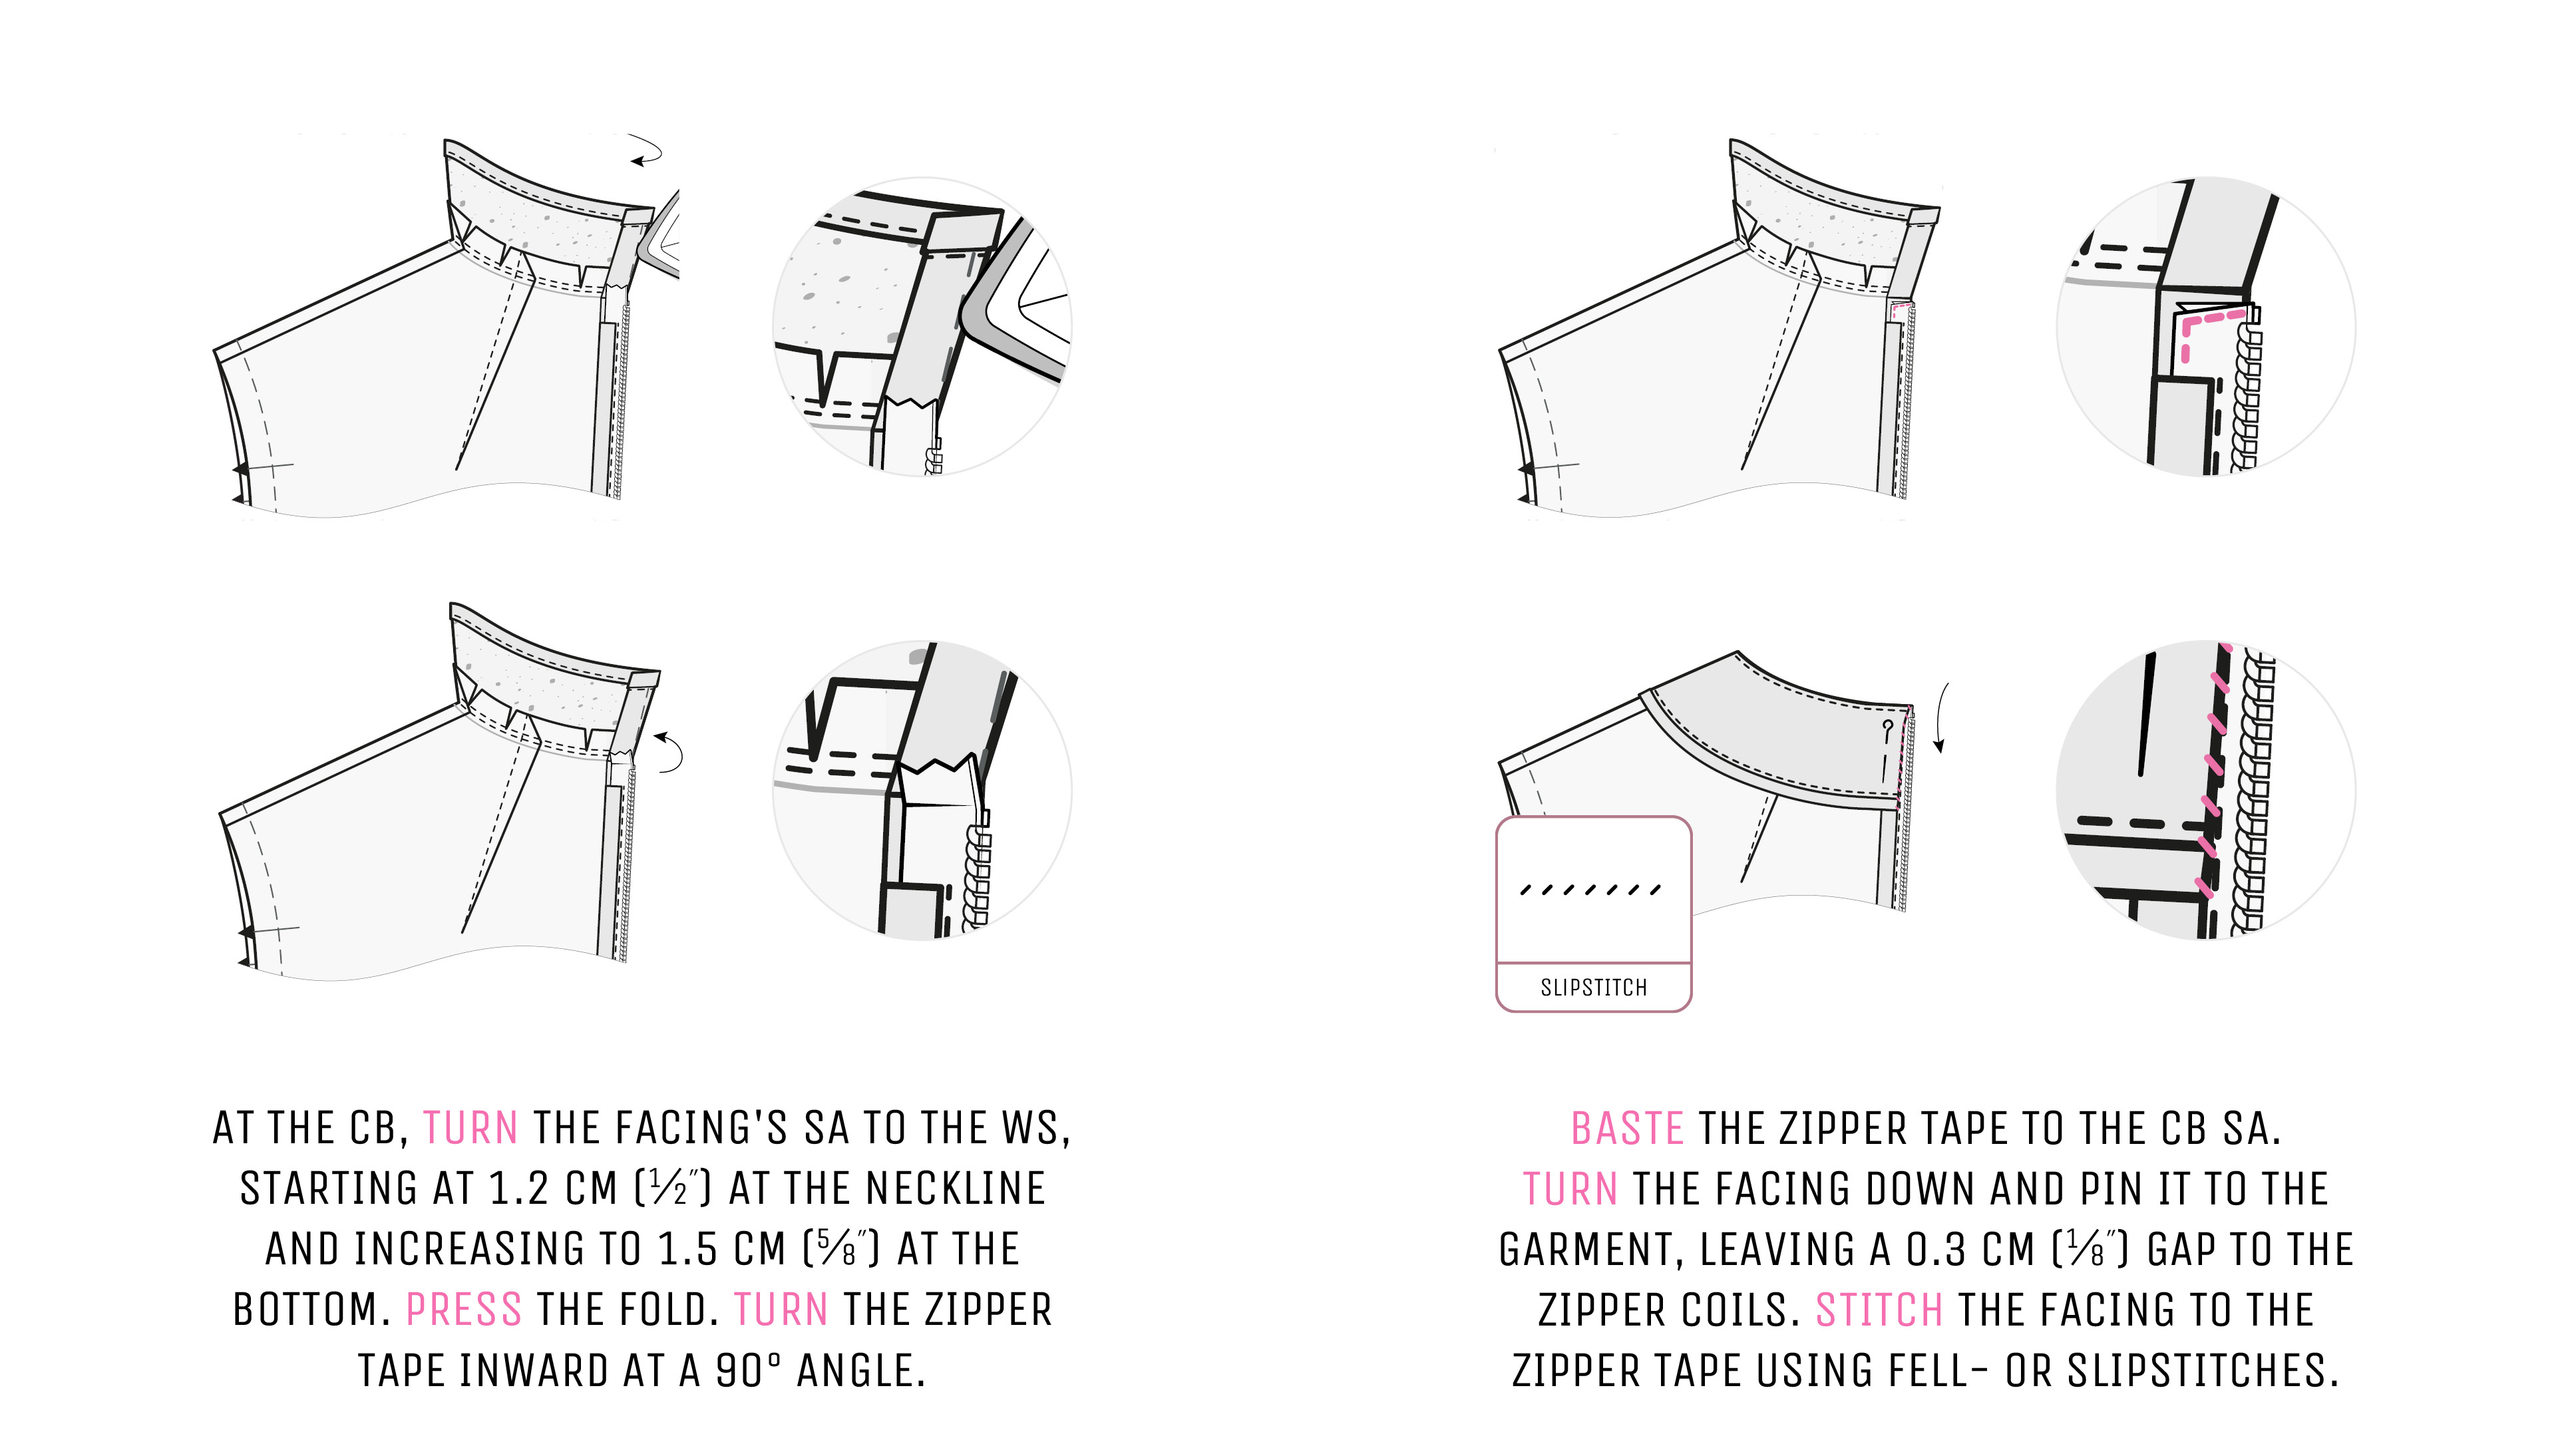
To finish the CB seam of the facing, turn its seam allowance to the wrong side—starting at 1.2 cm (½″) at the neckline and increasing to 1.5 cm (5⁄8″) at the bottom. Press the fold; it will serve as your stitching guide.
At the neckline fold, turn the top section of the zipper tape inward at a 90-degree angle to reduce bulk. Baste it to the CB seam allowance—not the body.
When attaching the neckline facing to the zipper tape, there are two possible methods: the common one by machine, or a more precise one by hand.
The machine method—where the facing and the back are stitched right sides together and then turned right side out—is fast and durable, but can be harder to control around the zipper coils.
However, the hand-sewn method, shown in these instructions, takes more time but offers greater control, gives a neater, softer result and better precision, especially when working with delicate fabrics.
For the hand-sewn method, turn the facing down and pin it to the dress, leaving a 0.3 cm (1⁄8″) gap between the facing and the zipper coils. Stitch the facing to the zipper tape using fell- or slipstitches.
For a refined hand-sewn finish, attach a hook and eye to the back facing. Place it just below the neckline seam, at the zipper opening.
Voilà!
Your garment now has an elegant and carefully crafted neckline. Enjoy.
Other posts in the Neckline Series you might be interested in:
- How to Sew a Shirt Collar
- How to Sew a Crew Neckband for a T-shirt
- How to Sew a Bow Collar for a Blouse
And if you’d like to get to know Lili, the dress behind this tutorial, a little better, you can read her pattern overview or find her in my Etsy store.
xoxo
Yours,
Kaia