How to Sew a Sleeve Booster
Category: Tutorials 20 November 25
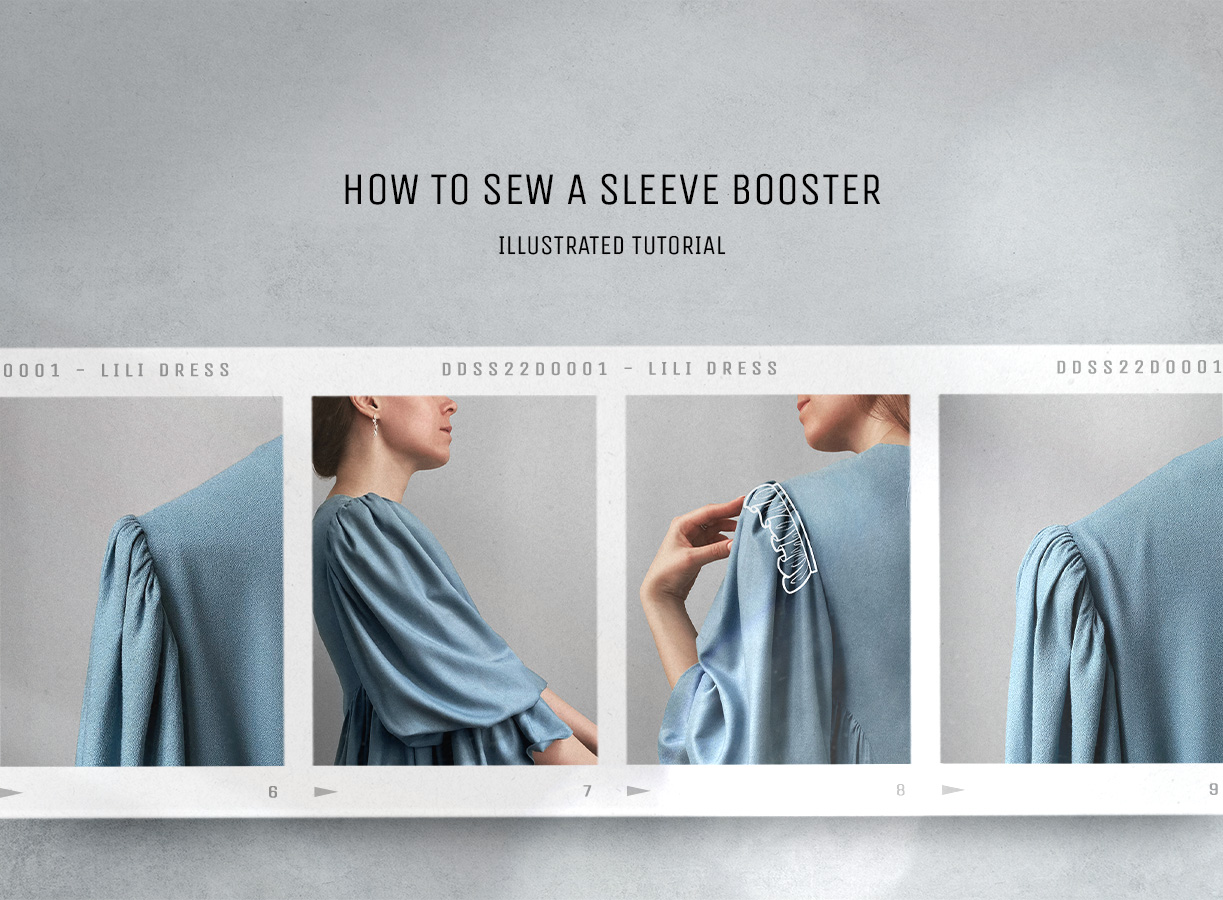
Ad: This tutorial is a complementary post for the Lili: Balloon-Sleeve Dress pattern, which is now available for sale on Etsy.
This post is based on the knowledge I gained from the fantastic Claire B. Schaeffer books.
The Prologue
No matter how good the pattern or fabric you’re working with is, sometimes the combination of materials and conventional at-home sewing techniques just isn’t enough to hold the desired silhouette.
That’s where the lesser-known techniques of couture come in—its hidden layers, inner structures, and quiet support systems that you’ll rarely find outside couture and only occasionally in high-end garments. These methods often ask for patience and precision, and their results will seldom be seen on the surface. But that’s never the point—not every effort should announce itself to the world.
What truly matters is how the garment transforms—sometimes subtly, sometimes dramatically—once these internal structures come into play. A layer of silk organza backing keeps Chanel-style tweeds from stretching and losing shape; careful pad-stitching helps the lapel roll just so; and sleeve heads give the sleeve cap that beautiful, rounded line.
The Sleeve Booster
And this is where one of my favourite little couture secrets comes in—the sleeve booster.
While some couture techniques ask for a steady hand and a deeper understanding, many are surprisingly approachable—even for an intermediate home sewist with a bit of curiosity and patience.
The sleeve booster, a close cousin of the sleeve head, is one of them. While sleeve heads accompany regular set-in sleeves in tailored jackets and coats, boosters—whether small or dramatically full—support the weight and shape of exaggerated sleeve caps, such as tucked, balloon, or Leg o’Mutton styles.
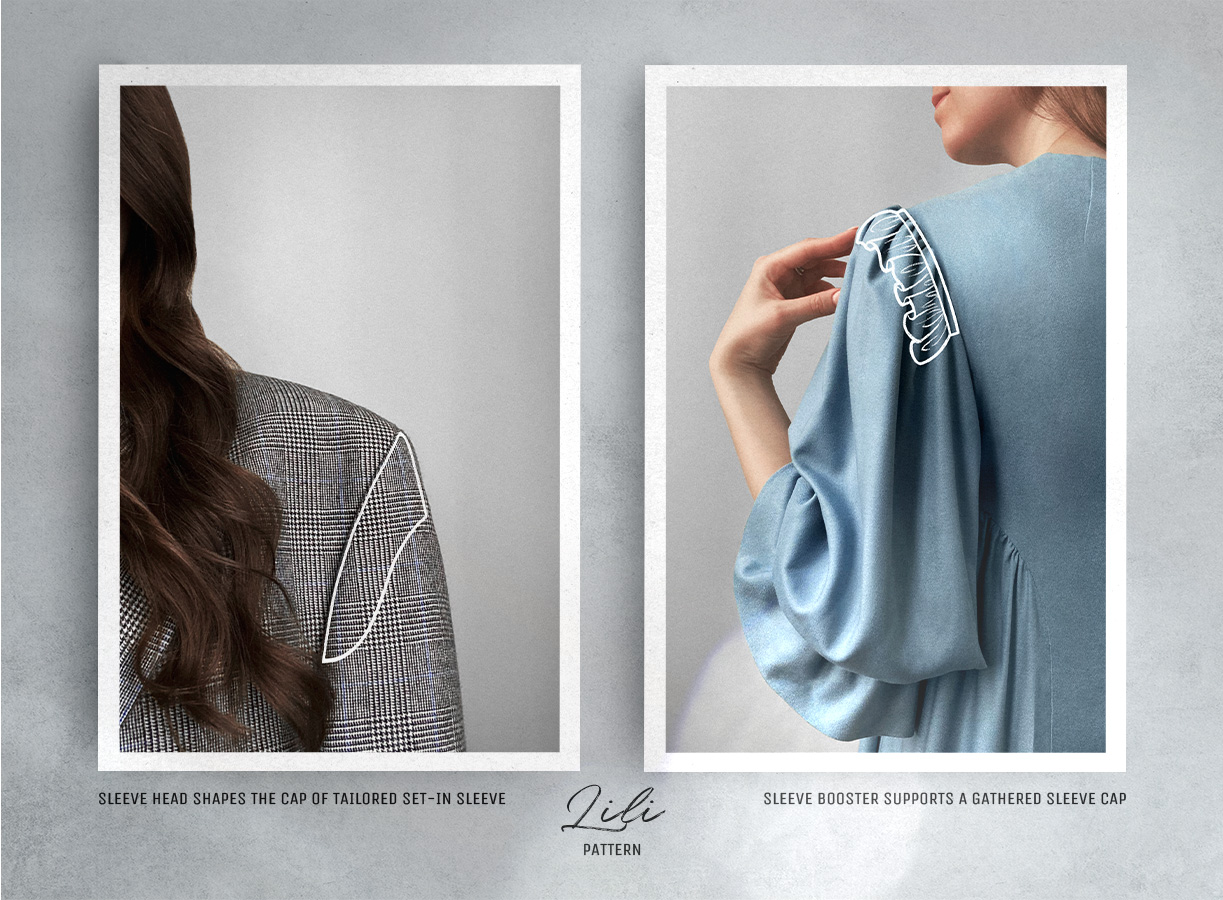
A booster is usually wider and fuller than a sleeve head. It can be made from various materials, such as self-fabric, silk organza, or even hair canvas, and is often softly gathered. Depending on your fabric choice, you can achieve endless variations: from light, upward-curving caps to crisp, sculptural ones that hold their own. Choosing the right type depends on the final effect you want—or how you’d like the sleeve to hang—which is why a sense of fabric behaviour becomes so valuable here.
In the following instructions, I’ll refer to Lili, the balloon-sleeve dress pattern I designed. Its sleeves have a beautifully rich, gathered cap — and in my case, the fabric alone couldn’t quite support that volume until I added the boosters.
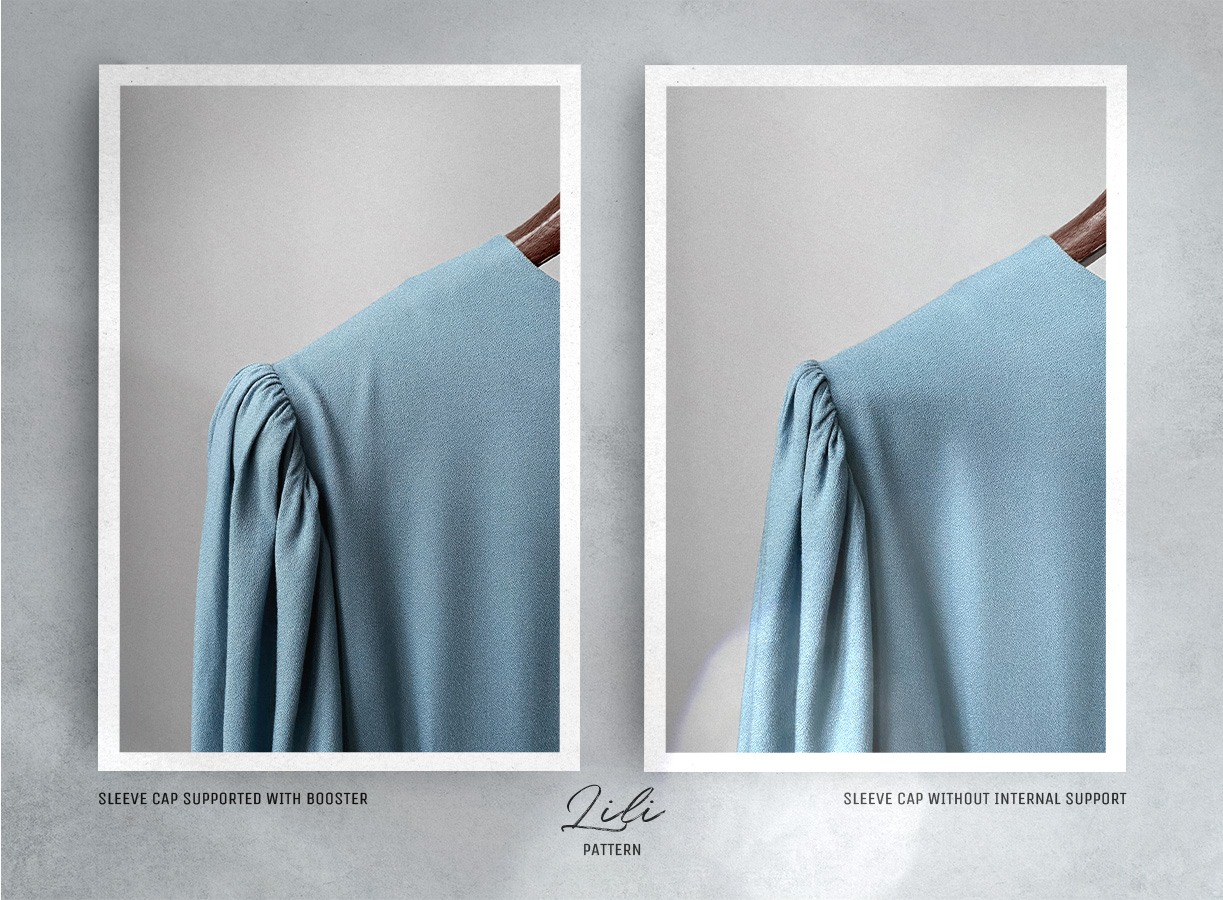
Depending on your material, you might need to test a few different boosters before finding the one that works best—whether you’re sewing Lili or another design of your own. You might even discover that your fabric doesn’t need extra support at all. Nothing in sewing is ever entirely predictable—and that’s the joy of it.
Now, let’s finally make these boosters.
Fabric & Supplies
For your sleeve boosters, you’ll need:
- Scraps of your Lili dress fabric. If your material—for example, taffeta—feels too stiff for the booster, use about 0.1 m (0.11 yds) of light- to medium-weight silk instead. The same amount applies if you’re working on another design.
- A little under 0.35 m (0.38 yds) of silk organza or a light- to medium-weight sew-in woven interfacing.
- Less than 0.5 m (0.55 yds) of thin single-fold bias tape, custom-made or store-bought.
Cutting
Below are the dimensions that worked well for my Lili dress. As mentioned above, your version might need a wider or fuller booster — don’t be afraid to experiment.
I made Lili’s boosters from viscose crepe, the dress’s fashion fabric, and silk organza.
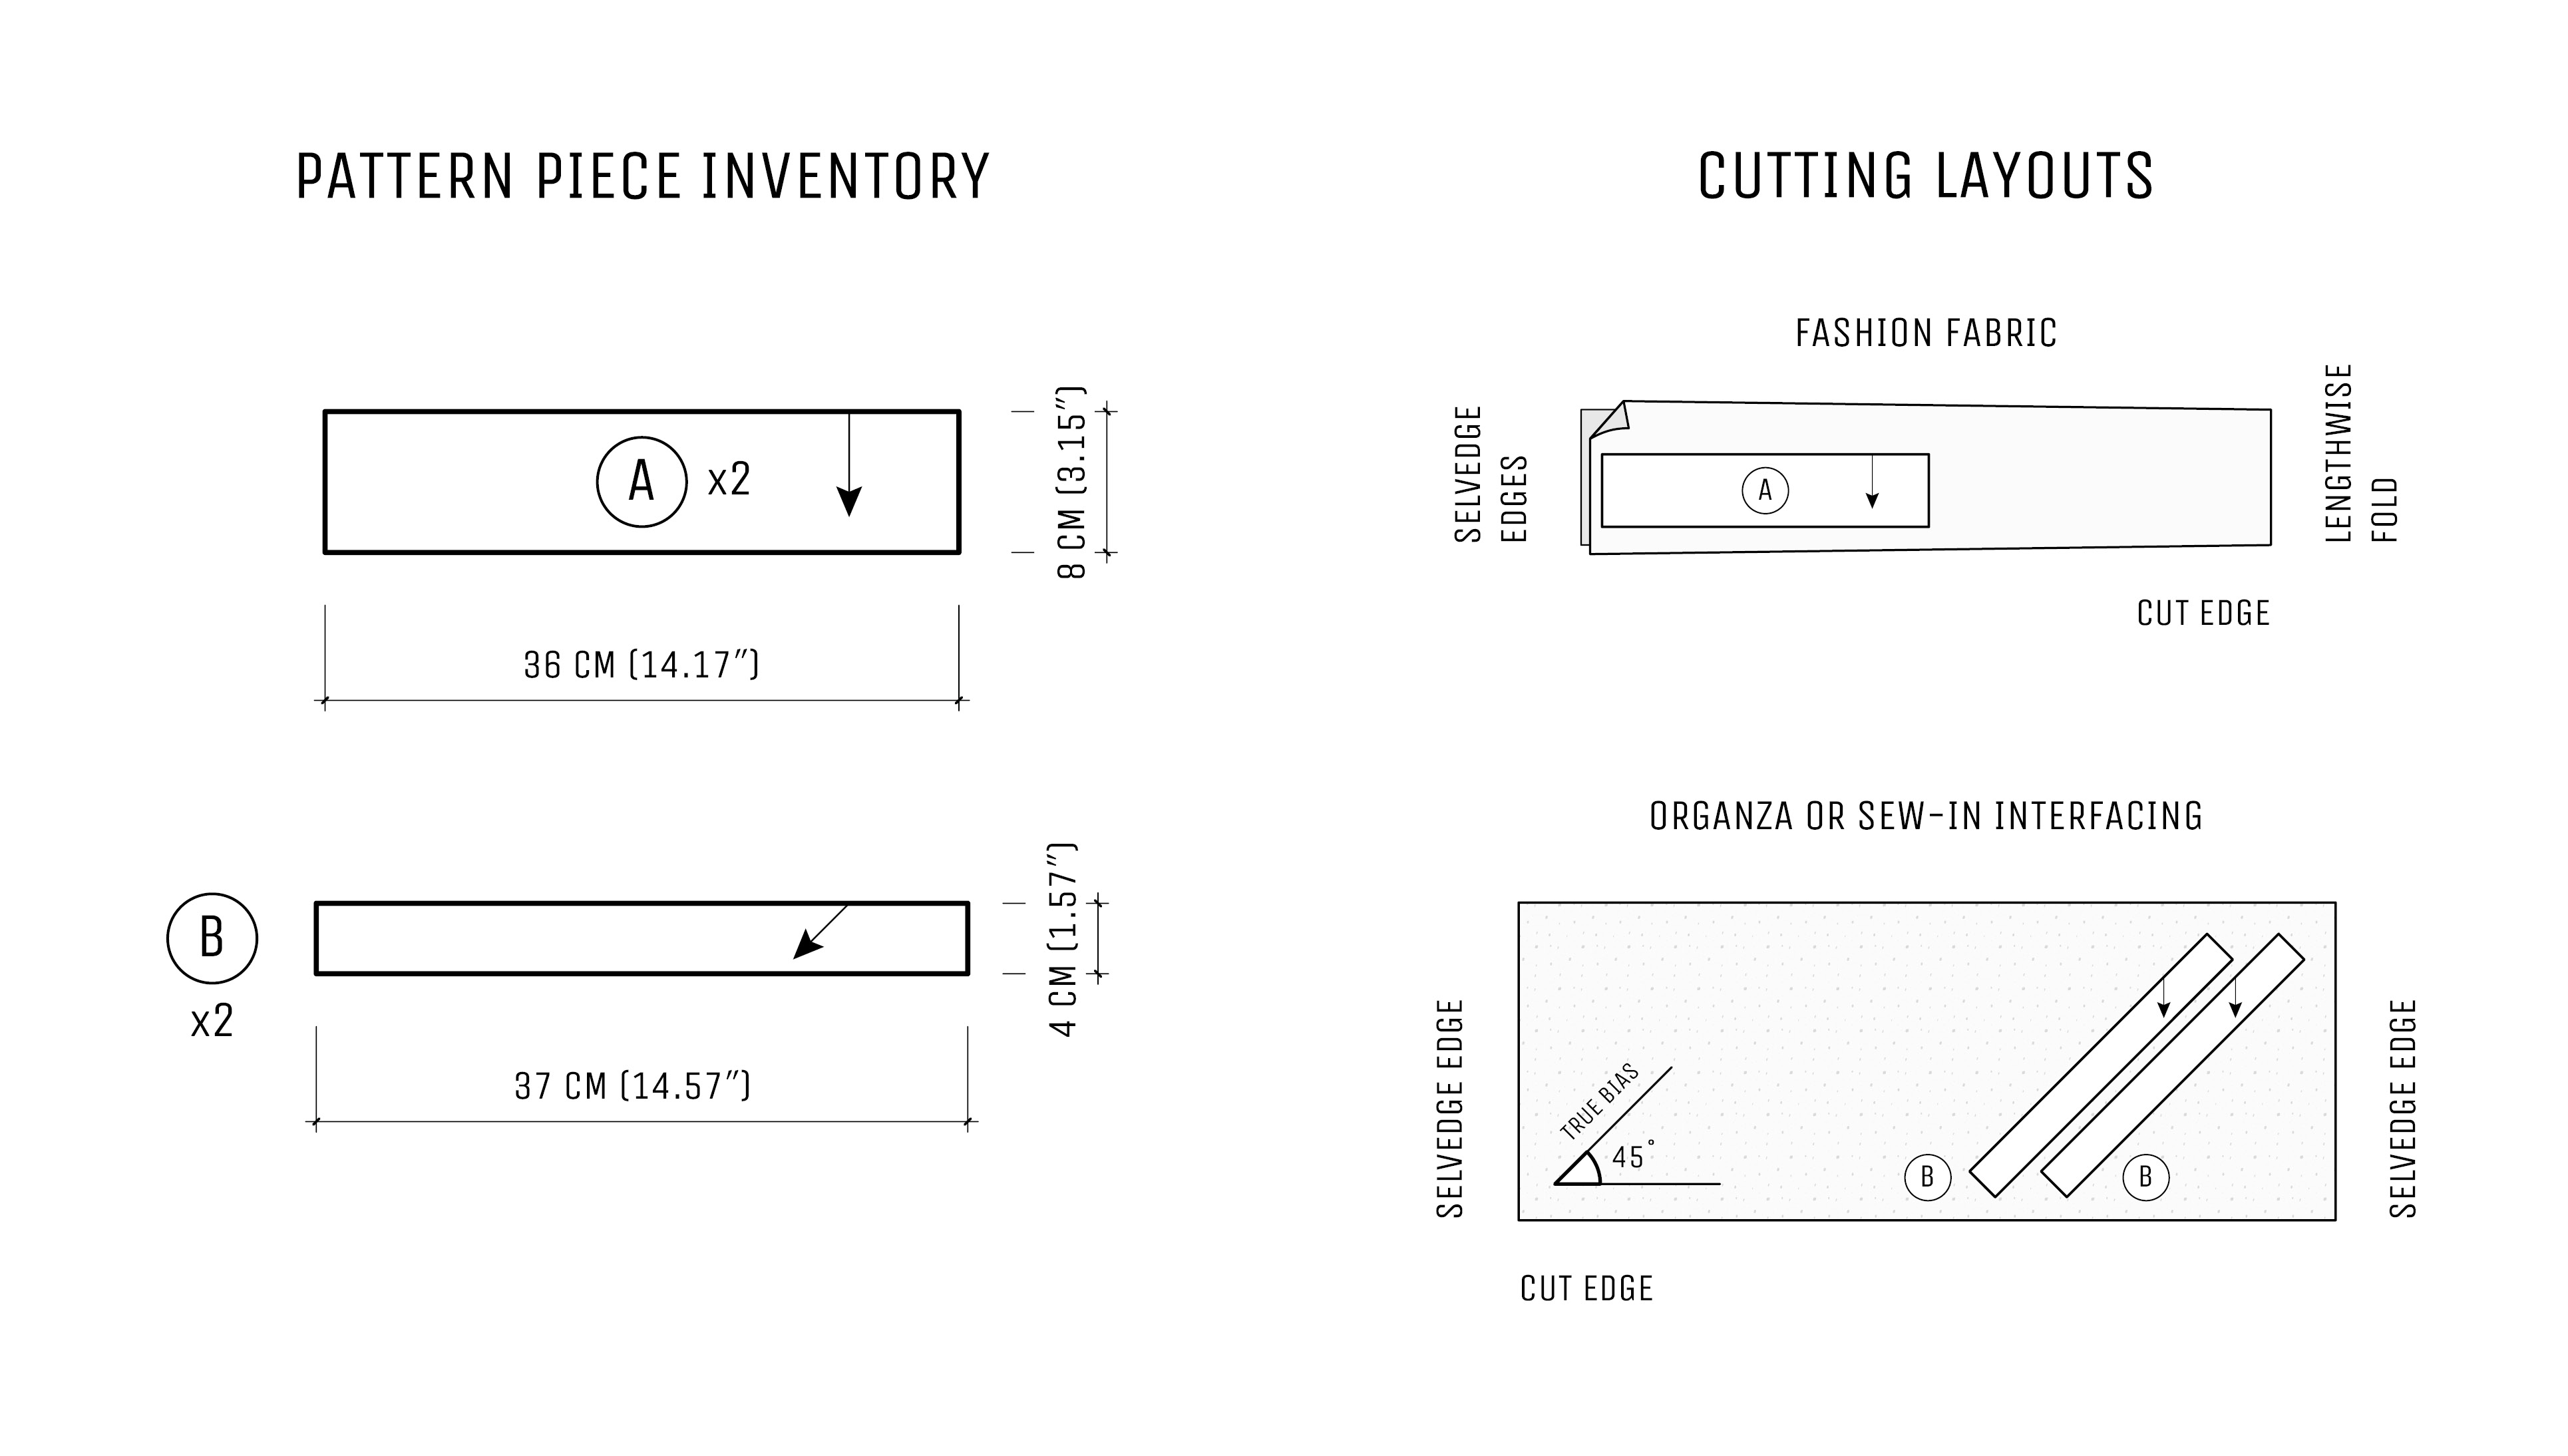
- Booster Shell (A) — from fashion fabric or silk: cut two rectangles, 8 × 36 cm (3.15 × 14.17″), with the long sides running parallel to the crossgrain of the fabric (the crossgrain runs perpendicular to the selvedges).
- Interfacing (B) — from organza or woven interfacing: cut two rectangles, 4 × 37 cm (1.57 × 14.57″), with the long sides running parallel to the bias (the bias runs at 45° to the selvedges).
Sewing
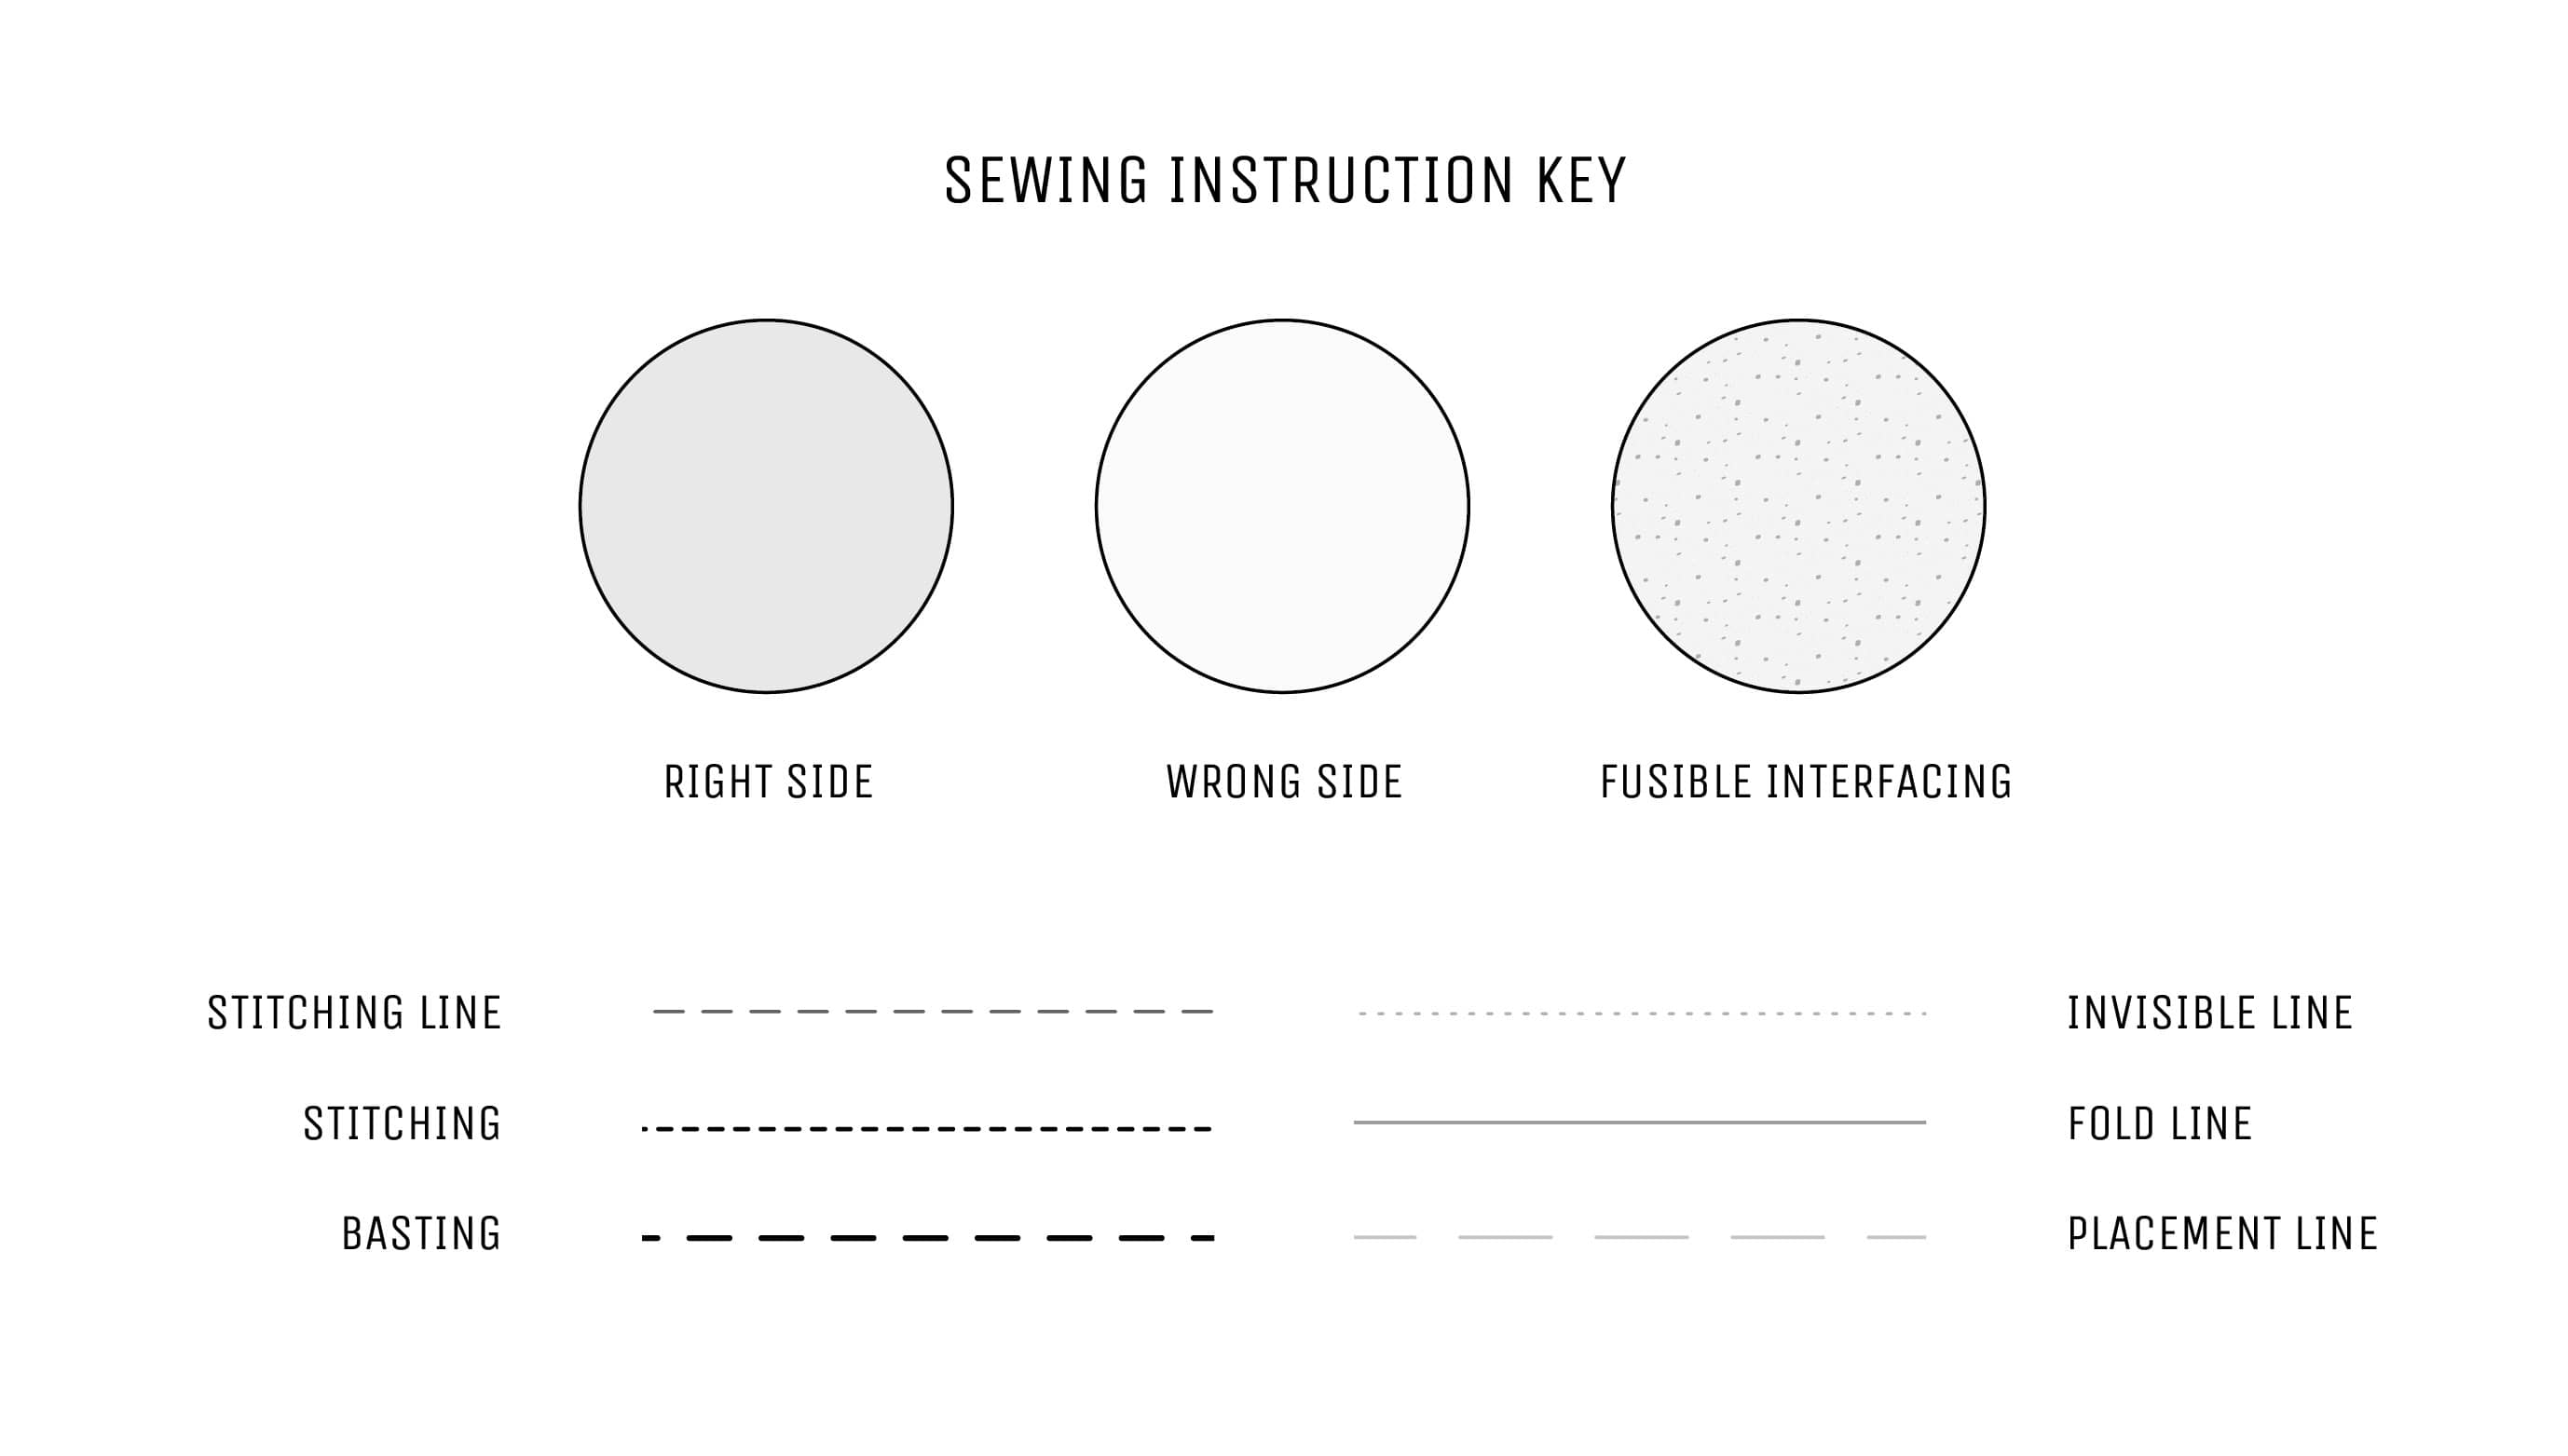
1. Prepare the booster body
Place the booster shell (A) wrong side up and lay the interfacing piece (B) on top of its lower half. Match the centre lines—the (B) piece will extend slightly beyond both sides of (A)—and baste the layers together as shown.
Turn the main piece (A) right side up and fold it lengthwise, right sides together, keeping the (B) piece facing down. Baste in place. Using tailor’s chalk, mark the stitching lines as indicated.
Beginning and ending with a few backstitches, stitch the short sides, rounding the large corners. Trim the excess fabric, leaving a 0.6 cm seam allowance. Carefully notch along the curved edges and clip into the small corners.
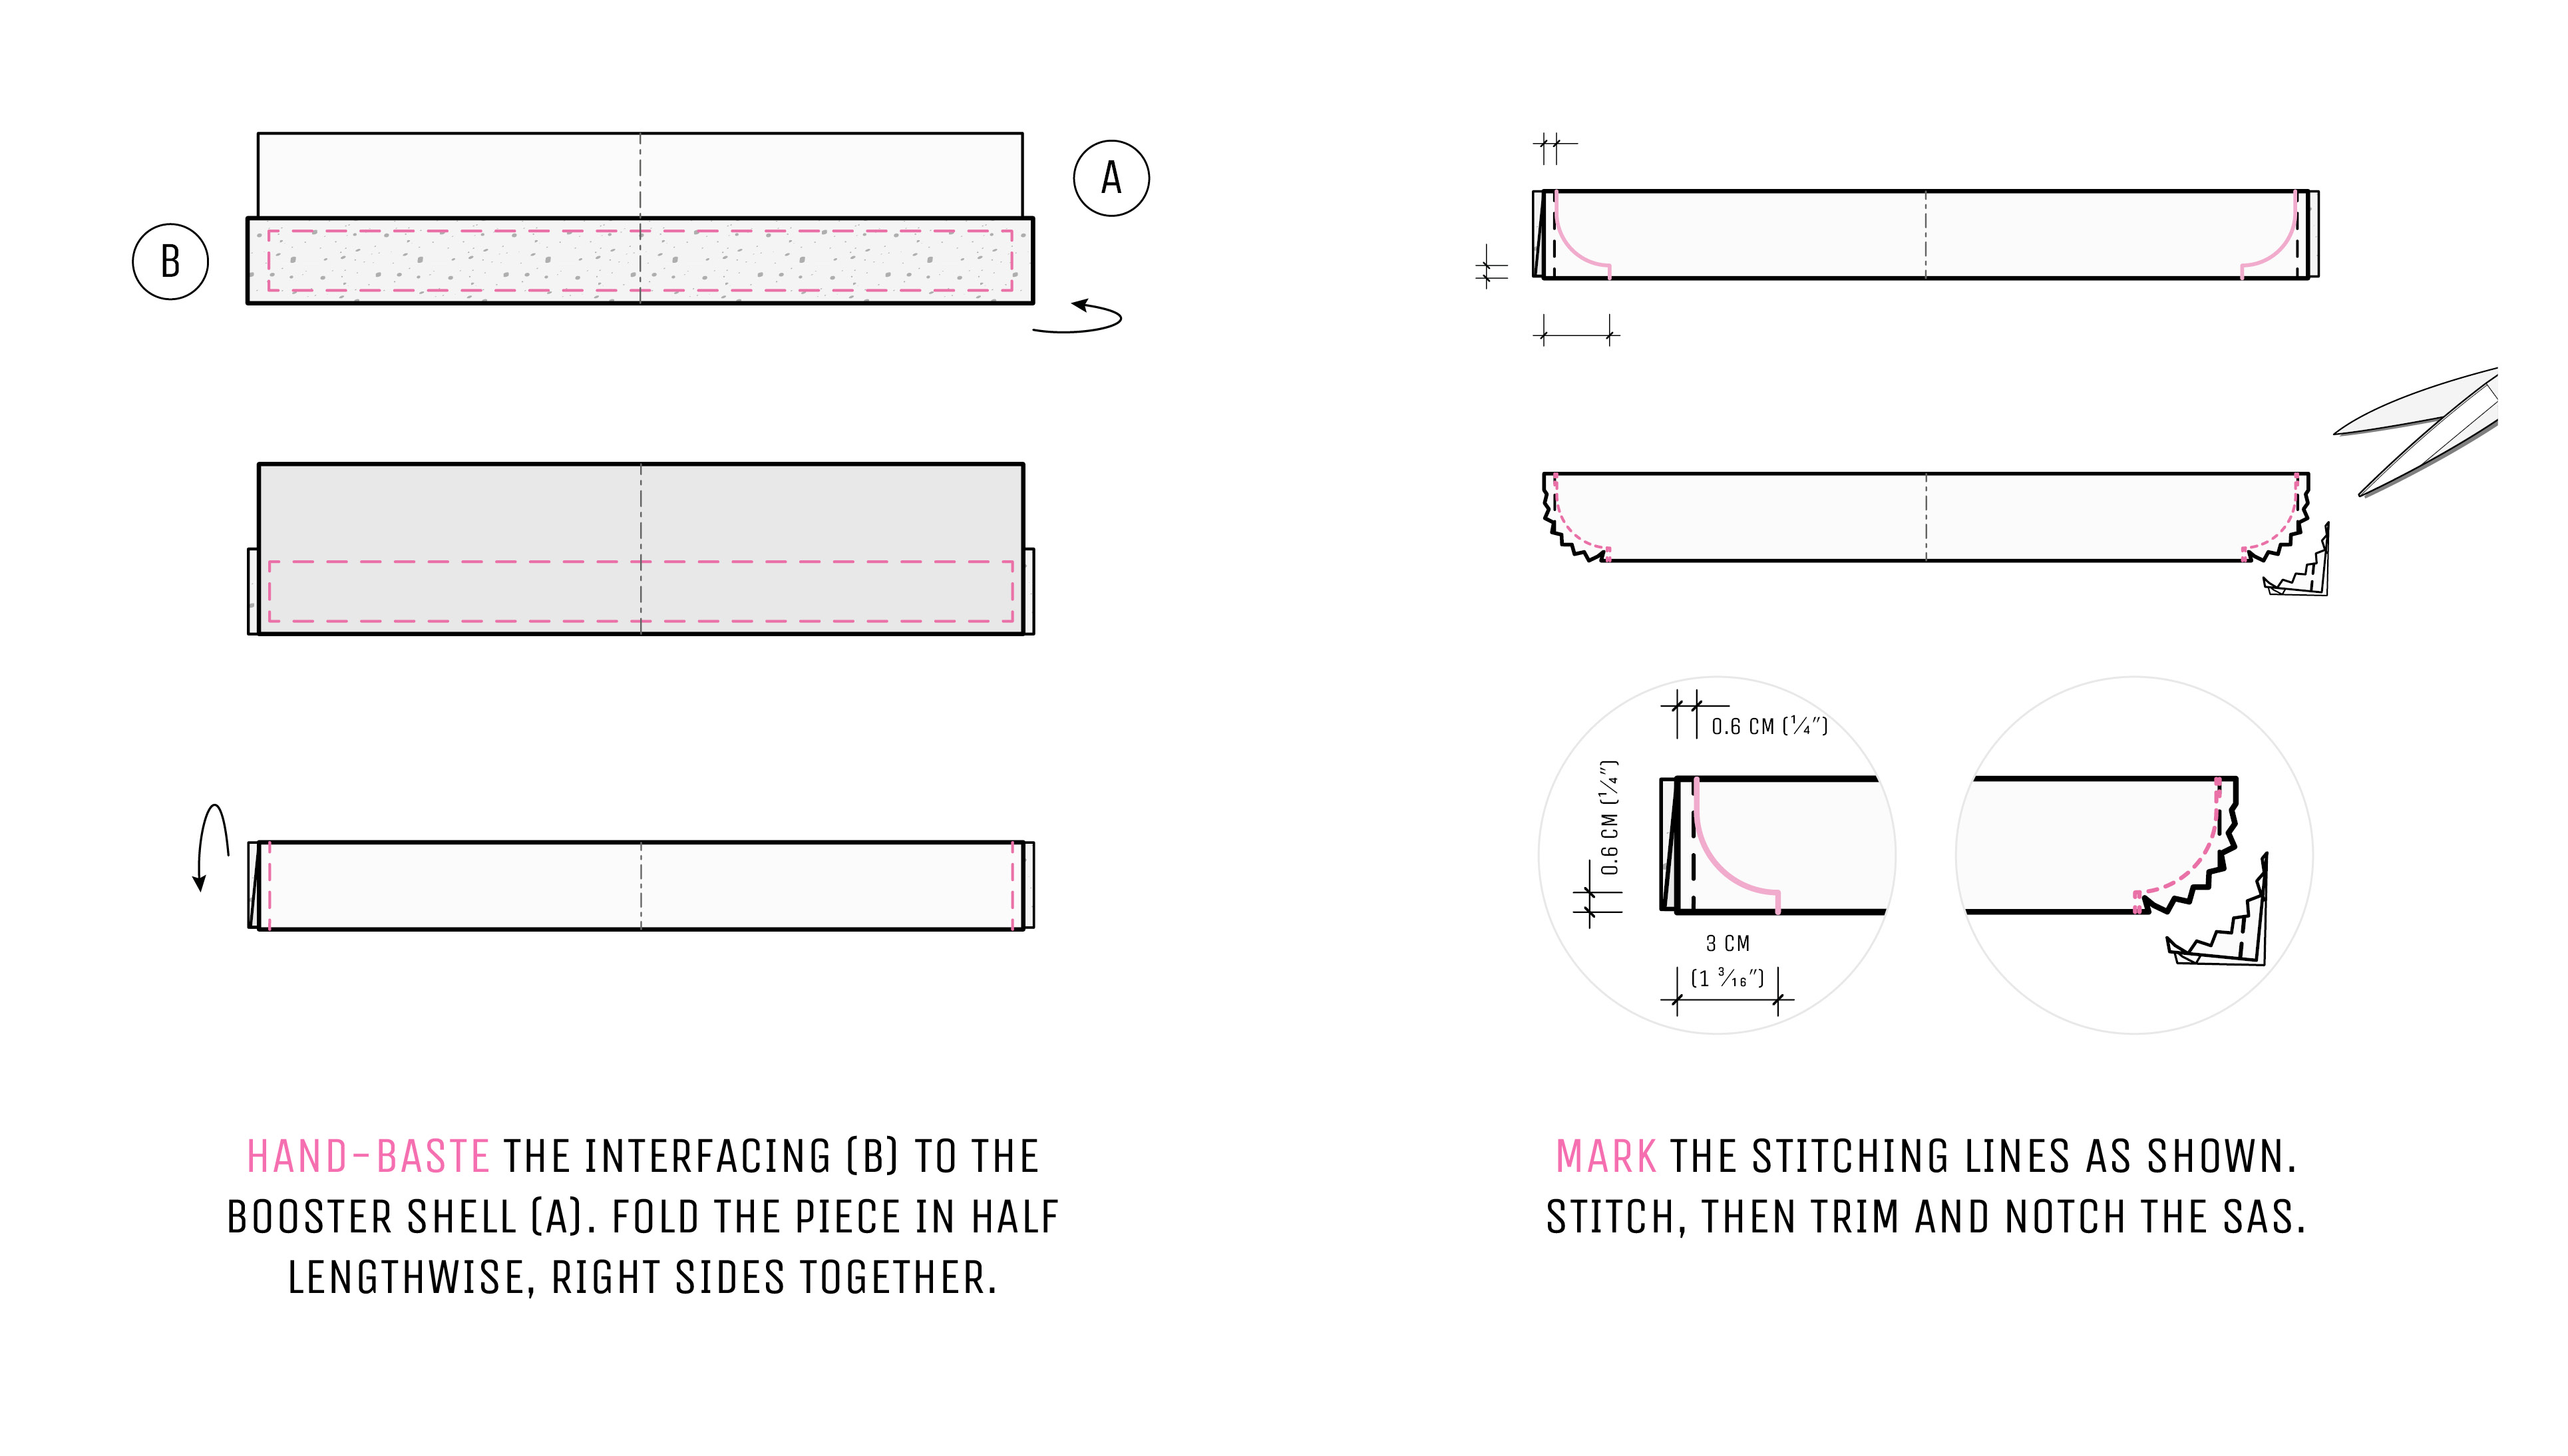
2. Clean-finish the bottom edge
Prepare the raw edge of the booster: make two rows of machine gathering stitches or hand running stitches between the edges and leave long thread tails. Stitch the first line 0.3 cm (a scant 1⁄8″) away from the seam allowance edge, and make the second line 0.6 cm (1⁄4″) away from the first one. Pull up the gathers to 18 cm (7.09″).
Place the booster’s bottom edge and the unfolded bias tape right sides together. At each side, the bias should be about 1.2 cm longer than the booster’s edge. Pin and stitch right into the bias’s fold. Press the tape onto the seam allowances.
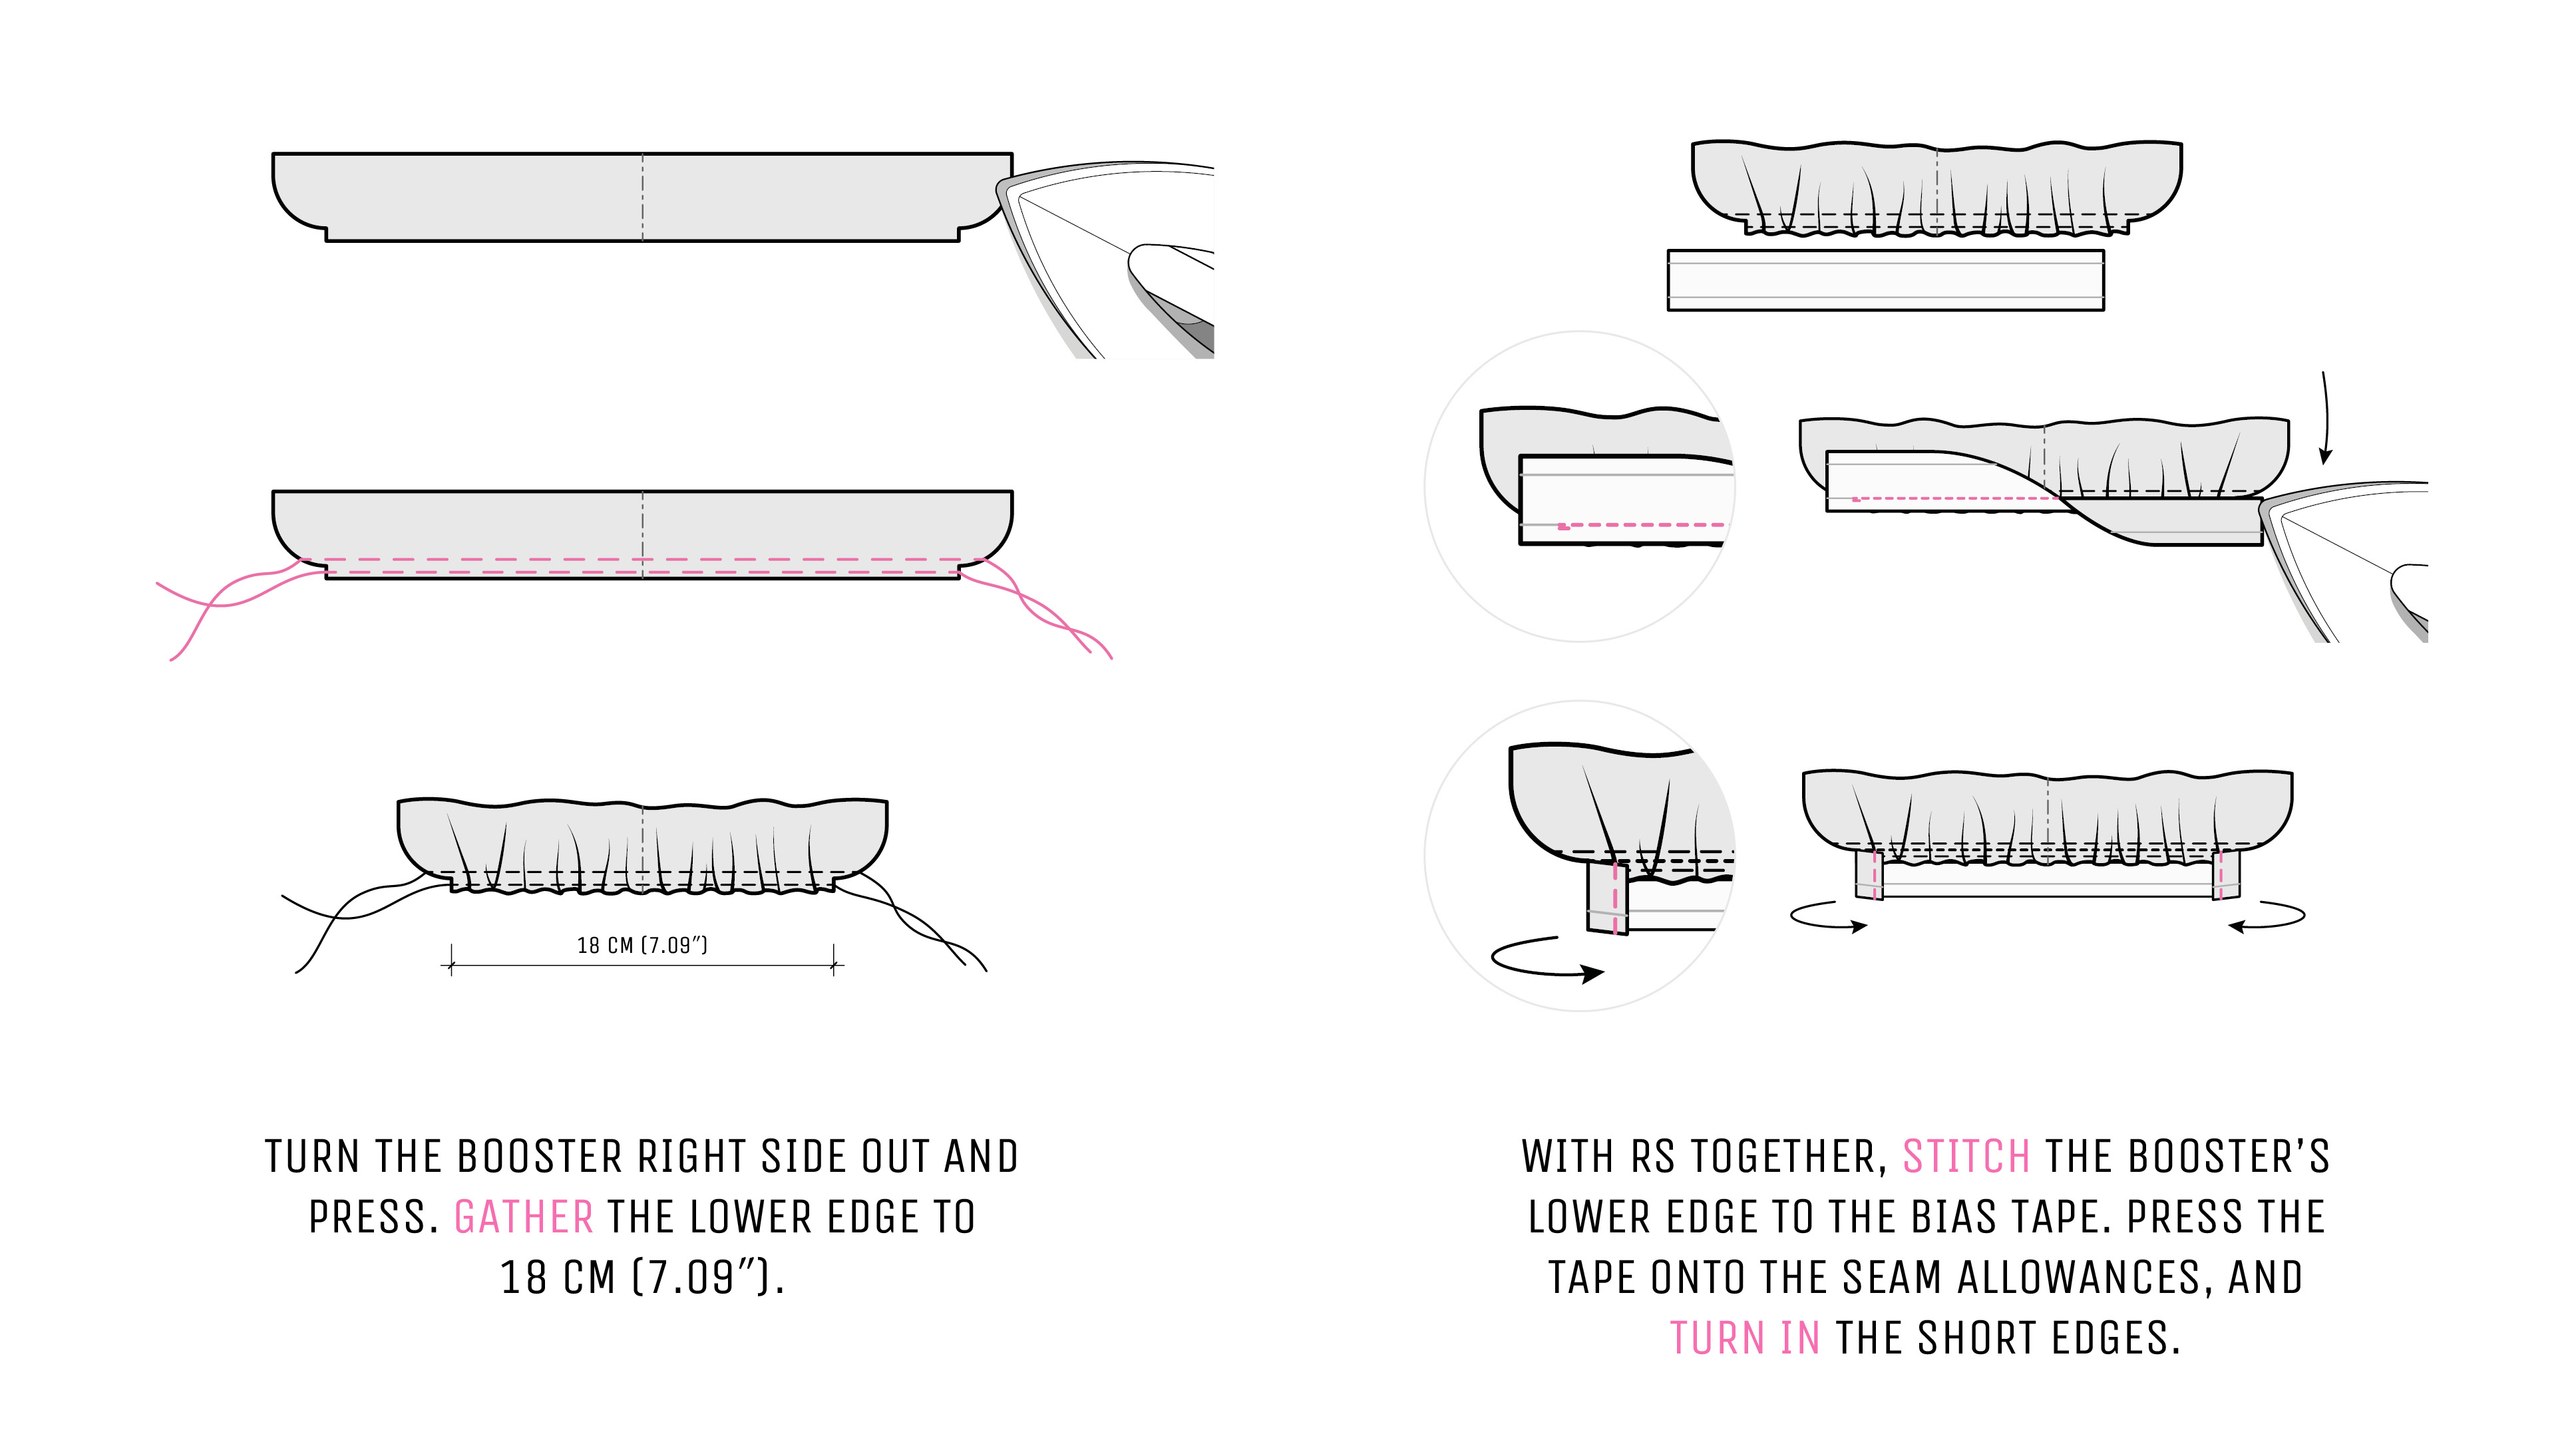
Turn the booster with the reverse side facing up. Carefully turn the bias edges over the short sides and baste in place. Then, fold the tape’s unsewn long edge back to the wrong side. Give a foldline a light press if needed.
Fold the tape in half, so its edge covers the stitching by 0.2 cm (a scant 1⁄8″) and press. Carefully baste in place. Place the booster with the side you-attached-the-bias-to up and stitch in the ditch, catching the wider fold’s edge underneath. “The ditch” is the groove where the tape and the fabric were stitched together. Remove all basting threads.
Press the finished edge flat and finish the tape’s short edges with a hand drawstitch.
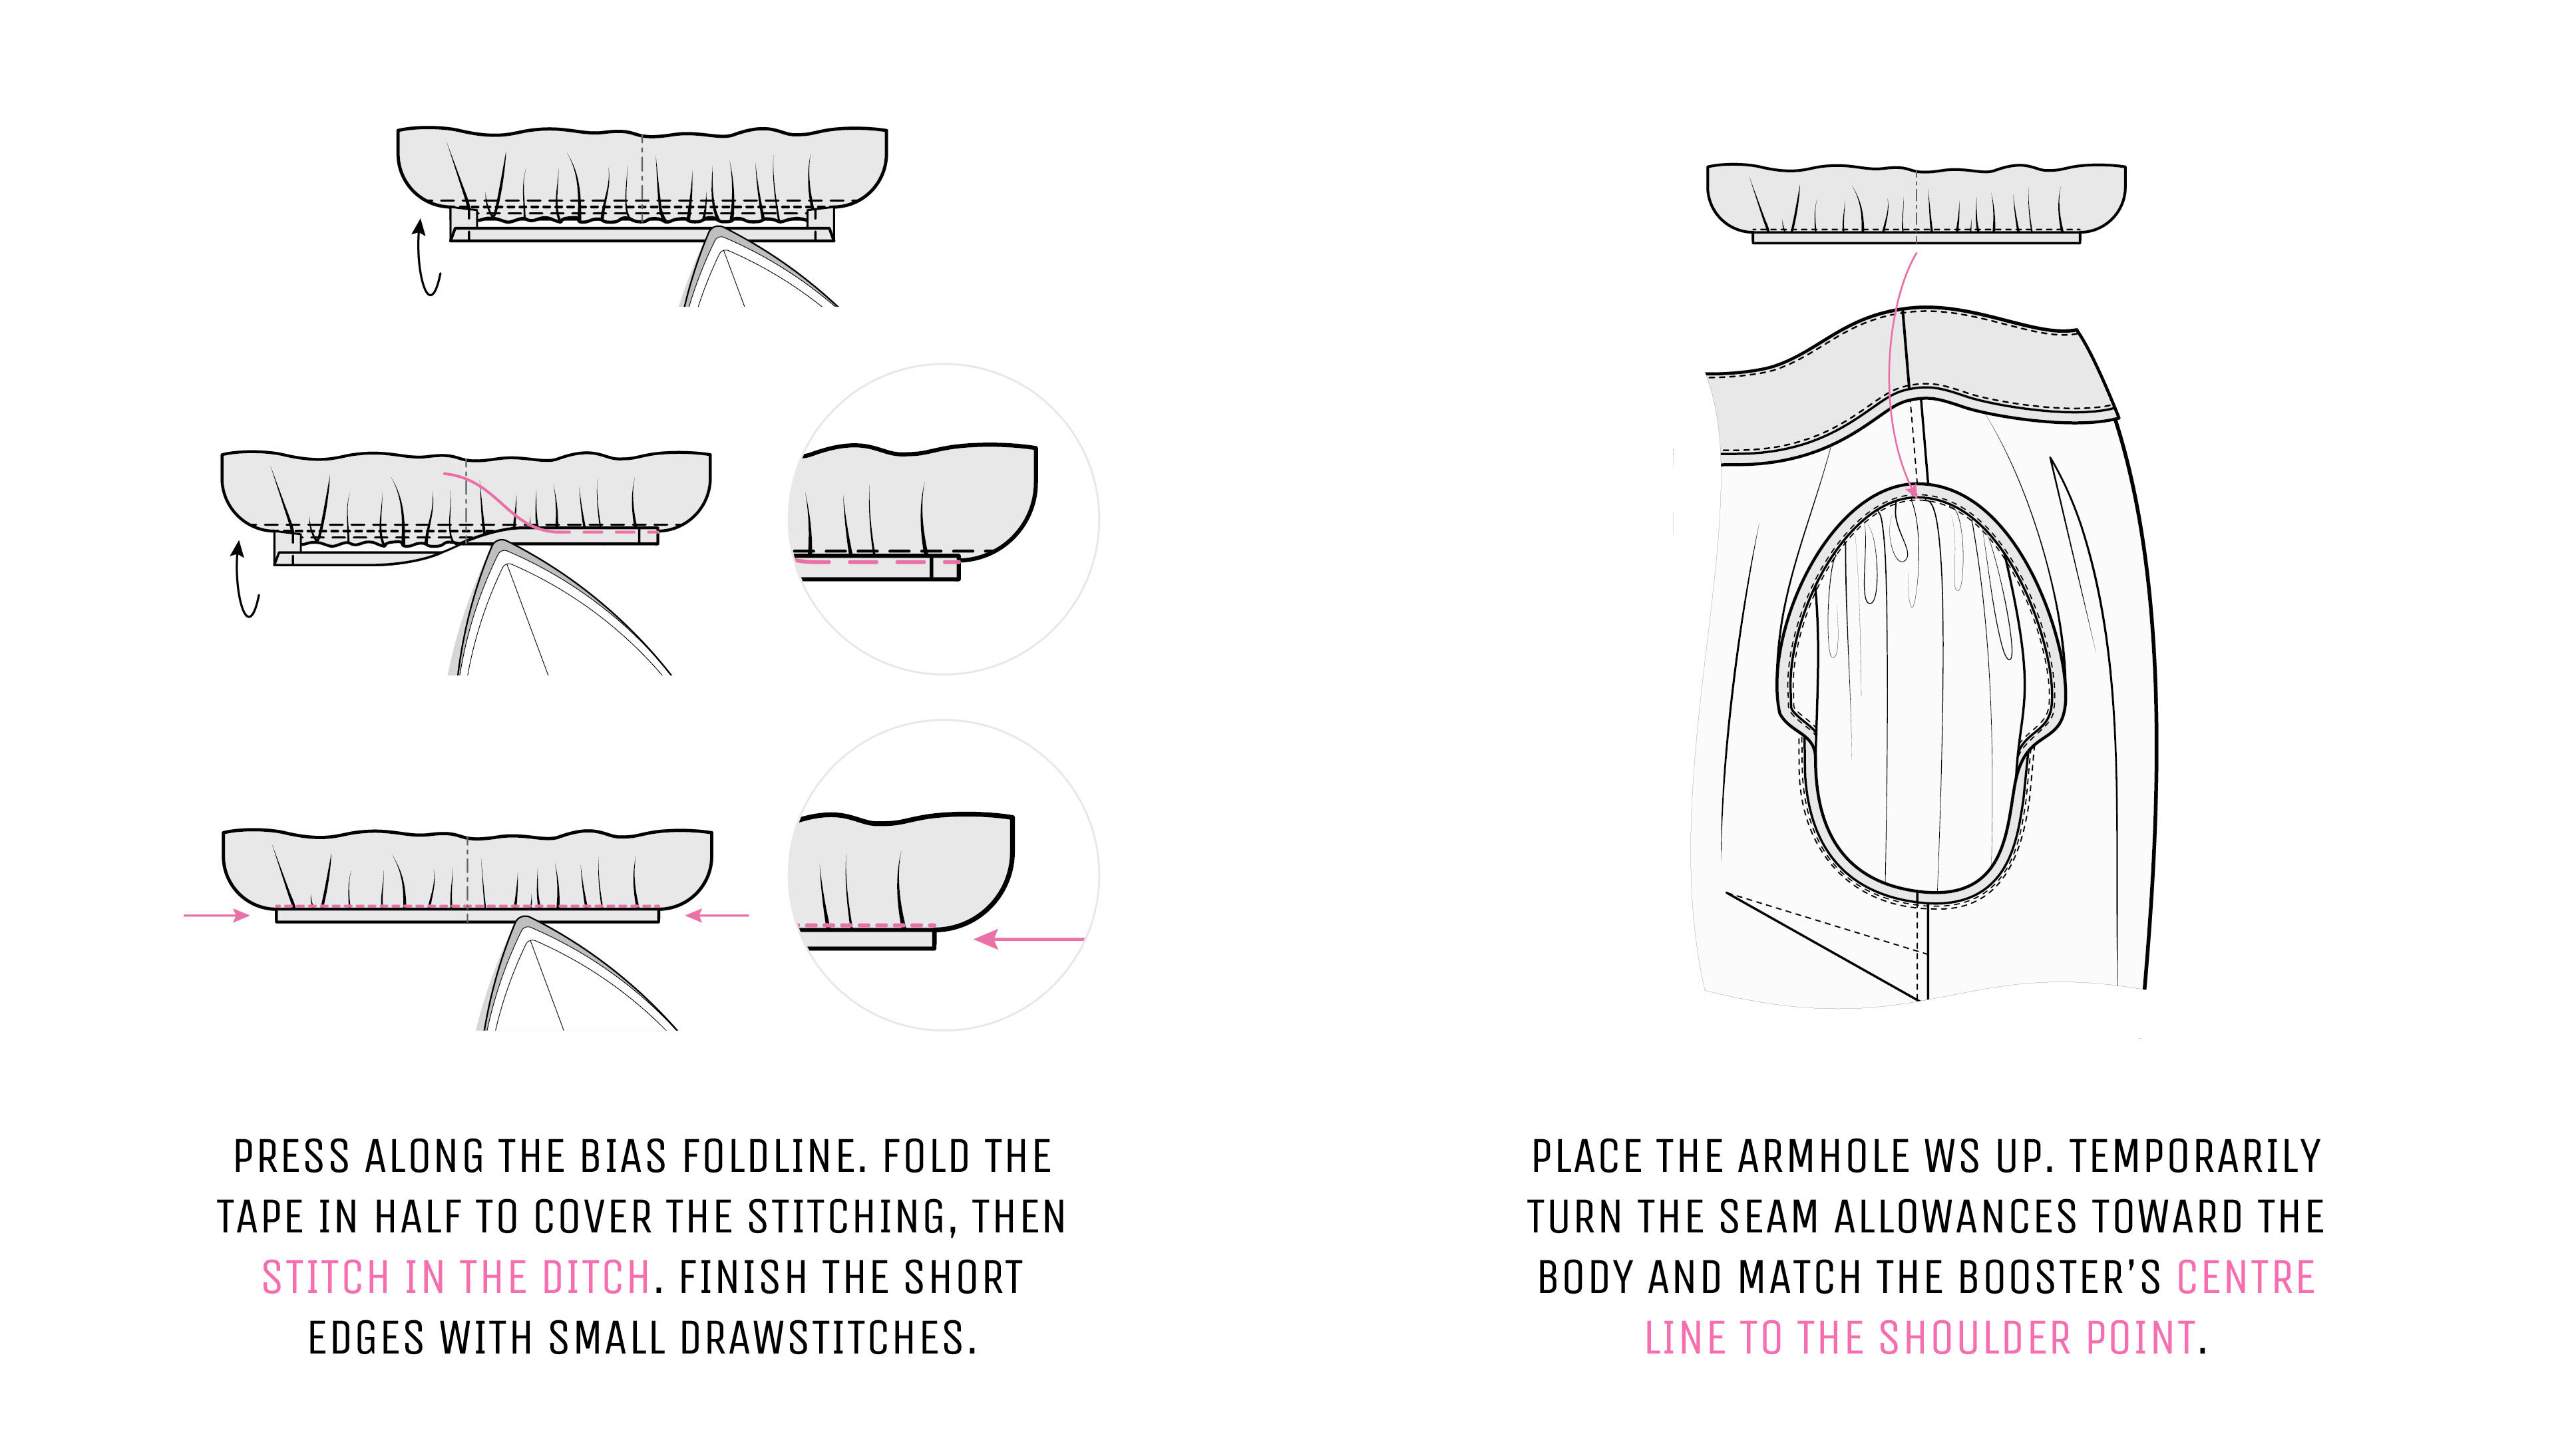
3. Attach the booster to the garment
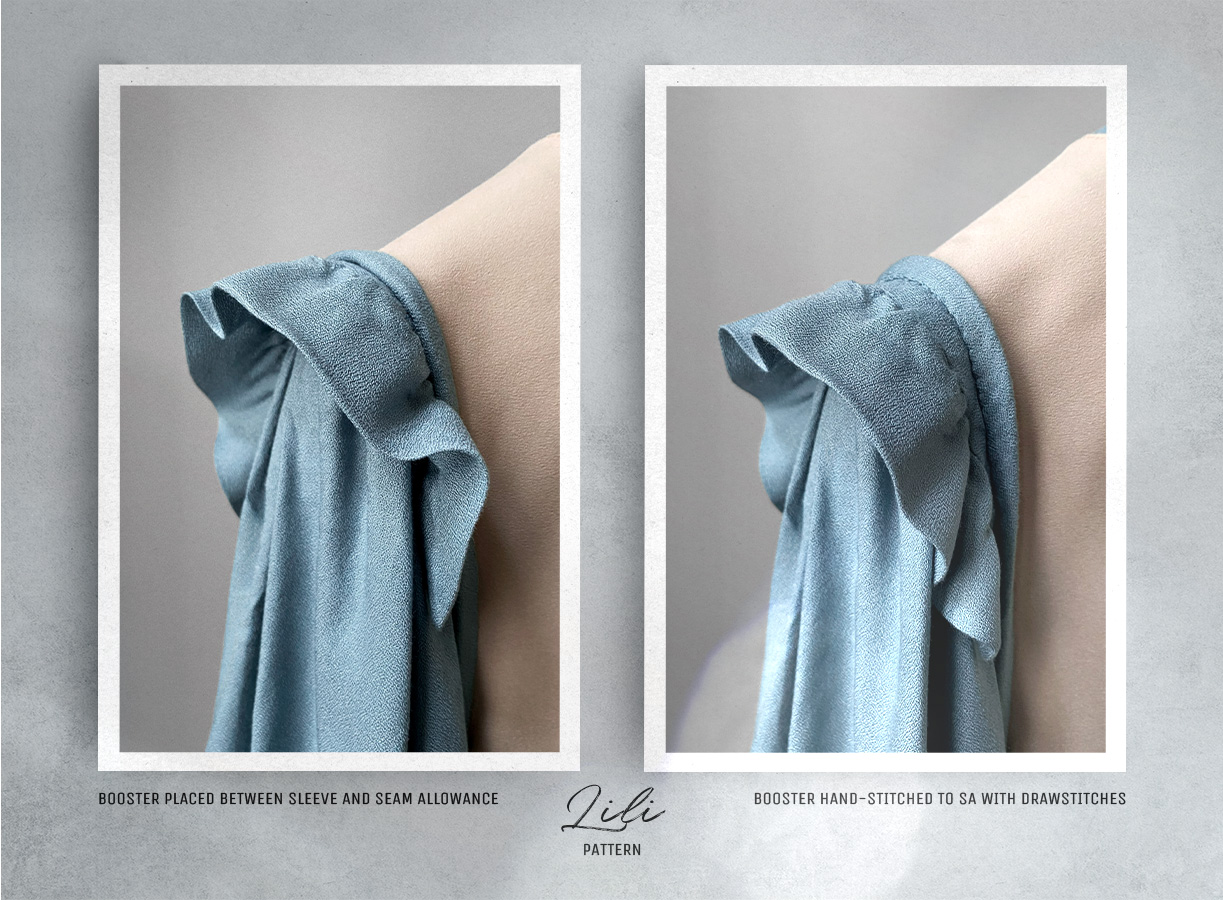
Place the garment’s armhole and sleeve wrong side up. At the sleeve cap, temporarily turn the seam allowances to the body. Match the booster’s centreline to the shoulder point of the sleeve cap. With a neat drawstitch, attach the booster’s bottom edge to the seam allowance right above the armhole seam.
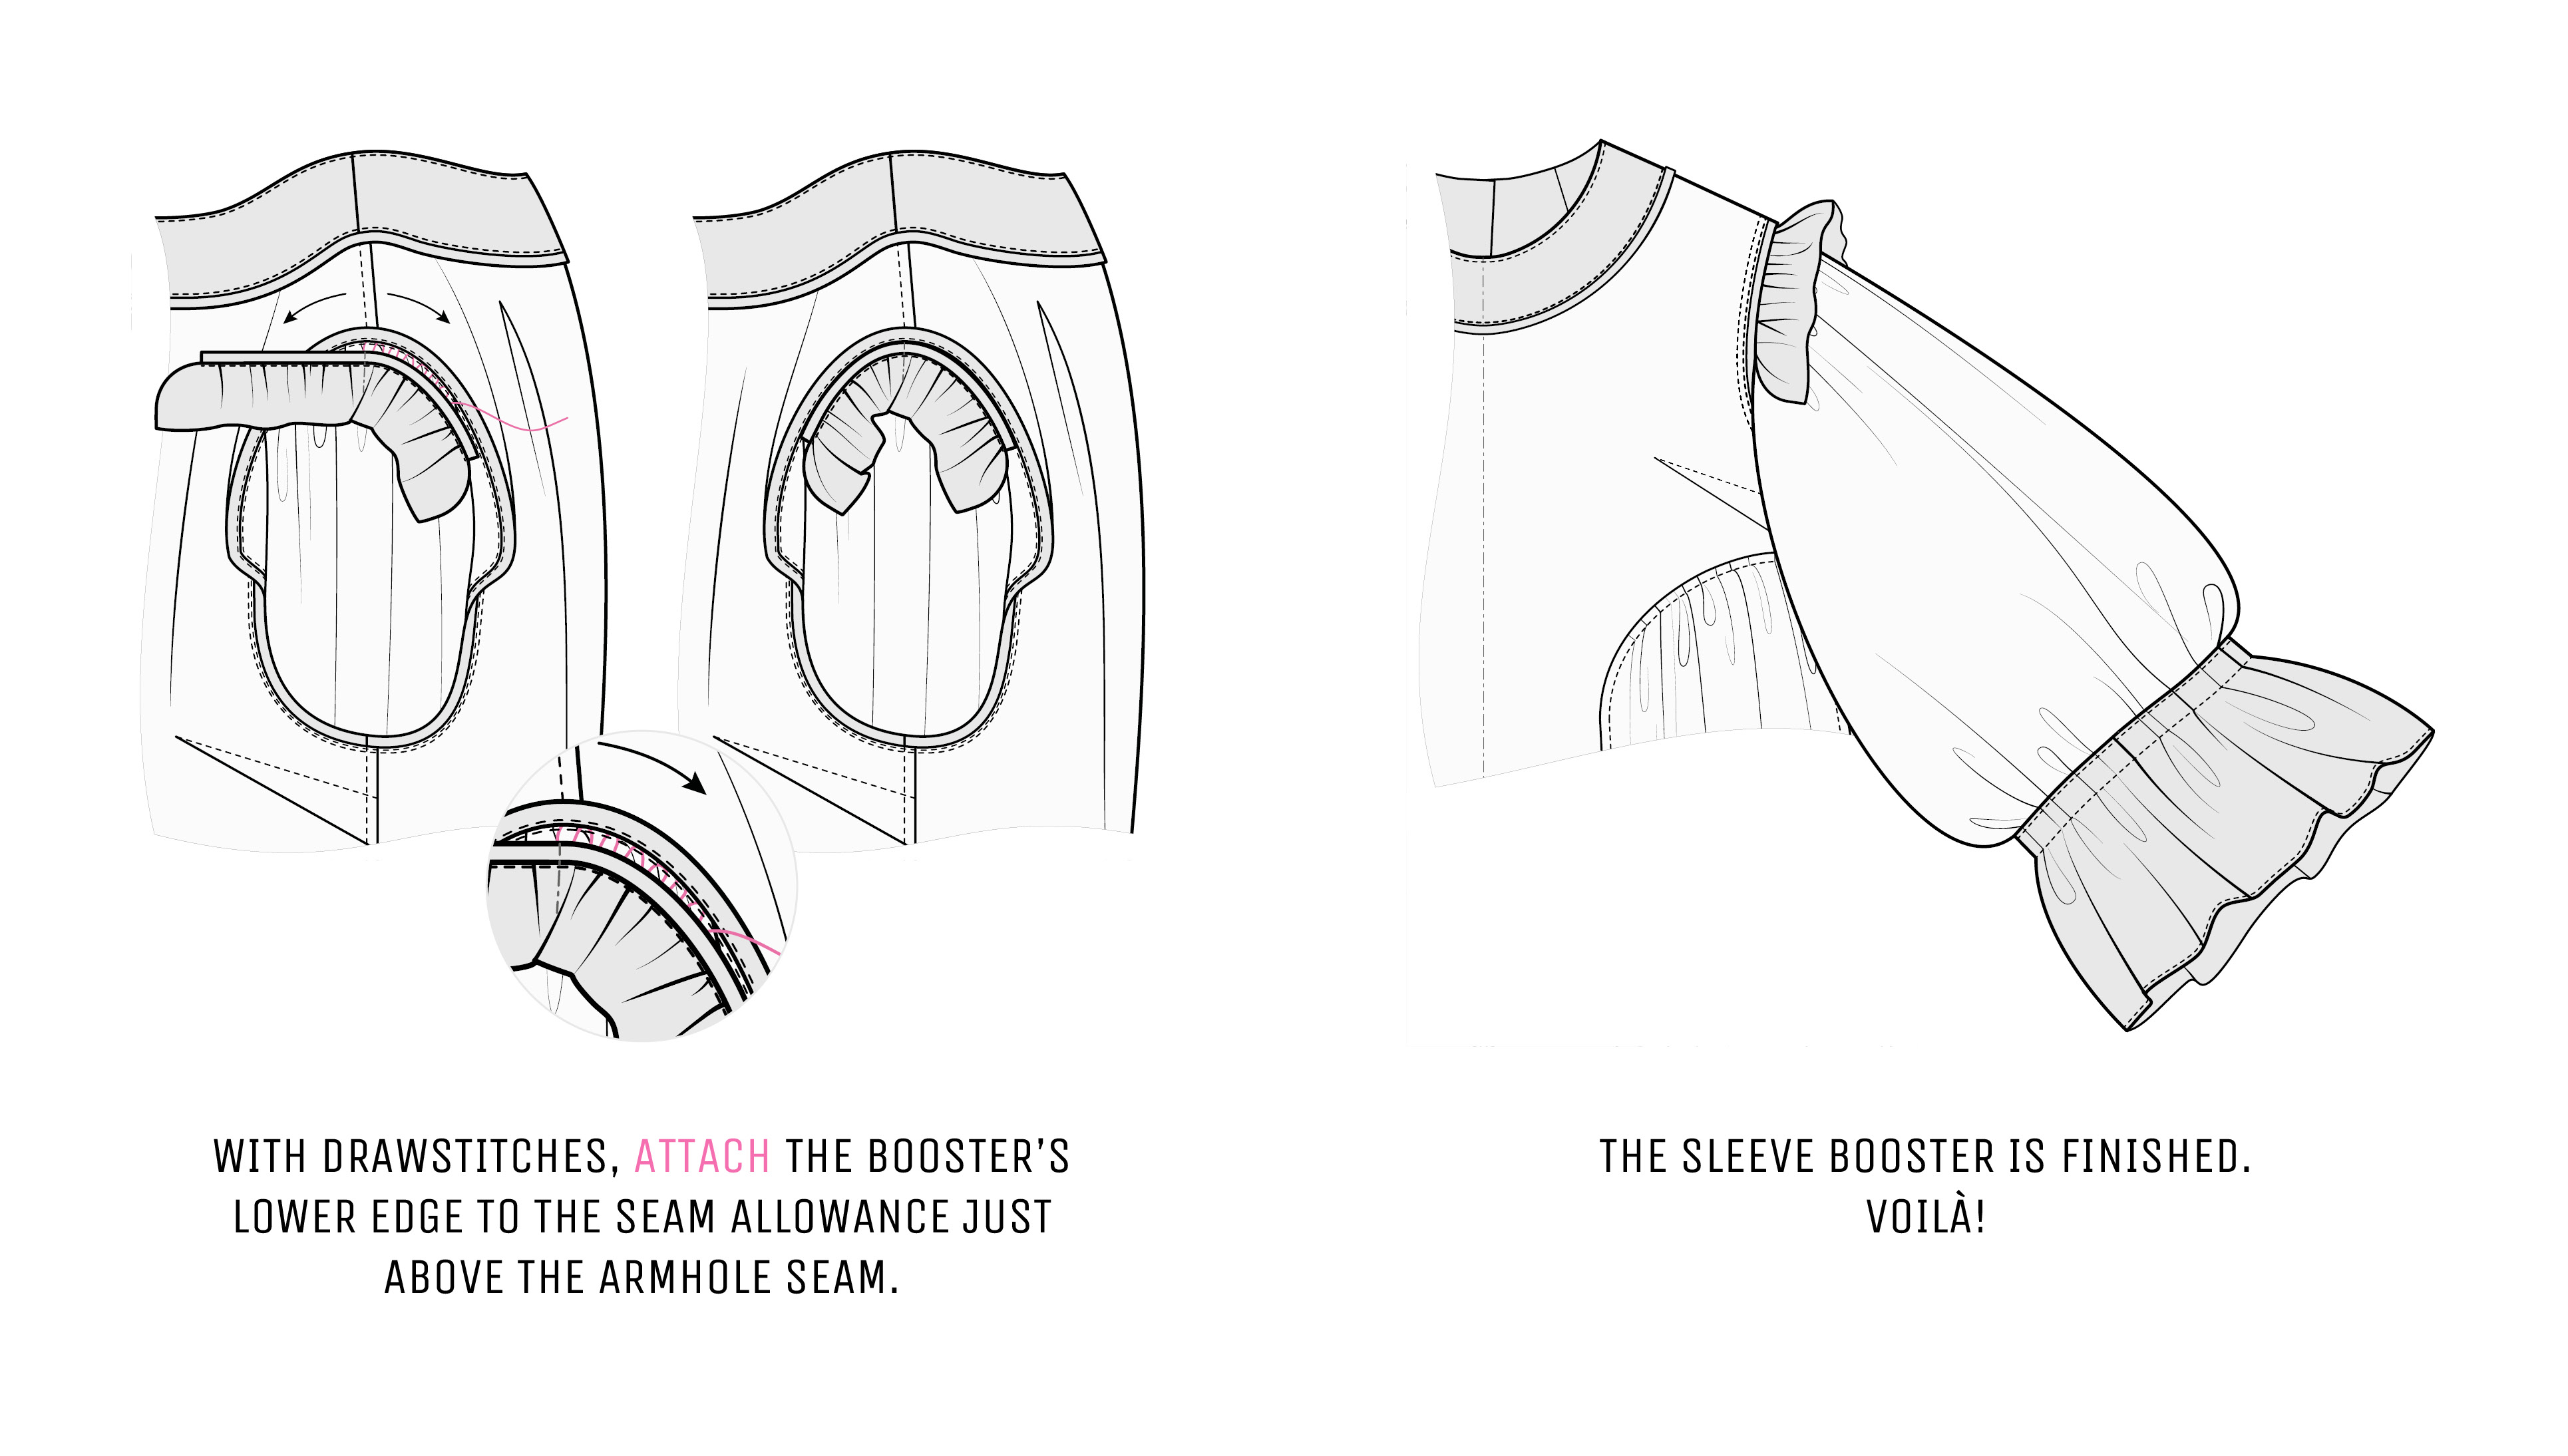
Voila.
Enjoy your chic garment that now has a couture touch.
xoxo
Yours,
Kaia

 My Etsy Store