How to Place Buttons and Buttonholes on the Shirt Front
Category: Tutorials 04 March 25
Ad: This tutorial is a complementary post for the Sienna: Button-Down Blouse pattern, which is now available for sale on Etsy.
It is no secret that I tend to write long articles, and this one is no exception. It is lengthy, almost like a book chapter, but filled with detailed information. If you’re here for the first time, I recommend reading it all. However, if you’re returning to refresh your memory, feel free to skip to the section you need using the list below.
Contents
Evaluating the Original Button Placement
Notes on Button Placement: Bust & Top Buttons, General Spacing
Stitching the Buttonholes & Buttons
Enjoy reading.
THE PROLOGUE
It’s fascinating how similar our bodies are in general, yet so different in small ways. No wonder even the best-fitting shirt patterns can sometimes leave slight gaps in the front placket—especially around the bust—thanks to differences in posture, bust shape, and even how we move. When button placement doesn’t match your body, it can lead to those tiny, often frustrating, gaps.
Luckily, if the shirt has enough wearing ease, and you haven’t stitched the buttonholes yet, it’s easy to fix. But if the buttonholes are already slashed, it may be time to get creative—think of wearing it unbuttoned as a layering piece or possibly even retiring the garment.
Whether you’re already dealing with this issue or just curious about it, let’s dig into how to prevent those quite annoying placket gaps and get your button spacing just right on your shirt or blouse.
Rule #1: Always check your button placement before sewing the buttonholes—it’ll save you a lot of time and hassle.
REASONS FOR PLACKET GAPS
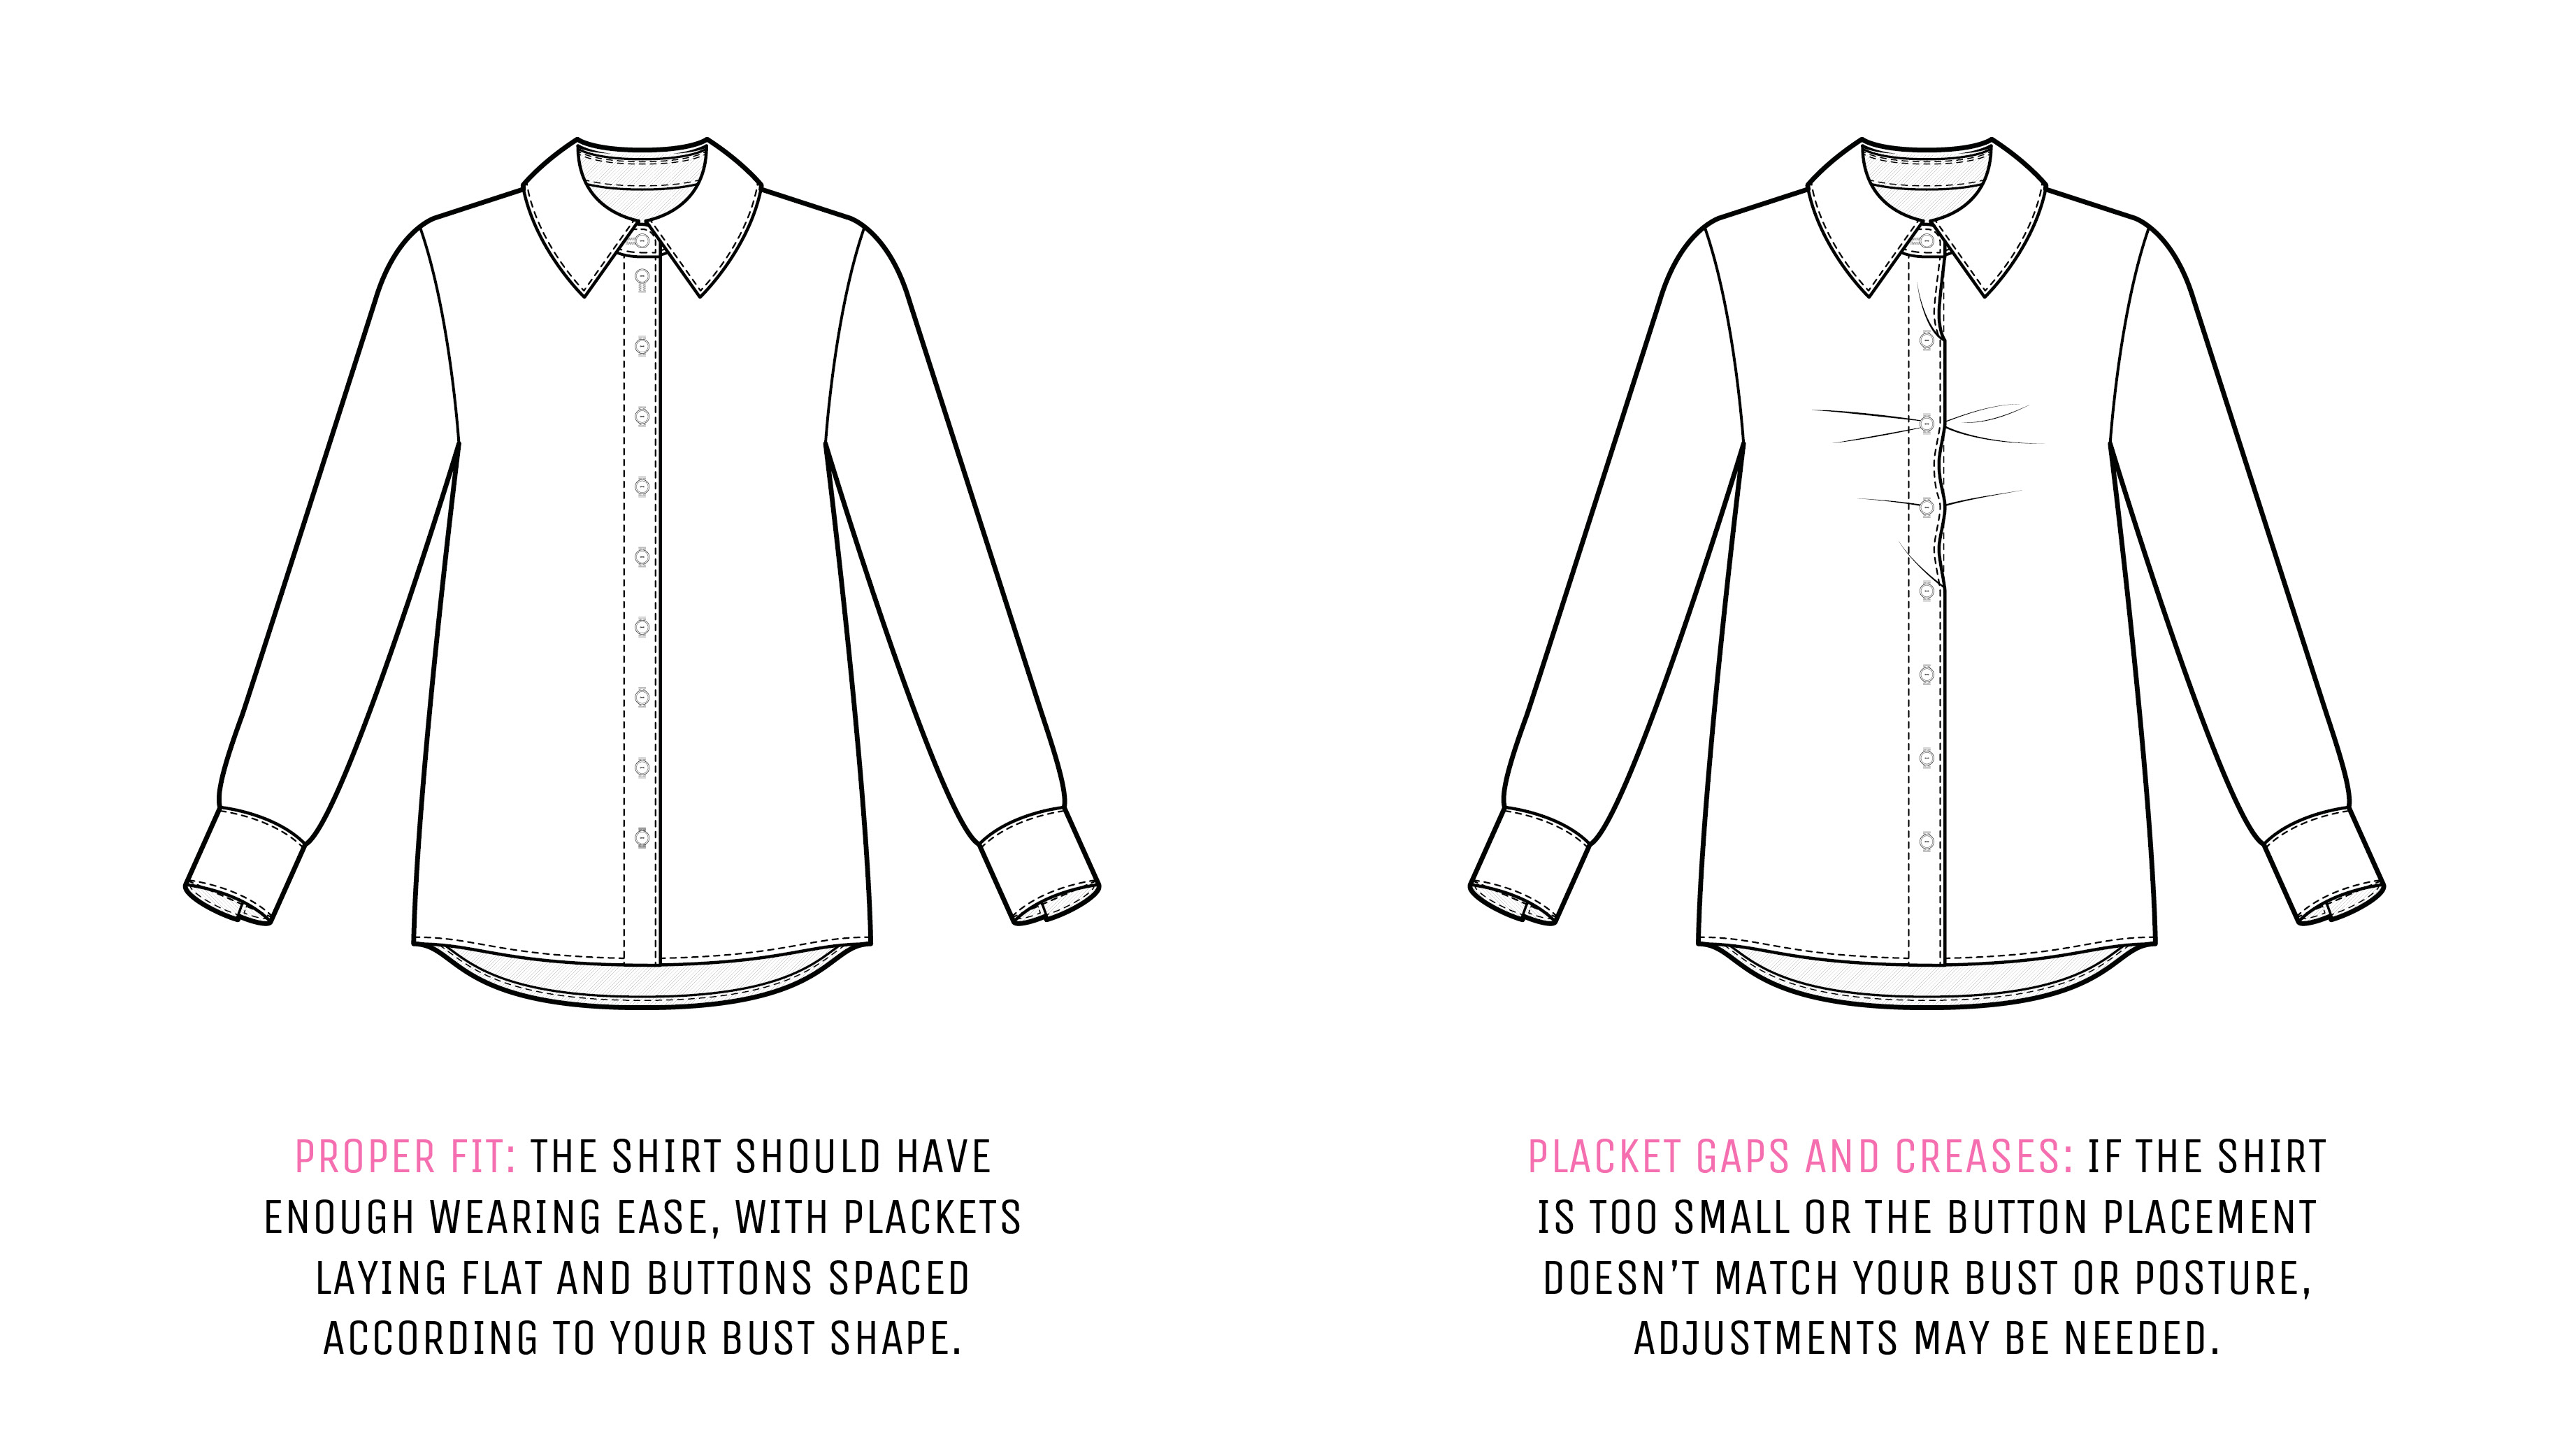
If you’re seeing gaps in the front placket, it could be due to the shirt not fitting quite right. But if the fit feels good and you’ve got enough ease, the real issue is probably the button placement—it’s just not lining up with your actual bust line.
Various factors can affect the fit: the shape or height of your bust, your posture, the bra you’re wearing, any alterations you’ve made to the pattern, or even how your fabric behaves.
Before making any tweaks, take a little time to test the button placement properly. Randomly shifting things around without looking at the whole picture isn’t likely to fix the problem.
EVALUATING THE ORIGINAL BUTTON PLACEMENT
Before you start sewing on buttons or stitching buttonholes, go ahead and try the shirt on. This lets you check if the original button placement works for your body. And don’t forget to wear the same bra or undergarments you plan on wearing with the shirt for the best-fit check. Here’s a quick step-by-step guide:
- Use your paper pattern as a reference and mark its centre front (CF) line and the original button placements on the right side of the wearer’s right placket and collar stand.
Fun fact: in women’s clothing, buttons go on the left front, but for easy fitting, mark them on the right first.
If you’re working with a concealed placket (like the one in the Sienna Blouse), use hand basting and a ruler to mark the upper flap’s CF. For a single-fold placket, you can machine baste the CF line for accuracy. Use thread tacks or pins to mark the button placement.
- Put the blouse on with the bra you’ll wear under it, and overlap the plackets, keeping the right front on top.
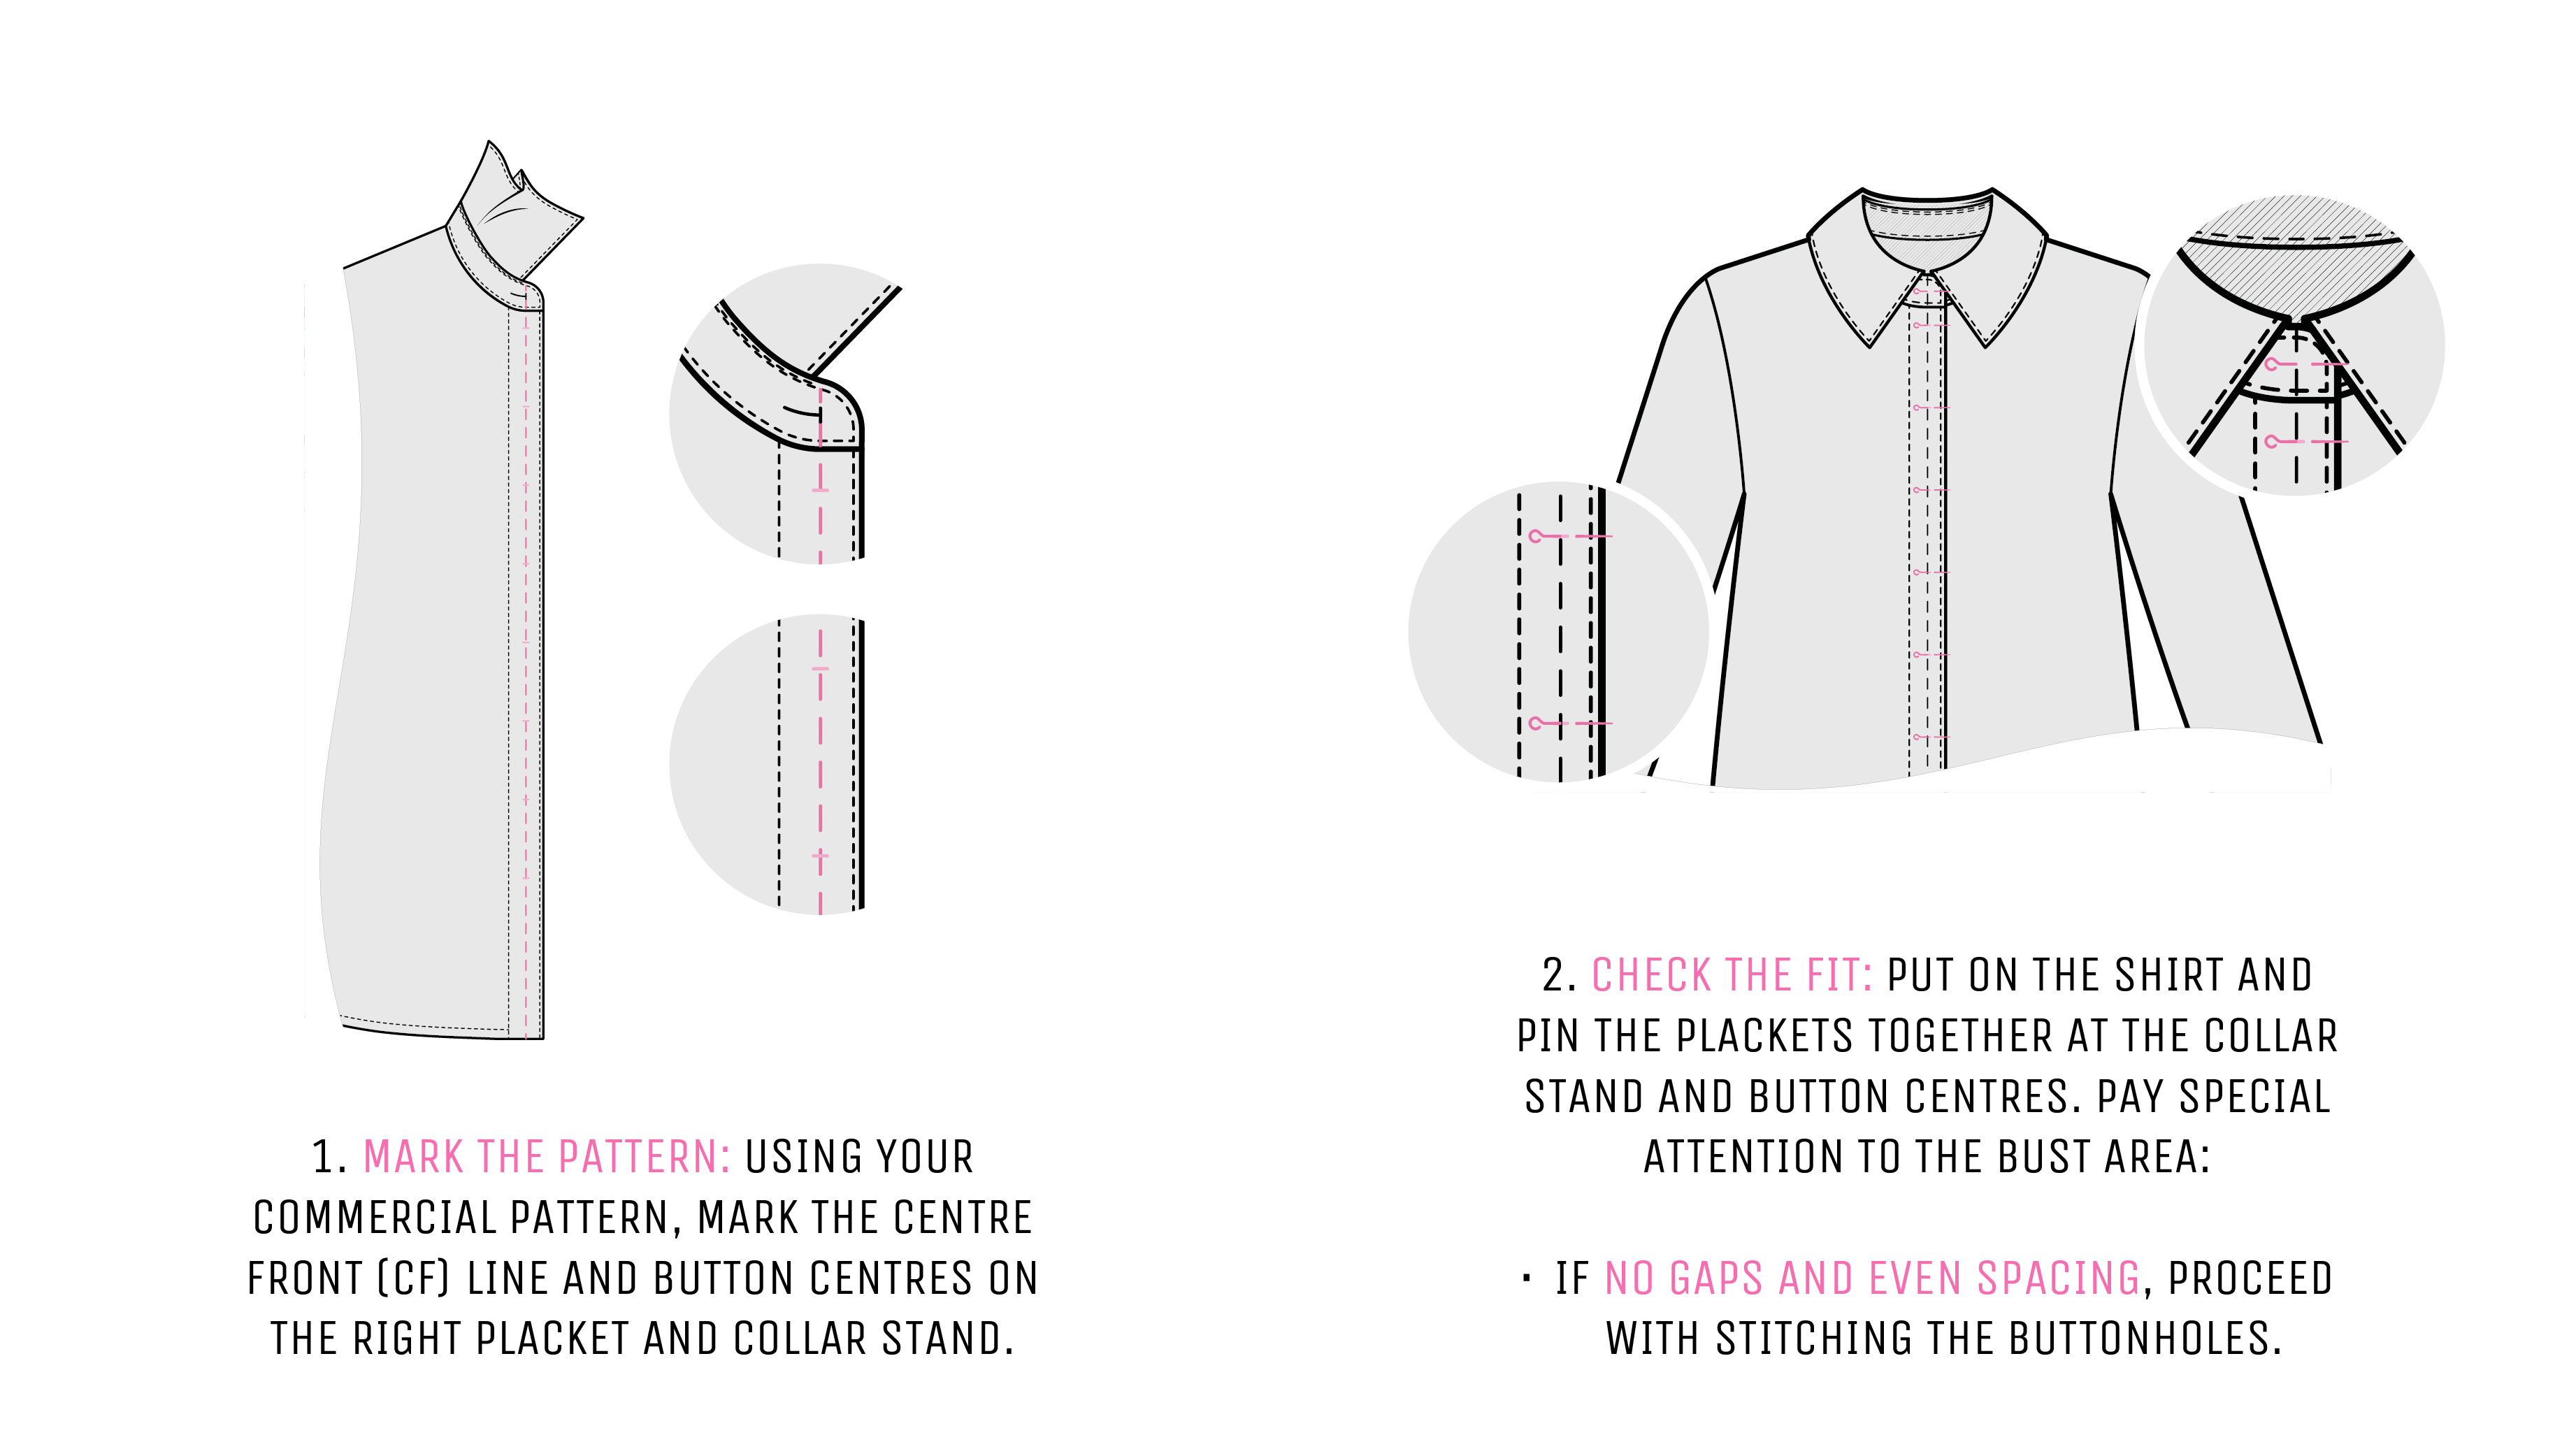
- Pin the plackets together at the button marks, and add a pin at the collar stand.
- Check the fit from the front and the sides. Pay special attention to the bust area:
- If there are no gaps and the pins seem evenly spaced, you’re all set.
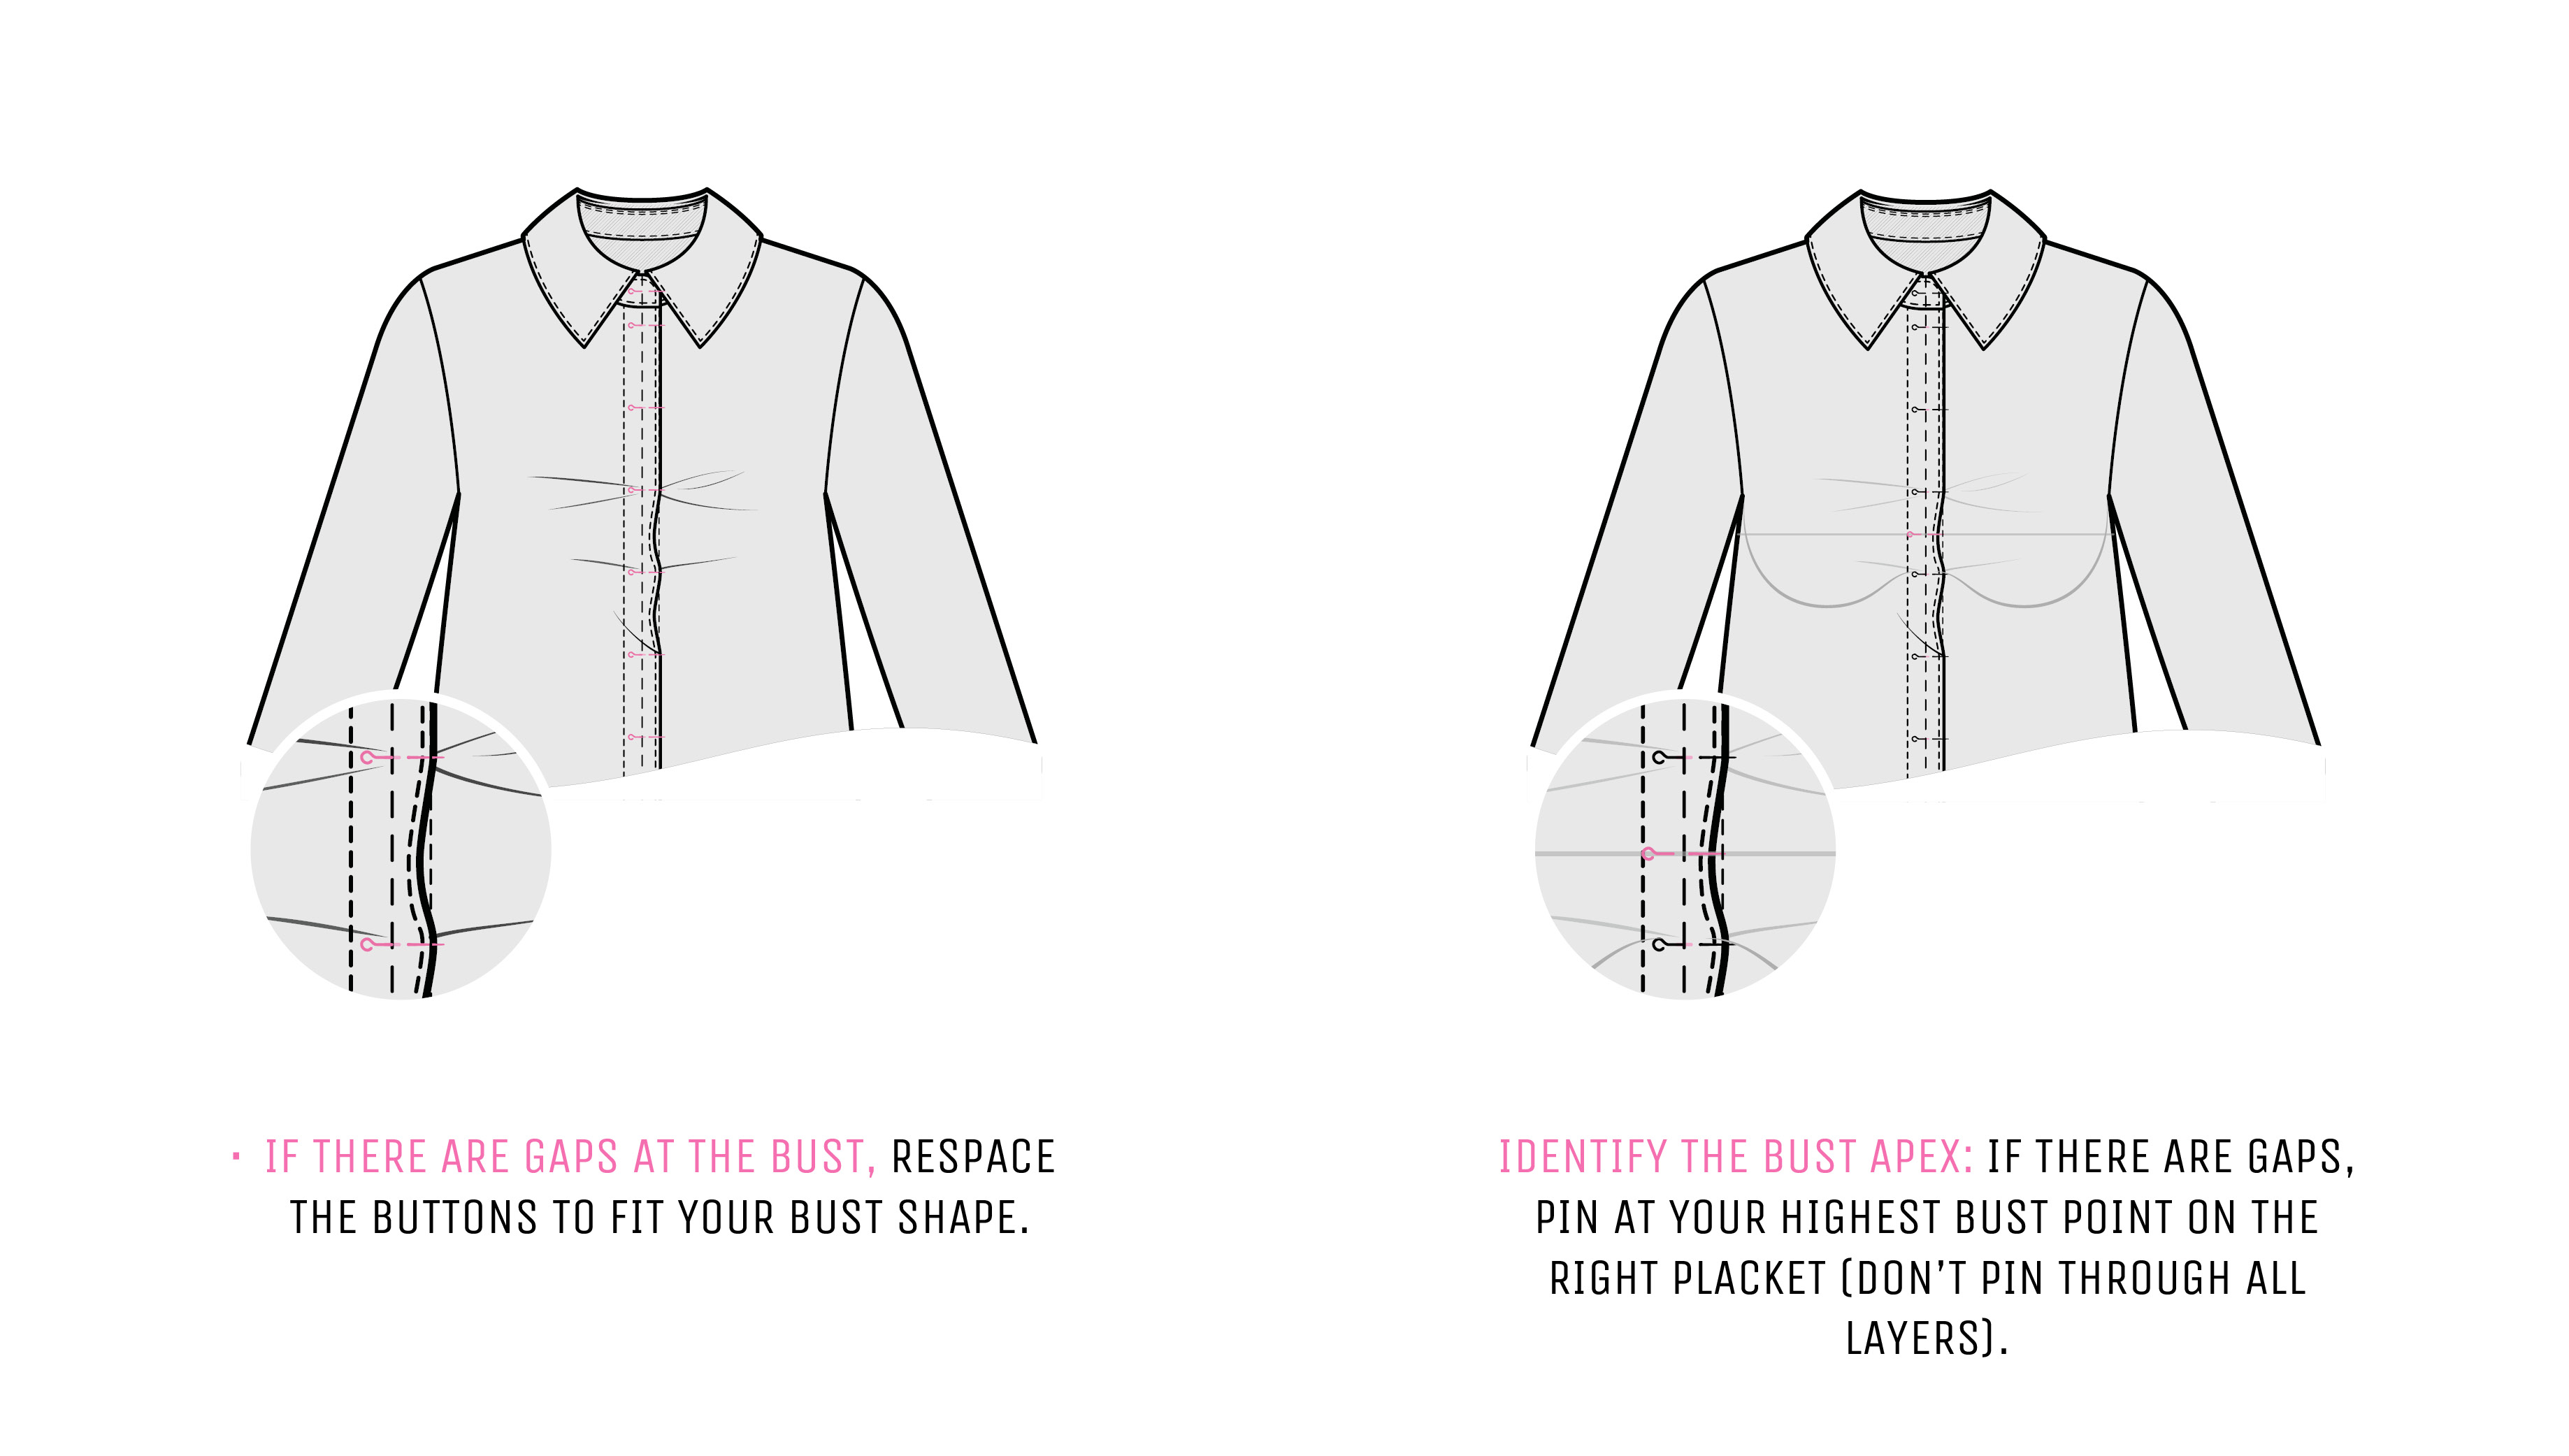
- If you notice a gap at the bust, place a pin at the apex (the highest point of your bust) and mark that spot, pinning through the right front placket only. This will mark your bust line and be the starting point for new button placement.
- Once you’ve determined your bust line position, remove other pins, and you’re ready to begin the next steps.
Before proceeding with our shirts, let’s review the theory and calculations behind the button placement.
NOTES ON BUTTON PLACEMENT
The Bust Button
Even though it’s often lower on the placket, the bust button is the most important one to get right. Since the bust is where the most strain occurs, placing this button correctly helps avoid gaps.
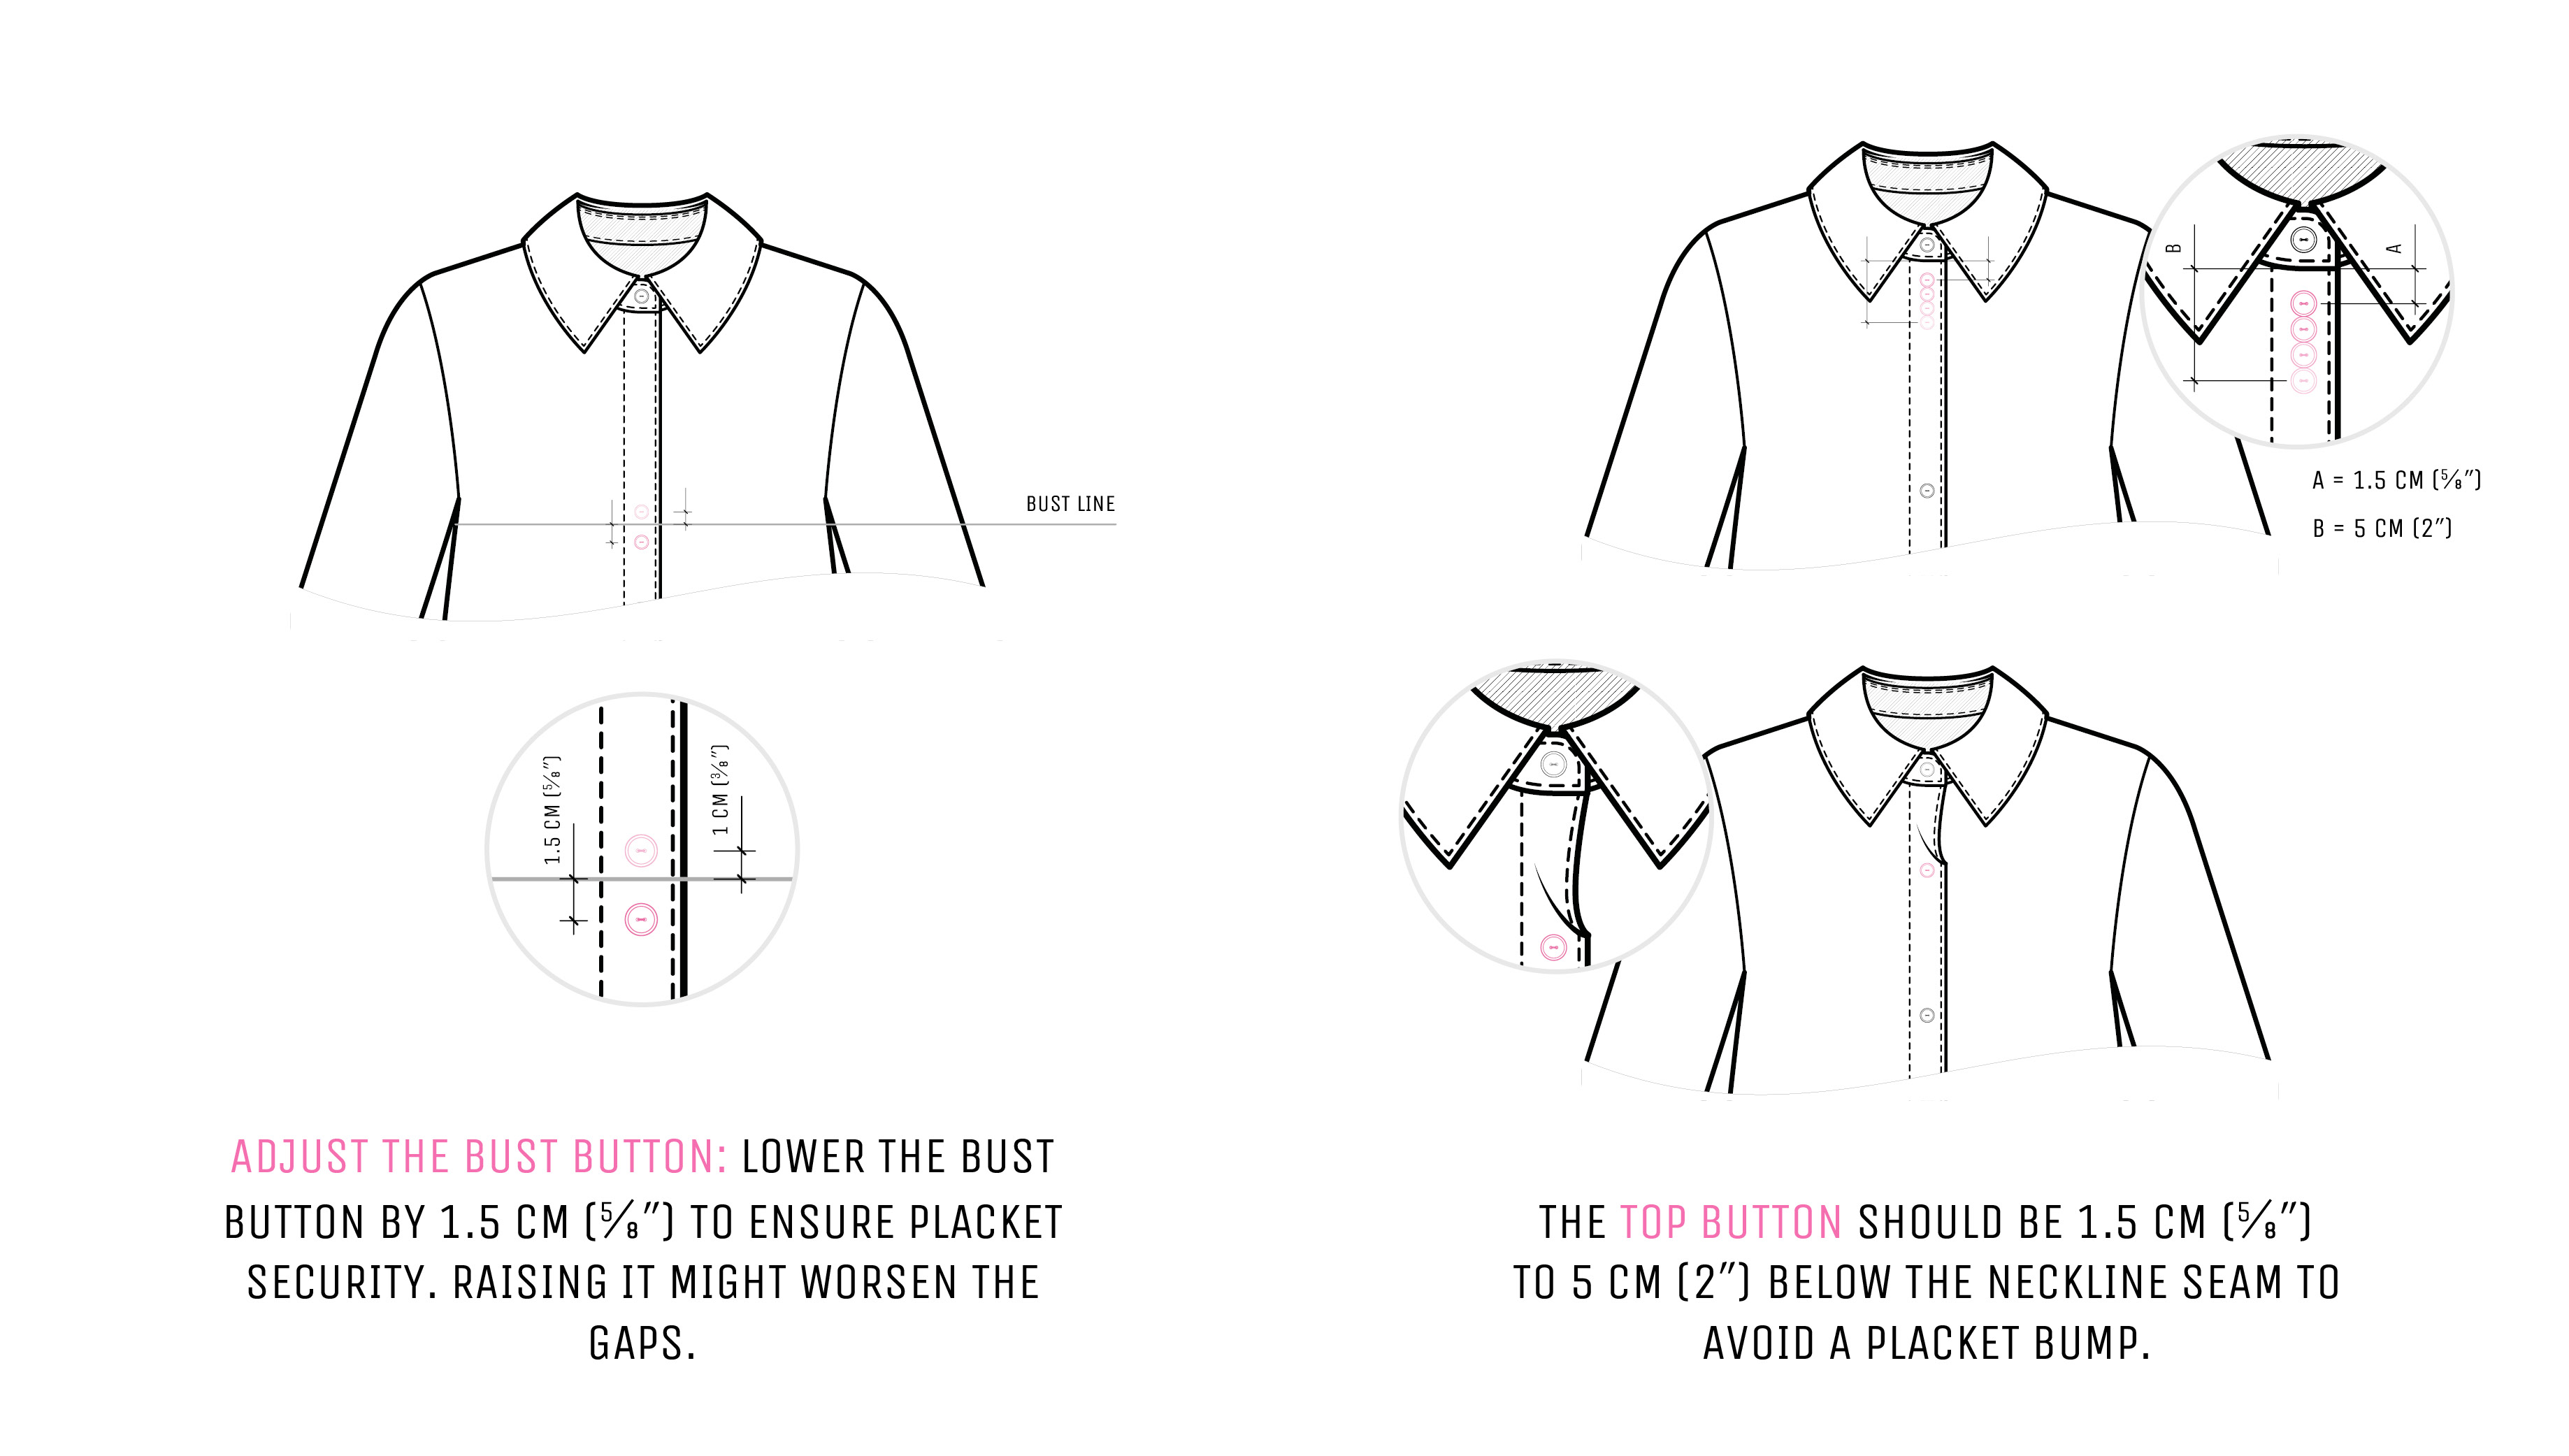
- Rather than putting it directly on the bust line, placing the bust button about 1–1.5 cm (3⁄8–5⁄8″) below is usually best. Lowering it slightly helps the placket lay more smoothly.
- Raising the button may work for some bust shapes, but it can often cause larger gaps in the placket. So, lowering the button tends to be the safest option for both comfort and appearance.
Rule #2: Always start respacing with the bust button and place it 1-1.5 cm (3⁄8–5⁄8″) below your bust line for the best look and fit.
Top & Collar Stand Buttons
In a classic shirt, the collar stand button’s position is fixed, but the button right below the collar is equally important. It should be placed anywhere from 1.5–5 cm (5⁄8–2″) below the neckline seam, depending on the style of your blouse or shirt and how you intend to wear it.
Consider whether you prefer a bow collar instead of a shirt collar, plan to wear your collar mostly unbuttoned, or want a certain amount of collarbone to show through the opening when unbuttoned.
- In a shirt with a classic collar, lowering the first button by 1.5–2.5 cm (5⁄8–1″) helps keep the plackets flat when fully buttoned. Be careful not to place it too low, or it could create an unwanted bump.
- In bow-collar blouses, as shown in a previous tutorial,the top button should be placed 1.5 cm (5⁄8″) below the collar seam to hold everything neatly in place.
- If you plan to wear a shirt partially unbuttoned, you can place the top button as low as desired, but ensure there is even spacing between all buttons.
Spacing Between Buttons
In custom-made garments, there are no strict rules or exact values regarding button spacing. Despite that, it should always complement both the design and fit.
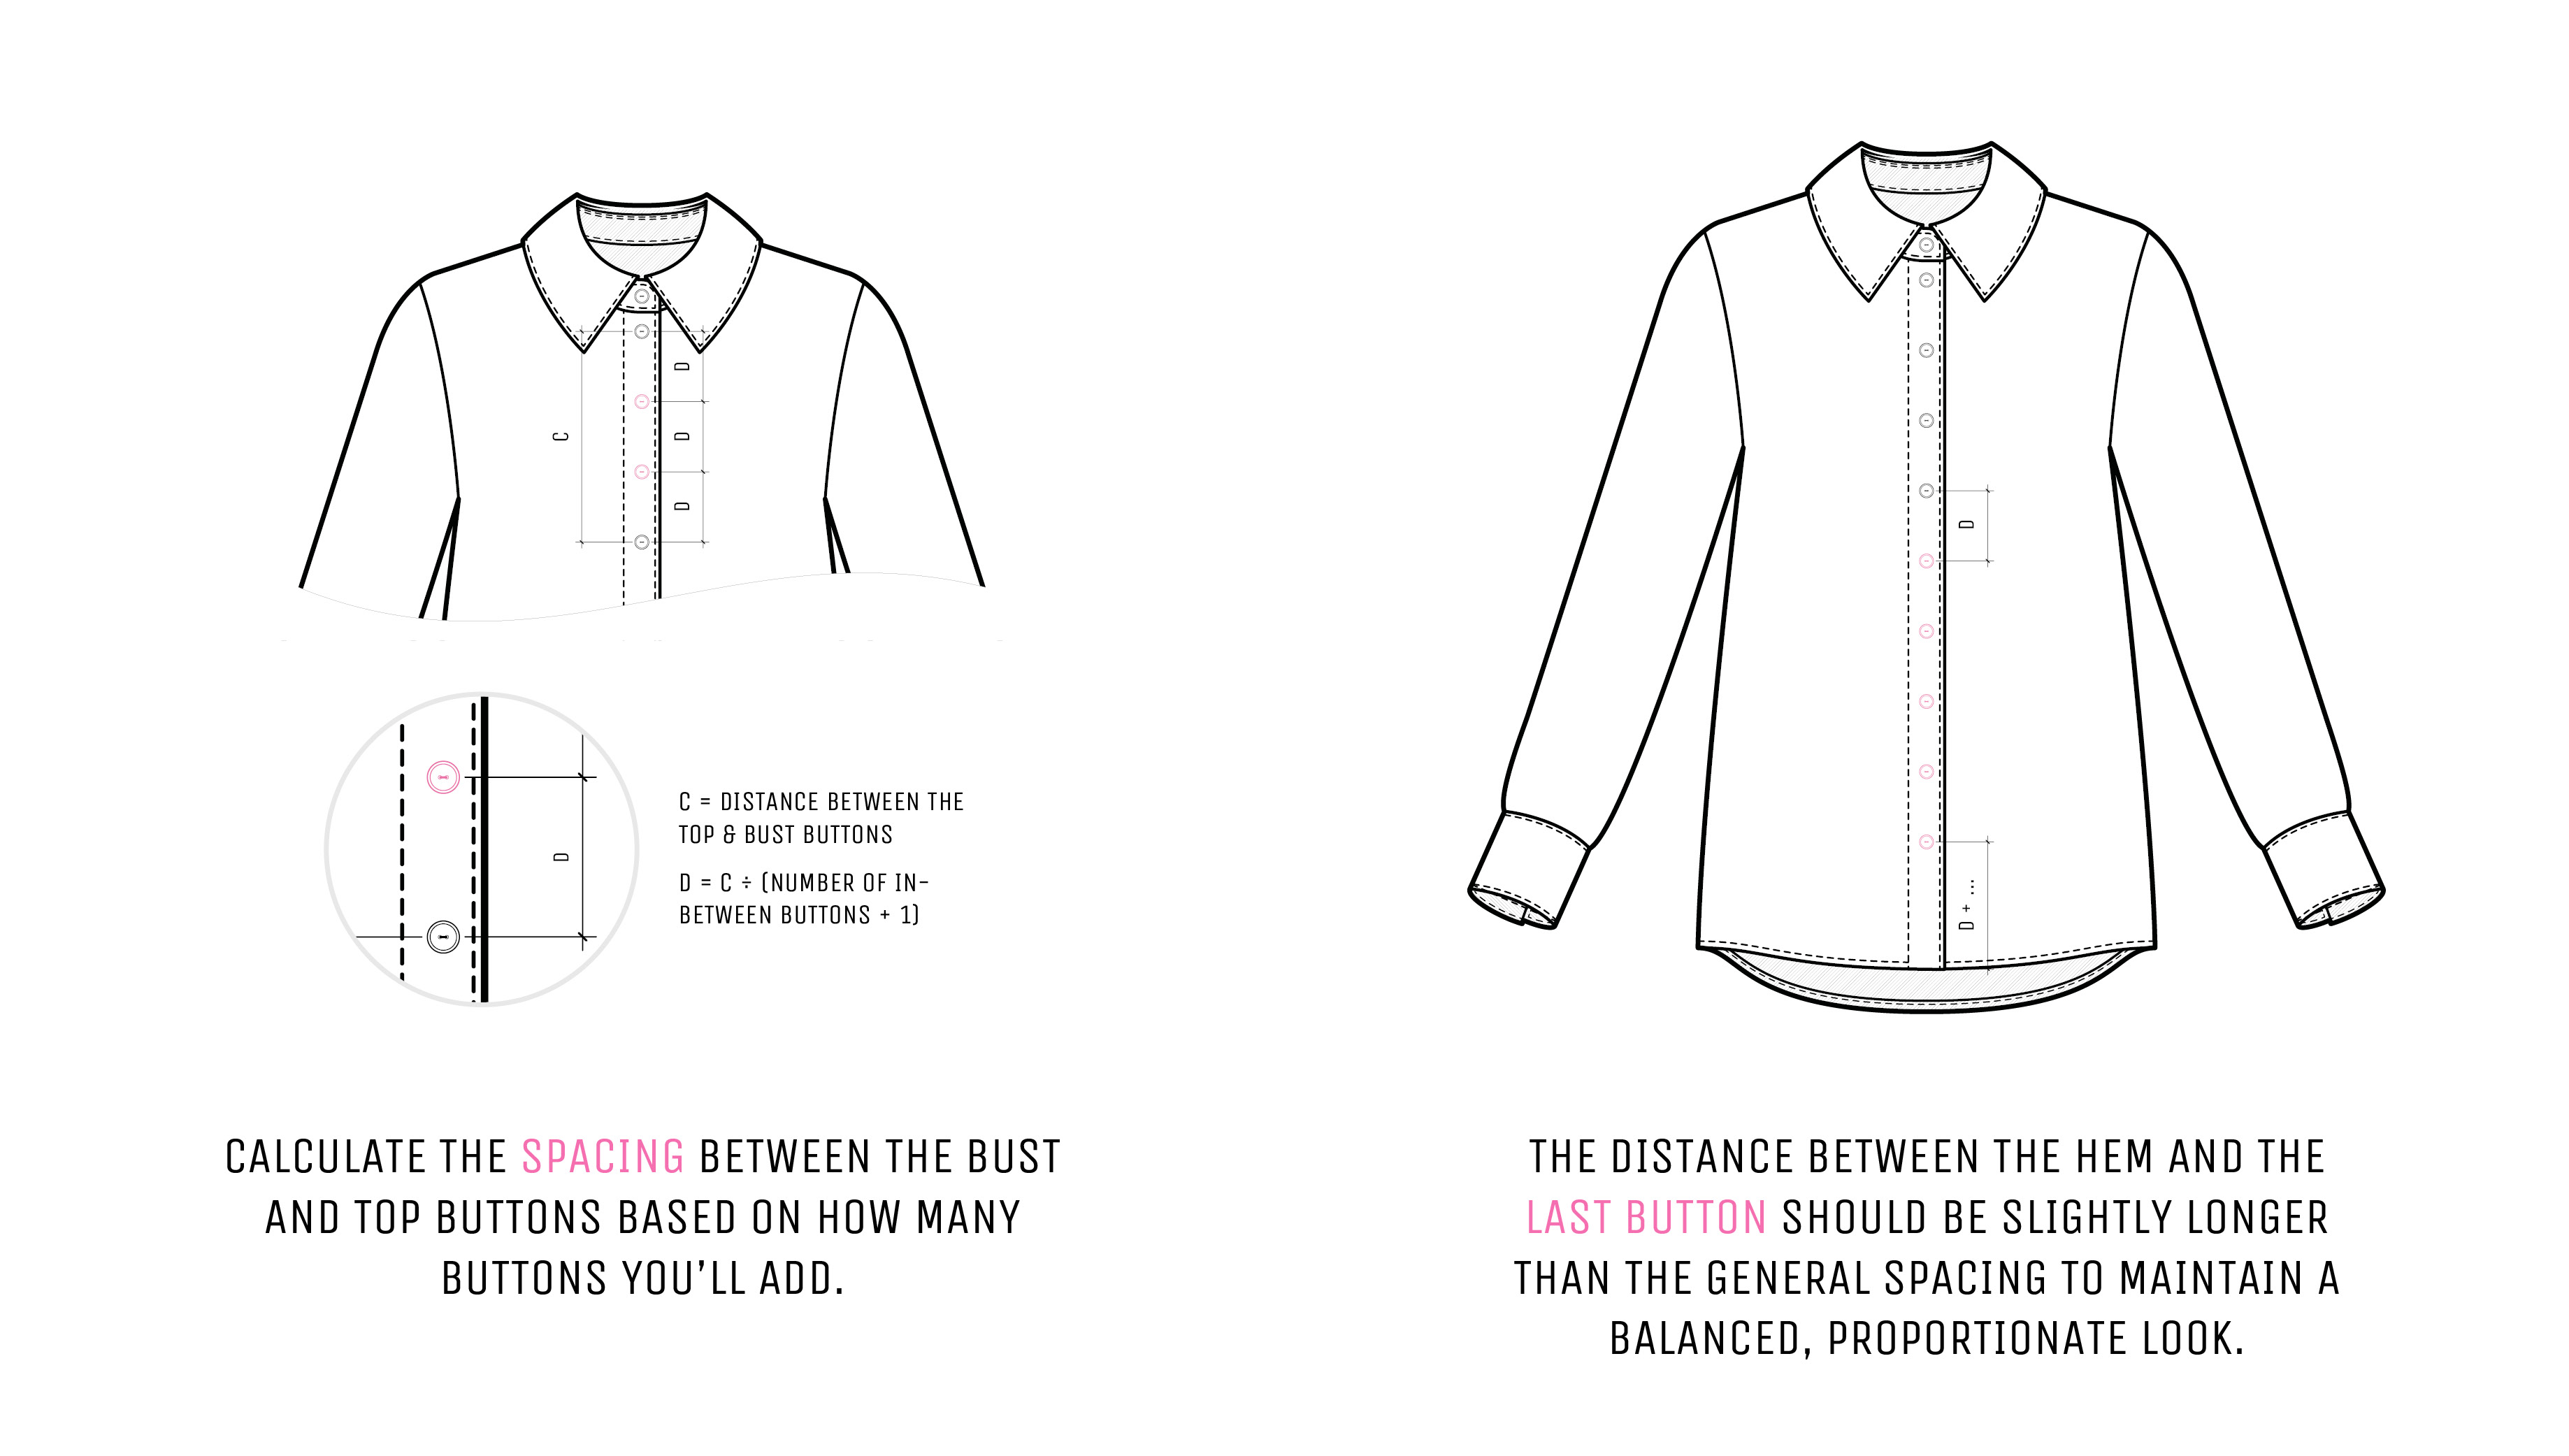
- As mentioned earlier, the bust and the placket top buttons are the most important. The number of buttons between these two will determine the button spacing. In a classic shirt, the distance between buttons is generally 6 to 8 cm (2.36–3.15″).
- It’s also essential to leave a larger distance between the hem and the last button, compared to the space between the rest of the buttons, to keep the design balanced and proportionate.
RESPACING THE BUTTONS
Now that we’ve evaluated your shirt’s fit and covered the theory essentials, here’s how to respace your buttons properly.
1. The Bust Button
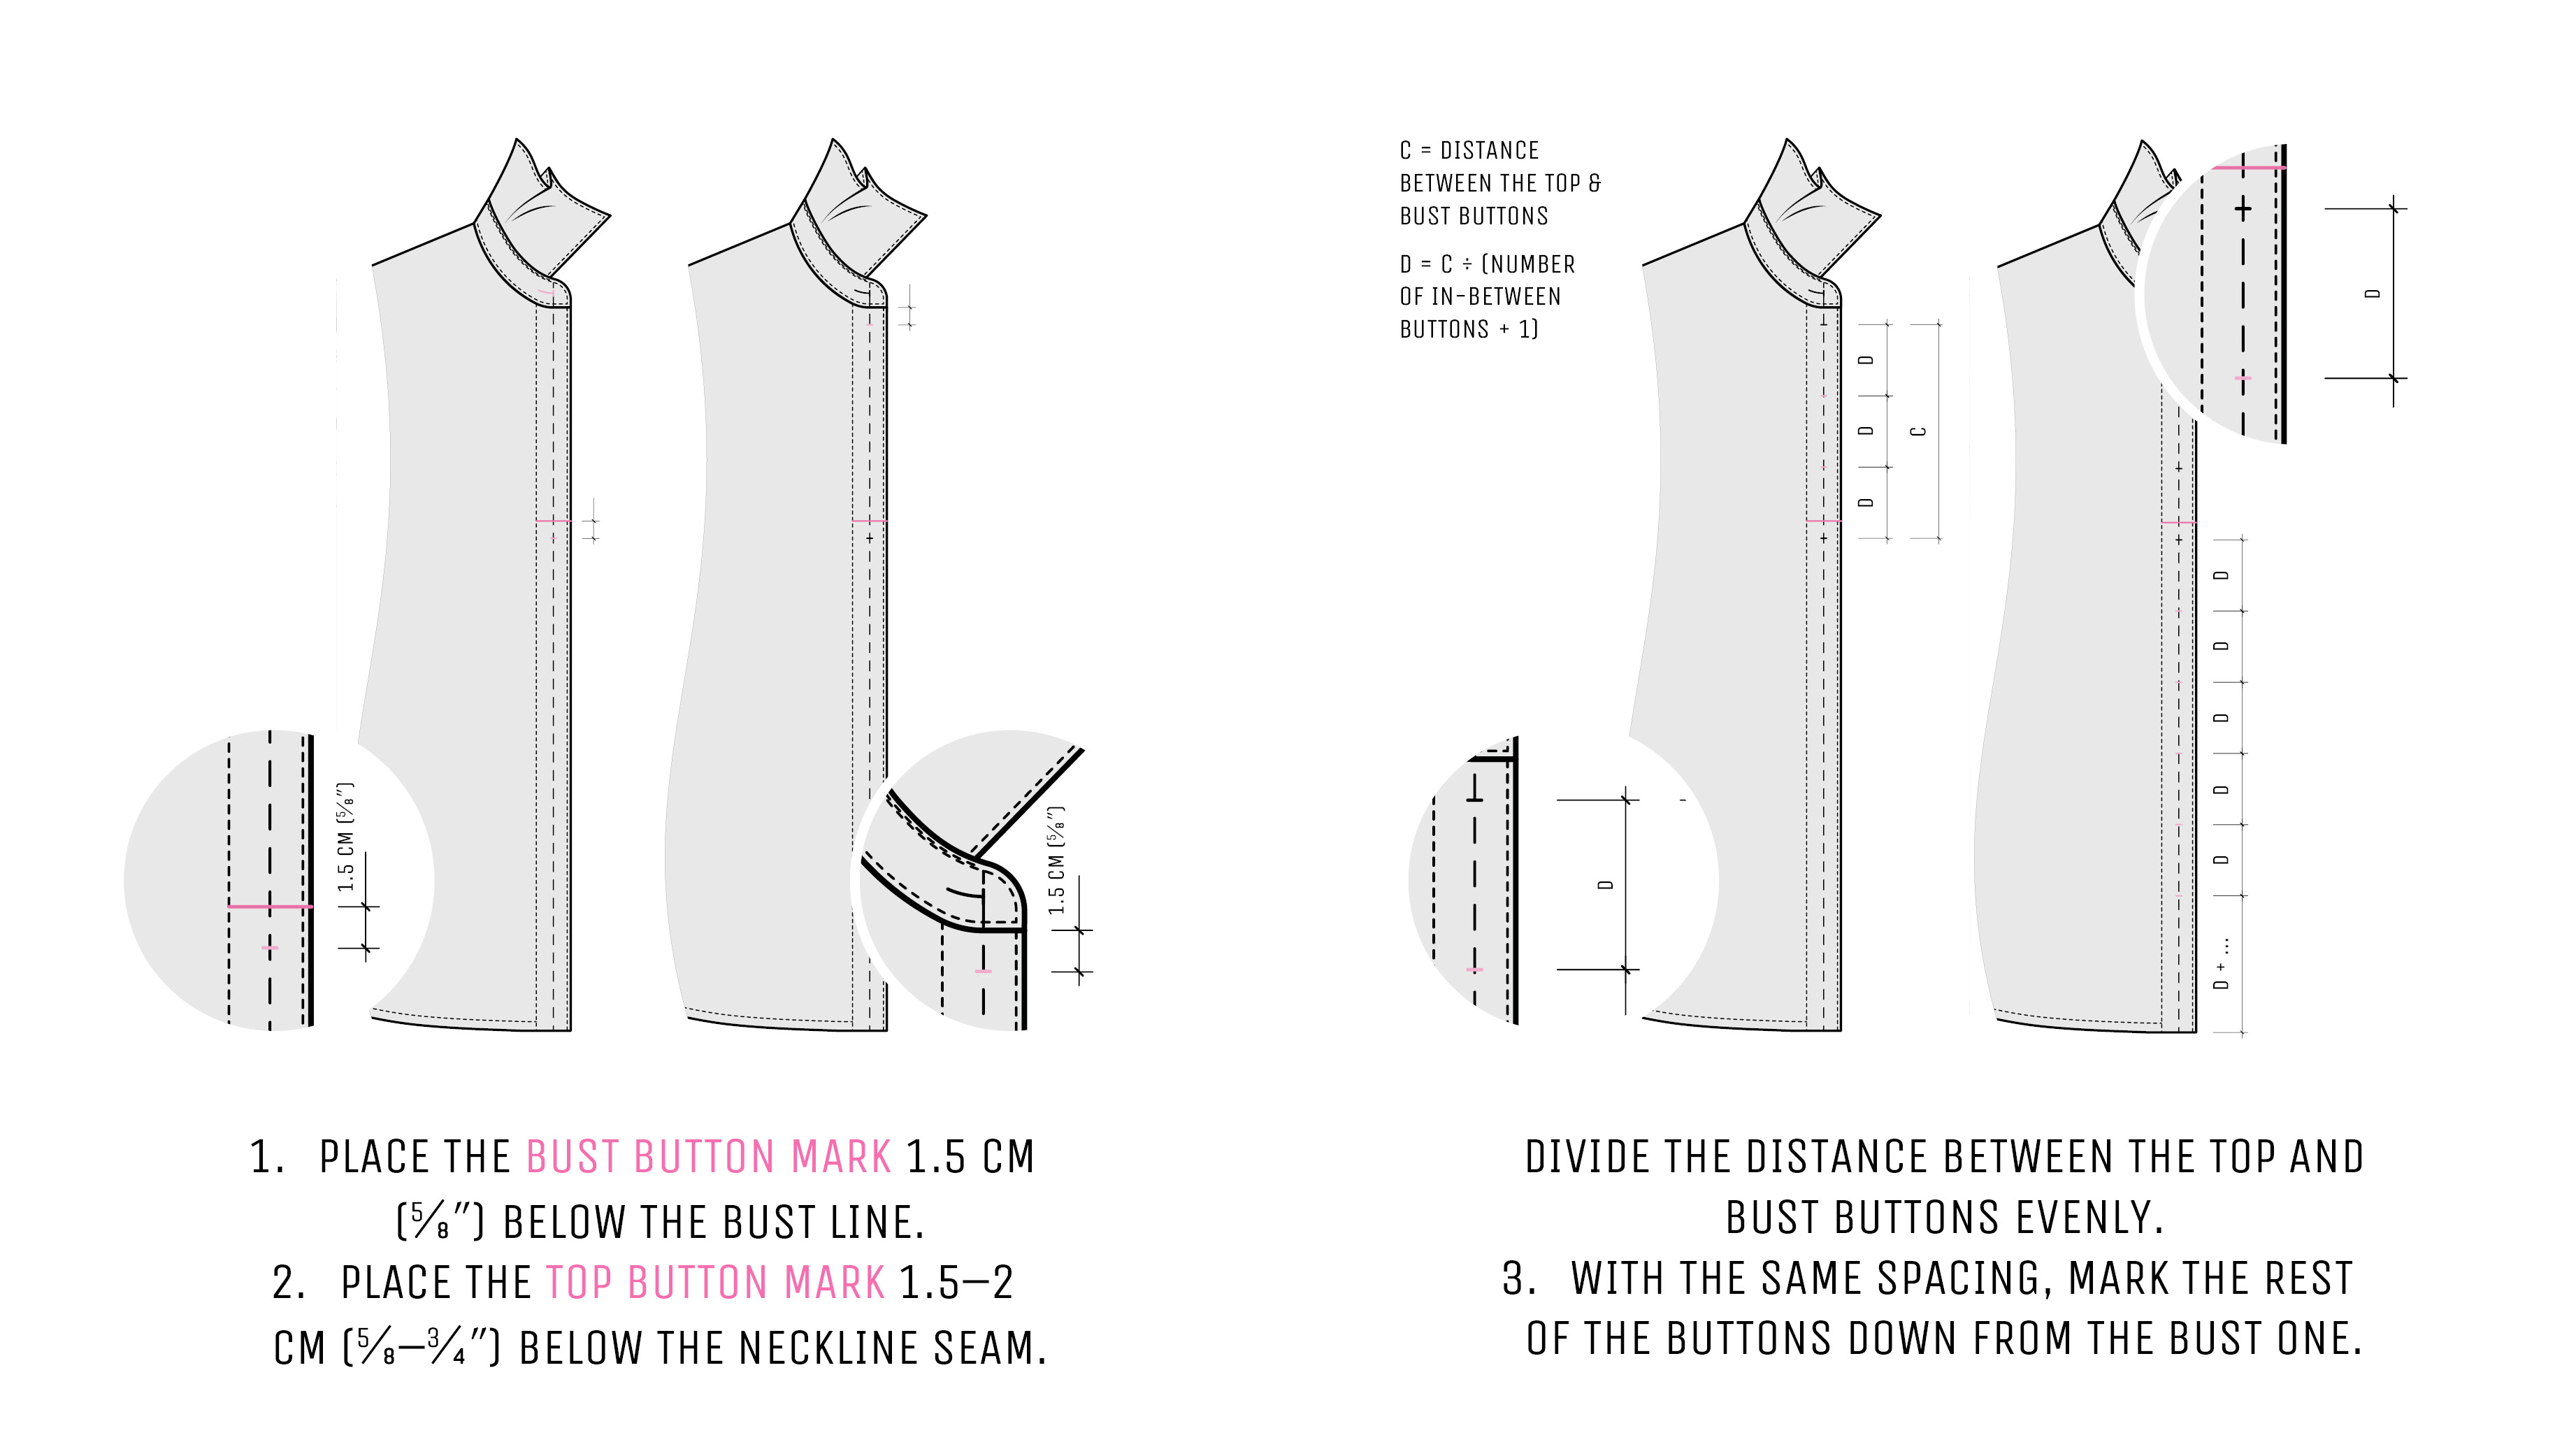
Lay your blouse or shirt flat, right side up, and remove any original button placement marks. Working with the wearer’s right front, mark the bust line on the CF using a thread tack and remove its pin. This is your starting point.
Measure and place the bust button 1.5 cm (5⁄8″) below the bust line.
2. The Top & In-Between Buttons
For the top button, mark a point 1.5–2.5 cm (5⁄8–1″) down from the neckline seam.
Measure the distance between the top and bust buttons, divide it by two or three, and ensure the spacing is 6 to 8 cm (2.36-3.15″). Use this spacing to mark the positions of the buttons in between.
3. The Rest of the Buttons
Once you’ve positioned the bust button, it’s time to mark the rest. From the bust button down, mark the remaining buttons using the calculated spacing. Leave a little more room between the hem and the last button. This helps keep the design looking balanced and prevents the shirt from pulling at the bottom.
Just like before, double-check the button placements by trying the garment on again:
- If the plackets are not lying flat, try moving the bust button closer to the bust line and recalculating the spacing accordingly.
- If there are no gaps, congratulations: you can proceed with stitching the buttonholes. Below, you can find a few helpful notes on that topic.
If you’re currently sewing the Sienna blouse and following its sewing instructions, jump back to the booklet and continue with directions written specifically for the concealed placket. However, if you’re working on a custom design with a single-fold placket, please stay tuned.
NOTES ON BUTTONHOLE PLACEMENT
Orientation
Choosing the correct orientation for stitching buttonholes can be challenging, as buttonholes can be stitched horizontally, vertically, or even at an angle. However, it’s straightforward for classic shirts.
For classic shirts, the collar stand should have a horizontal buttonhole, while the front placket should have vertical ones. Horizontal buttonholes on the collar stand ensure stability, while vertical ones along the placket prevent shifting and gaping.
The classic collar stand doesn’t have enough space for a vertical buttonhole, and if the front placket has horizontal or angled buttonholes, they wouldn’t fit properly.
Positioning
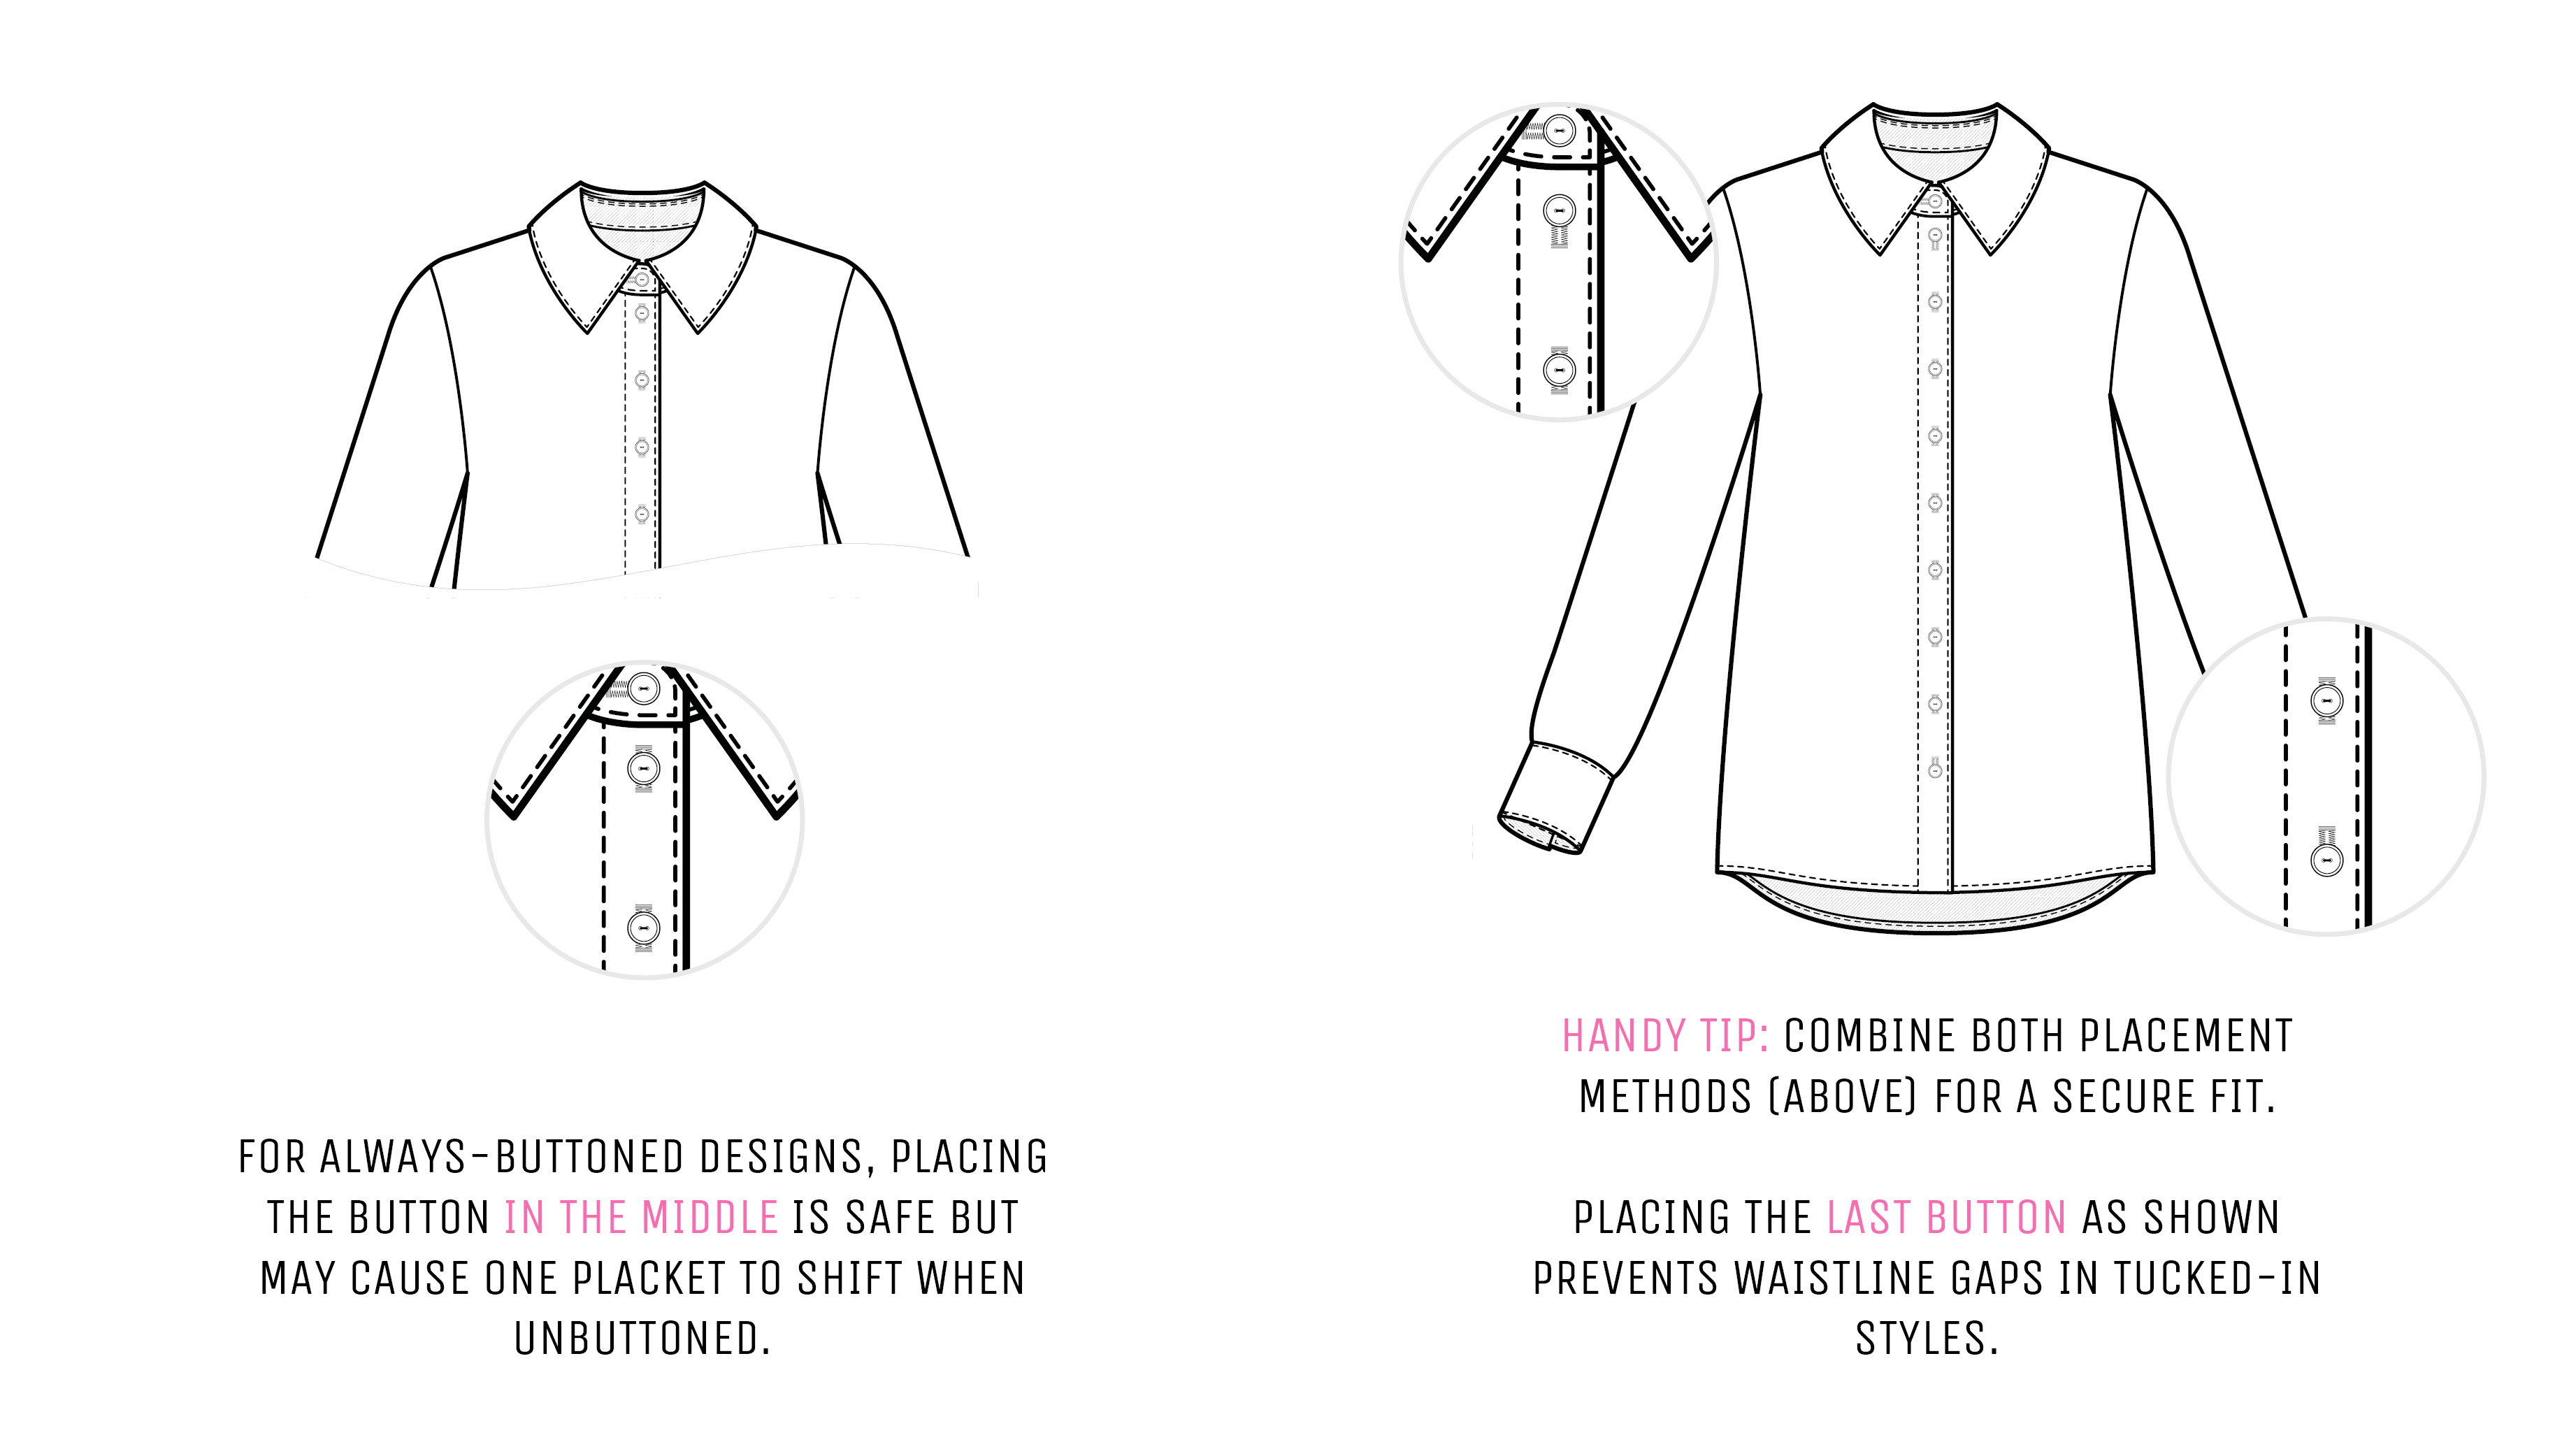
If we take a look at some store-bought shirts, we can notice that sometimes the manufacturers place the buttons at the very top of the buttonhole, which helps keep the placket in place even if a few buttons are left undone. On the other hand, some shirts have buttons centred in the buttonhole for more flexibility. Both solutions have pros and cons, so it’s worth considering what suits your shirt best.
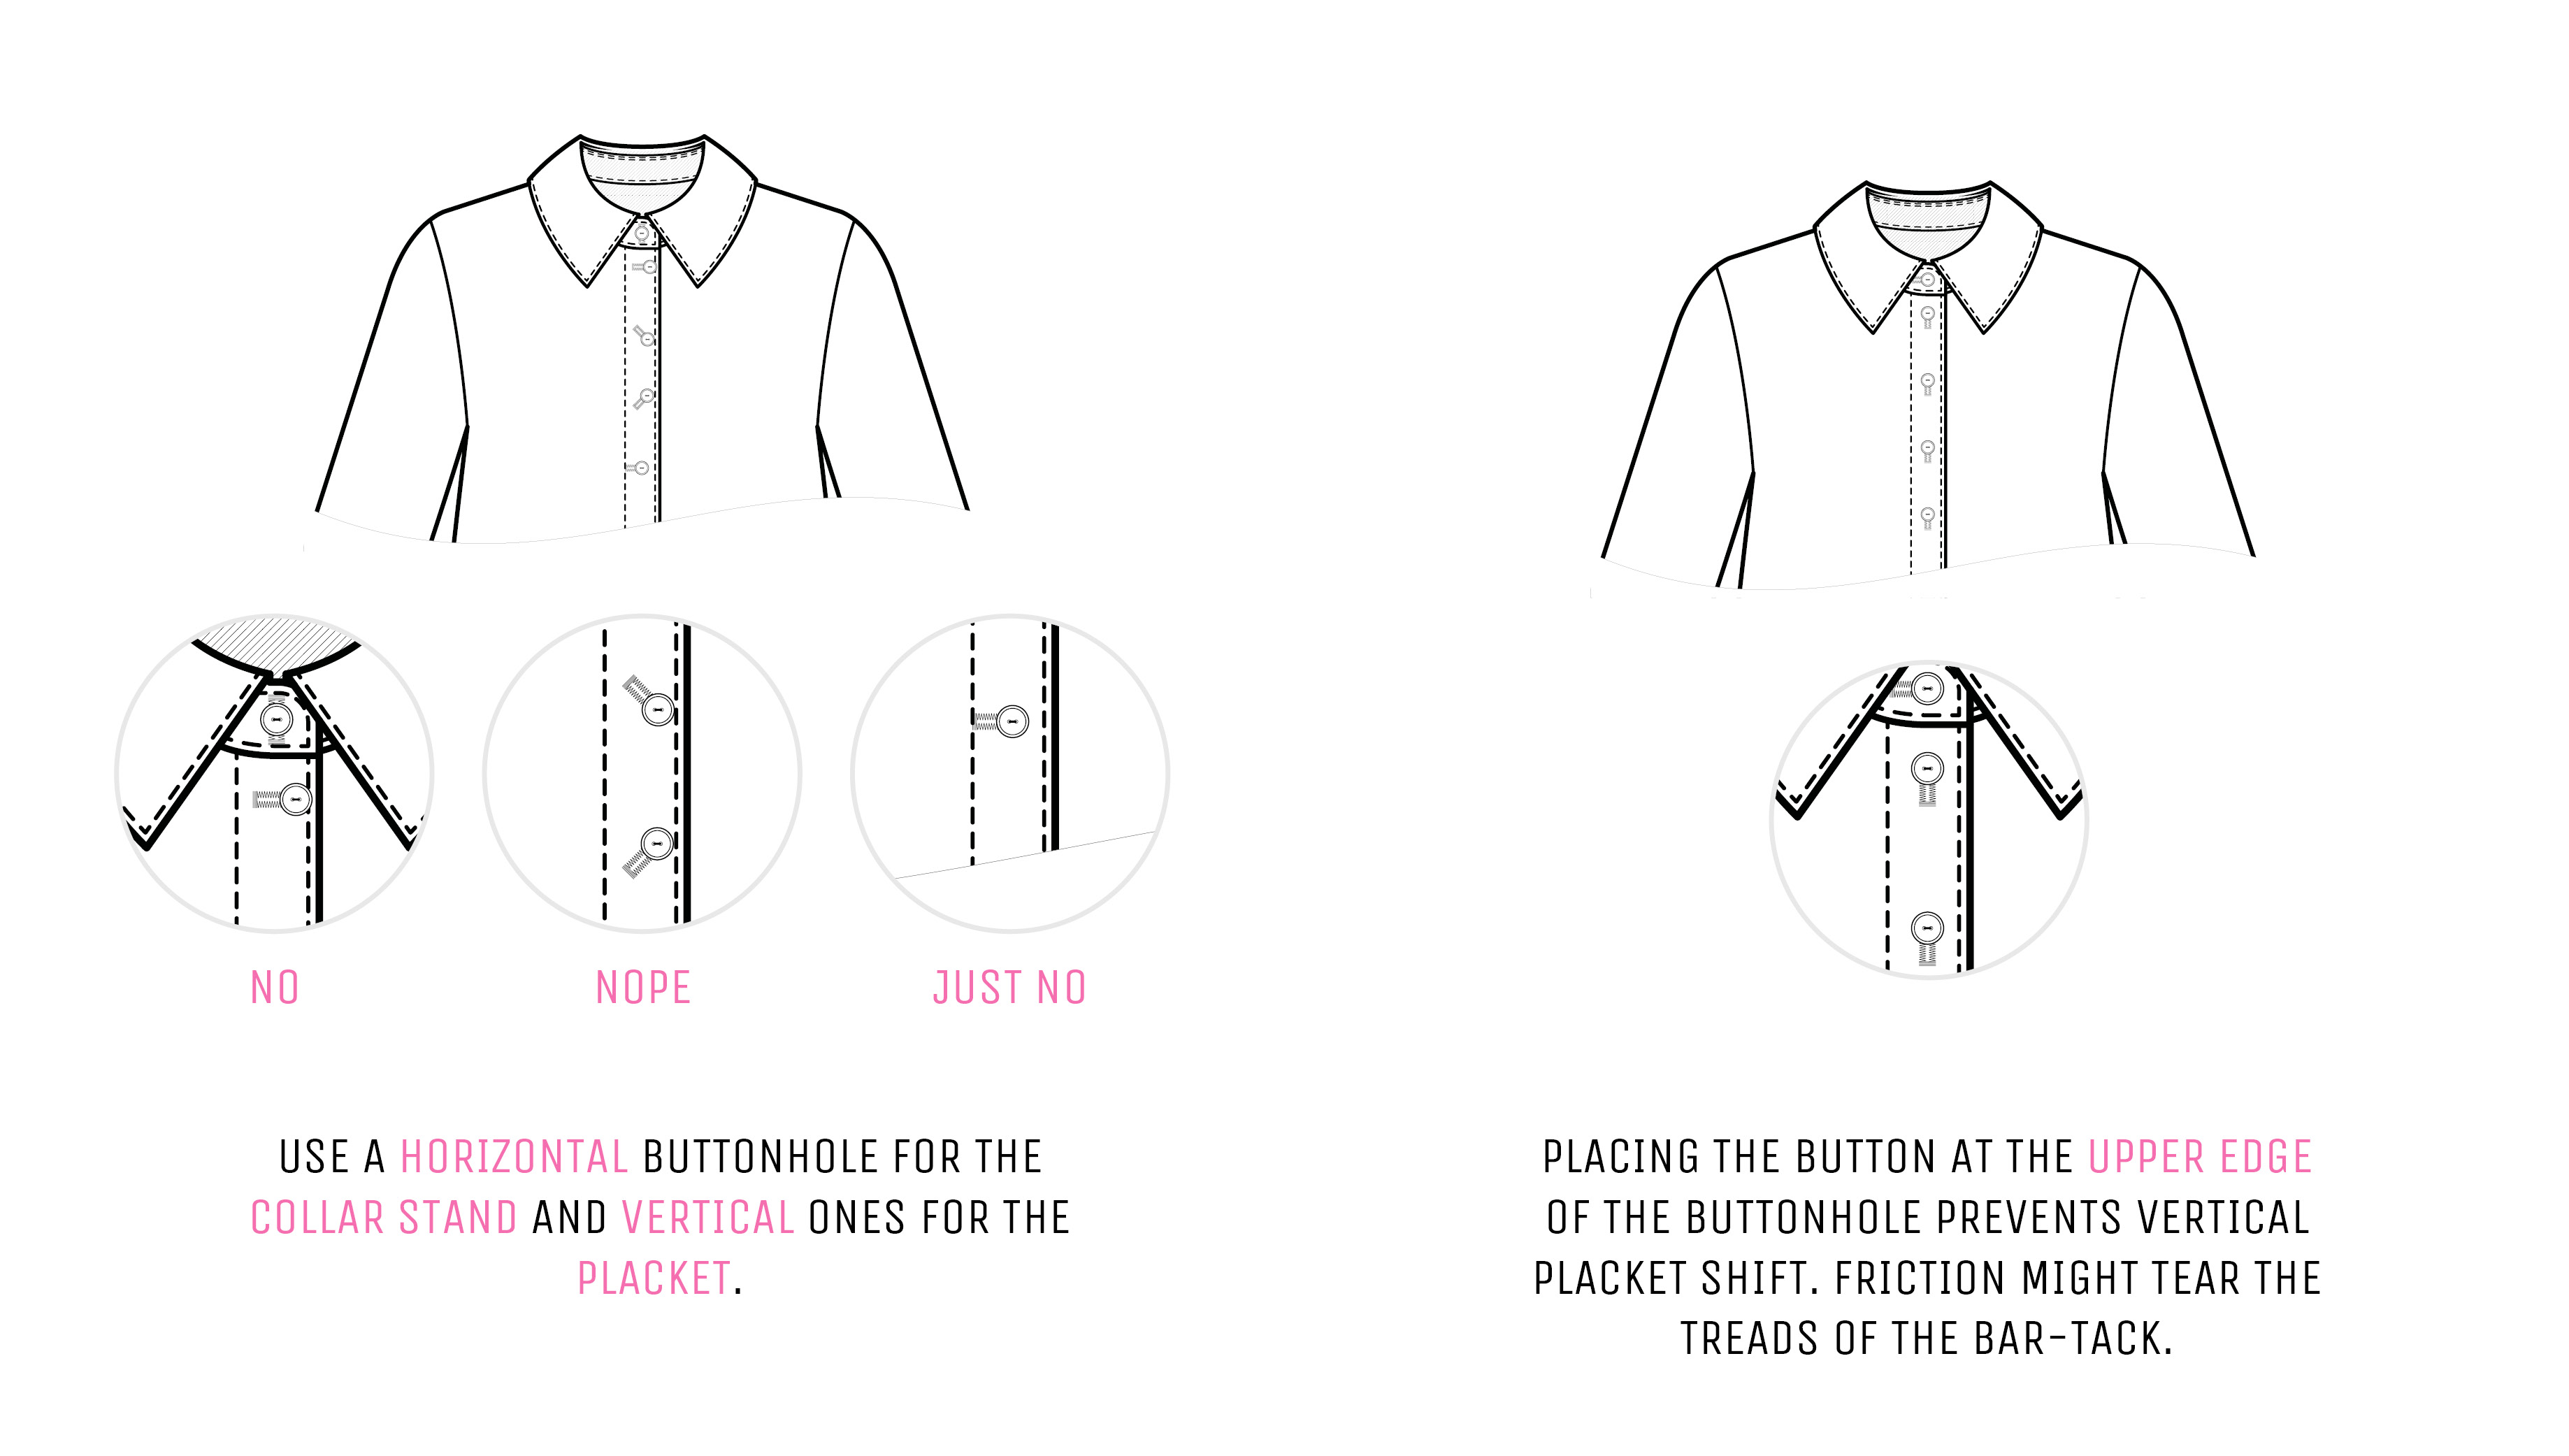
- When buttons are placed at the upper edge of the buttonhole, it prevents the plackets from moving vertically, even if some buttons are left undone. Unfortunately, frequent friction between the button and the upper bar-tack may eventually tear the threads of the latter.
- Placing the button in the middle is a safer option for always buttoned designs, as the collar stand button will keep the rest in place. But, if you decide to show more of your collarbone, the buttonhole placket may slip down slightly.
When creating custom garments, you are in complete control and can add unique details and enhance comfort. So why not combine the best aspects of both options?
- My go-to solution is to keep the top button at the upper edge of the buttonhole and place the rest in the middle to avoid tearing. This approach ensures all buttons remain in place, even when I undo the collar-stand button. It is also a perfect solution for designs without collar buttons.
- And if you only wear the shirt tucked in, placing the last button near the bottom edge of the buttonhole can help prevent gaps at the waistline, although this isn’t a common placement.
STITCHING THE BUTTONHOLES AND BUTTONS
With the theory in mind and button centres marked, let’s finally mark and stitch our buttonholes.
Please note: during this step, the blouse’s top button will remain at the upper edge of the buttonhole, while all the other buttons will be placed in the middle.
1. Stitch the Body Buttonholes
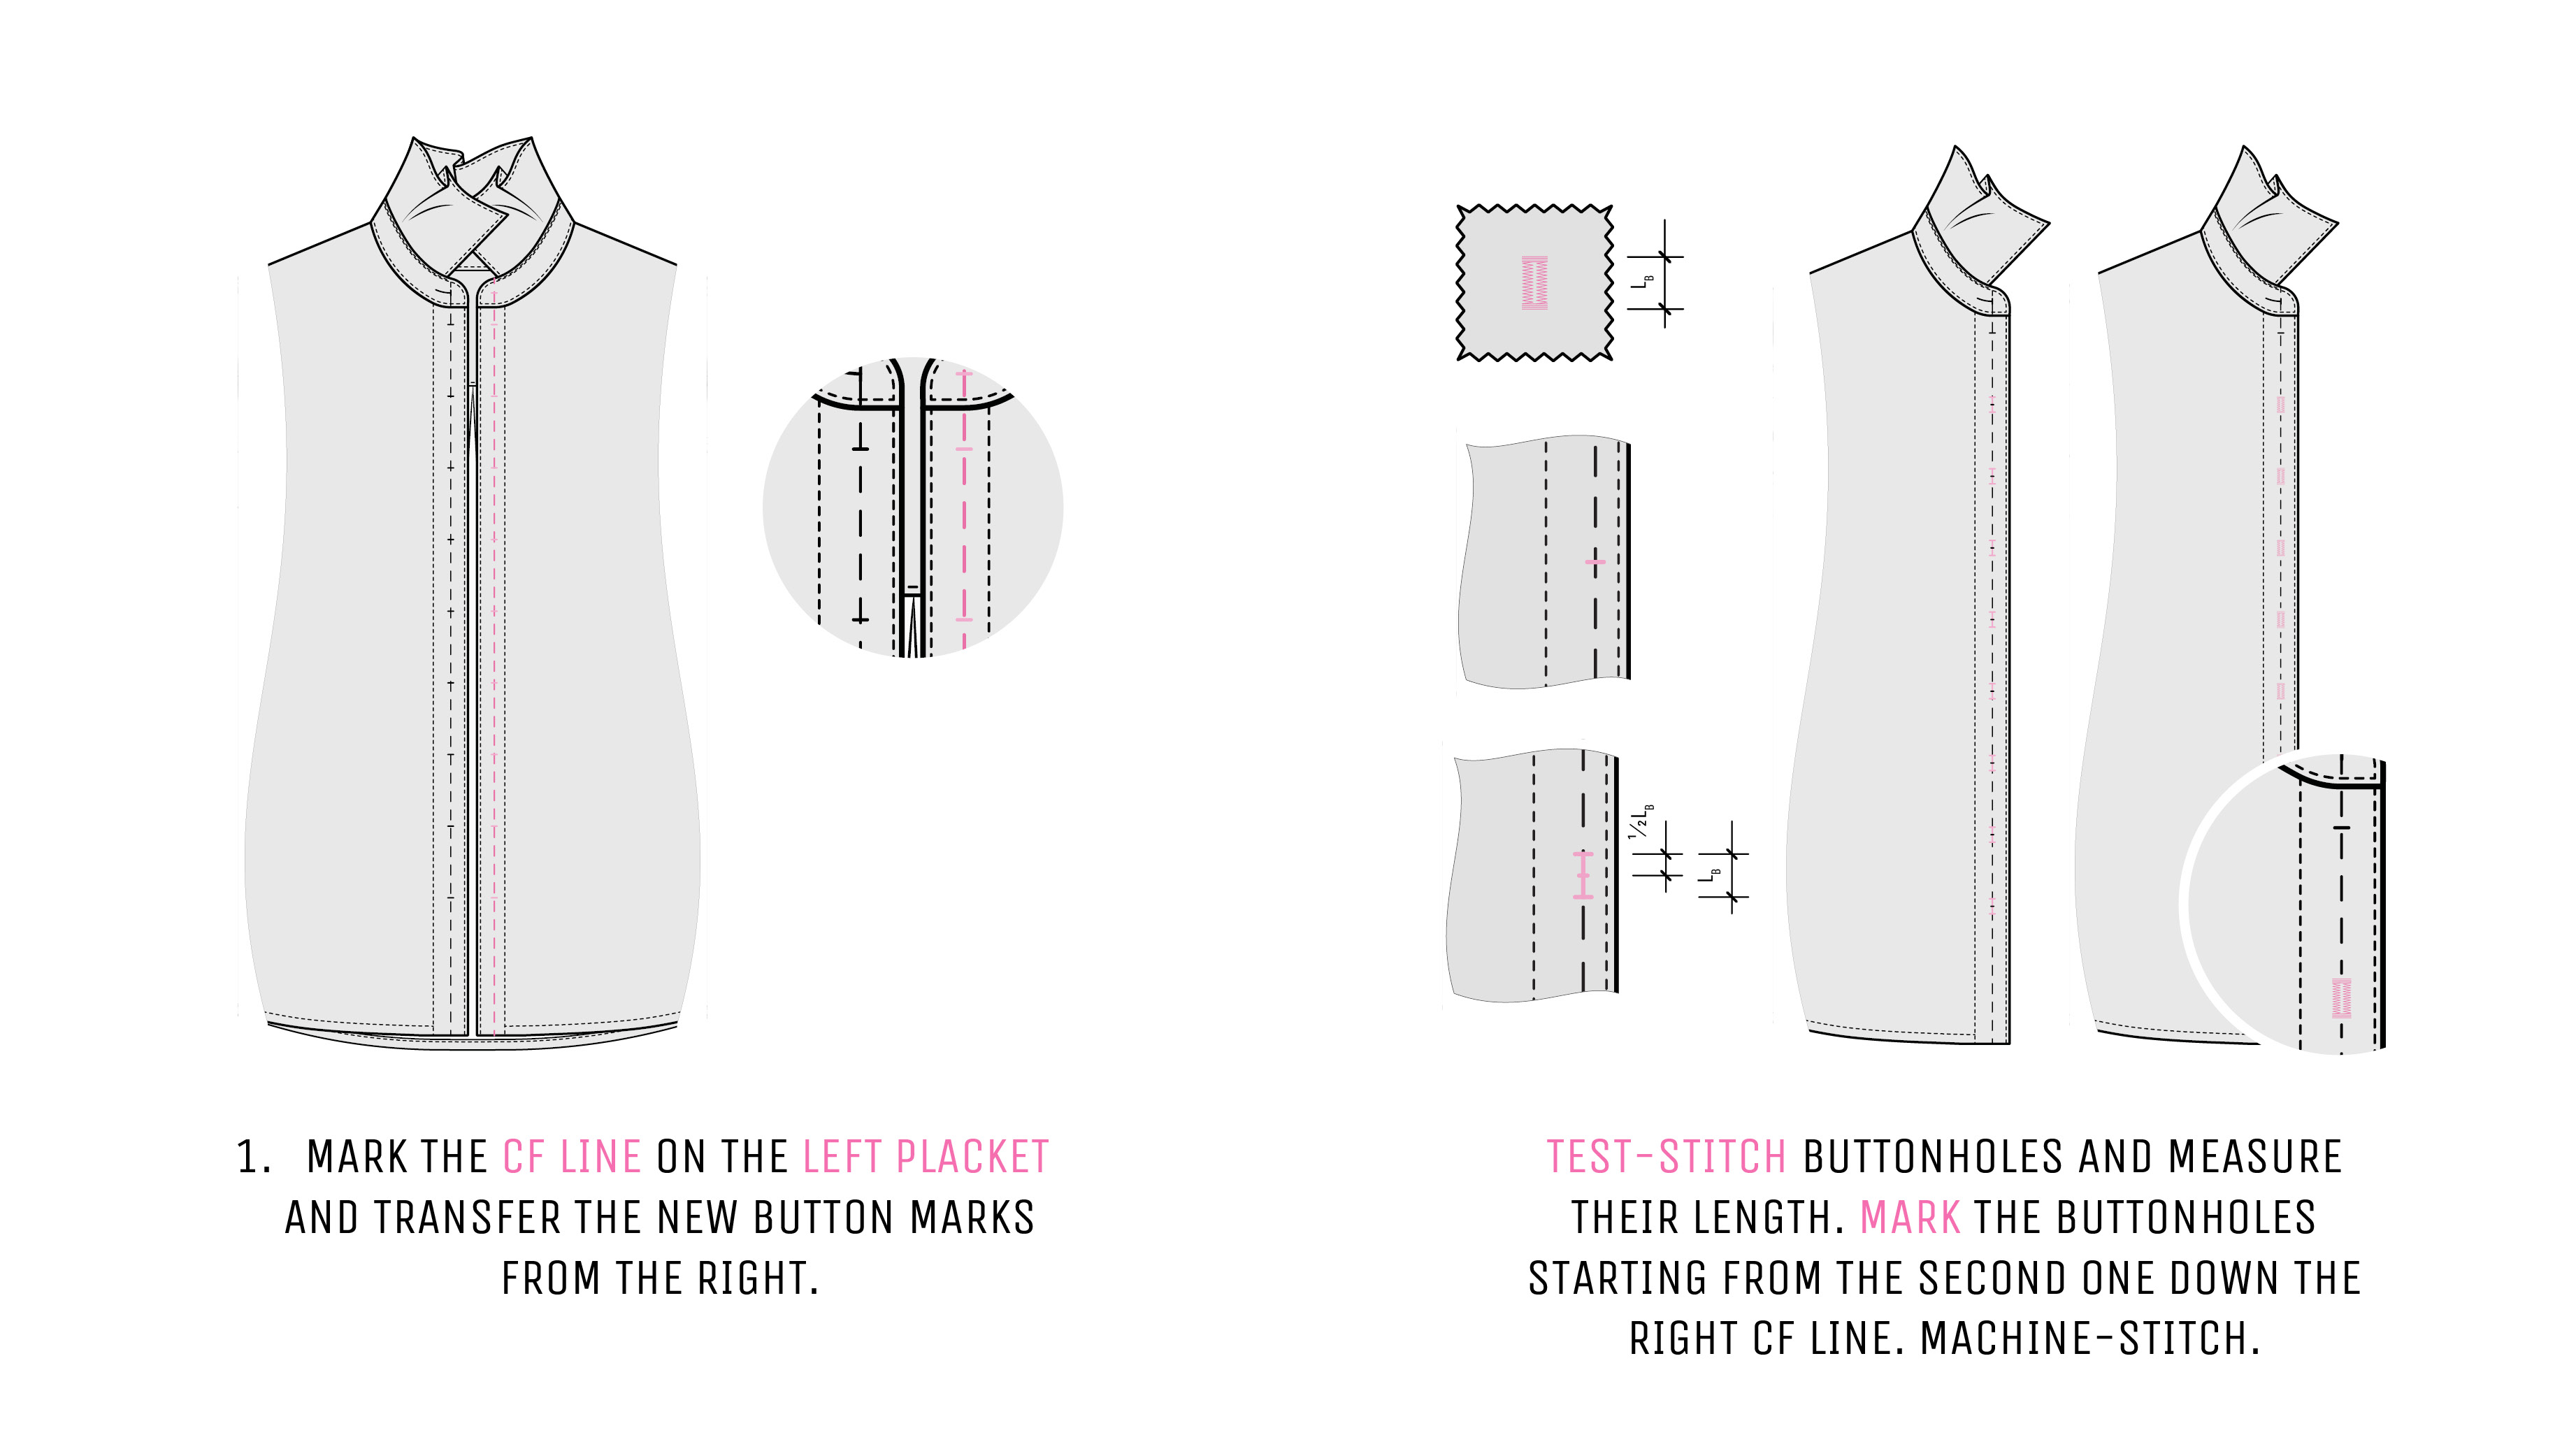
On the left front placket, mark the CF line by machine basting. Transfer button placement marks from the right front placket. Test-stitch buttonholes on fabric scraps to check for size and stitching. Make the buttonholes 0.3 cm (1/8″) longer than the buttons.
After you are happy with the result, measure the length of the buttonhole (Lb) and make a note of it. Divide this length in half and mark these equal distances downwards and upwards from the button centre point, starting from the second buttonhole on the right front.
Machine stitch buttonholes along the CF line.
2. Stitch the Neckline Buttonholes
When making buttonholes at the top and collar, start stitching slightly before the mark you made. The buttonholes have a horizontal bar at each end, and if they’re stitched precisely at the mark, it can lower the button’s position.
Once you’ve finished stitching the buttonholes, place a pin horizontally at one end of the buttonhole. Then, insert the seam ripper at the opposite end and carefully slash the buttonhole open. Finally, trim any fraying threads and press to reduce bulk.
3. Stitch the Buttons
To make sure everything lines up, lay both plackets side by side before sewing on the buttons. Then, hand-sew each button onto the left placket, matching them up with the buttonholes you’ve stitched. As you sew, make neat shanks to avoid any bulk, especially around the collar and top button. Chunky threads may distort the button position in the buttonhole.
Once you’re finished, give the whole placket a quick steam to smooth it out and check that everything looks nice and tidy.
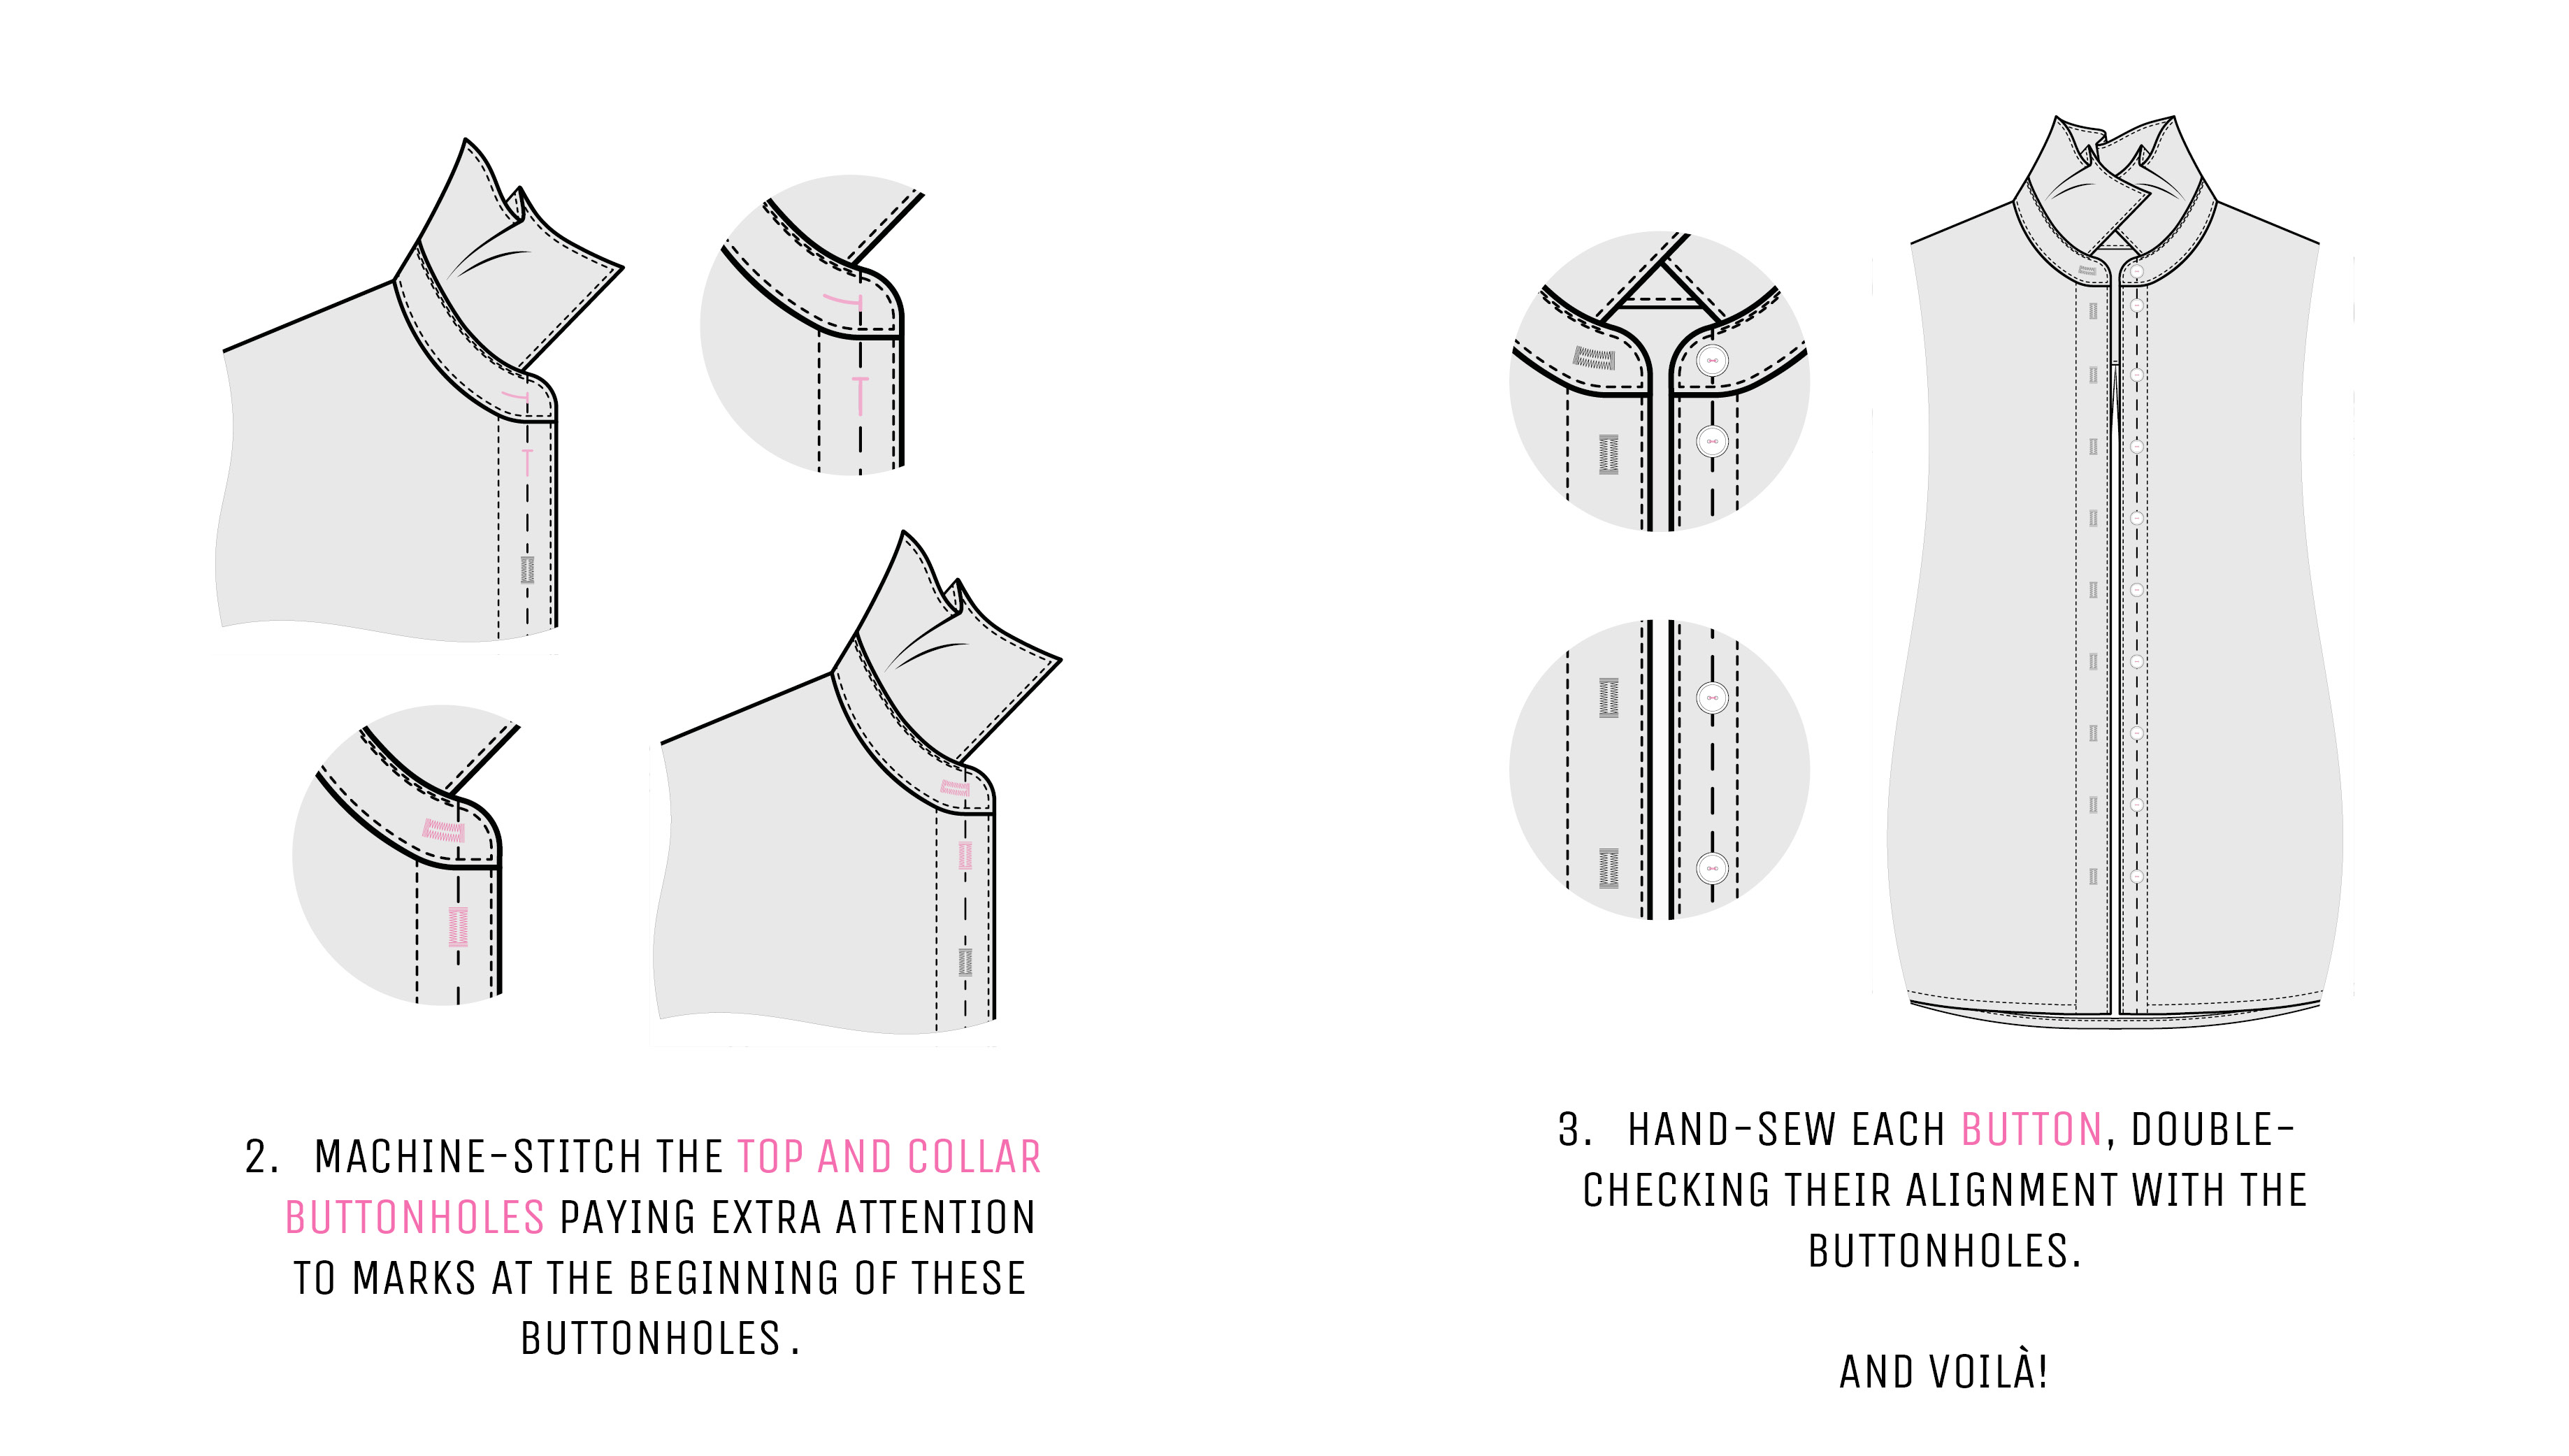
And voilà! You’ve now respaced your buttons for a well-fitted blouse—no more gaping in sight.
xoxo
Kaia

 My Etsy Store